eWaCZkveiVOw81&t=51e37521" type="text/javascript">

Autopunch and bean stitch tutorial

As promised here's a mini tutorial on how to use PE-Design Lite in combination with our Pre-Design Studio program. It's getting the best of two worlds: create filled areas using the AutoPunch function in PE Lite on the basis of an image made with Pre-Design Studio and create bean stitch lines with Pre-Design Studio. Those bean stitch lines can then be imported into PE-Design Lite, creating surprising and beautiful designs.

Made with Pre-Design Studio and PE-Lite

The description below will also work with the AutoPunch function in the full PE-Design digitizing program, using the Image To Stitch wizard.

Okay, let's get started:

If you don't have Pre-Design Studio, then download a trial version here.

1. Start Pre-Design Studio and choose menu Background > Load from Picture file. Open the file "EasyDrawing.png" which can be found inside the Pattern Samples folder, in the Pre-Design Studio program folder. Keep the default background settings and just click on OK.

2. Take the Curve tool and start tracing the line of one petal by clicking from point to point. Close the petal and end the line by double-clicking.

trace any background in Pre-Design Studio

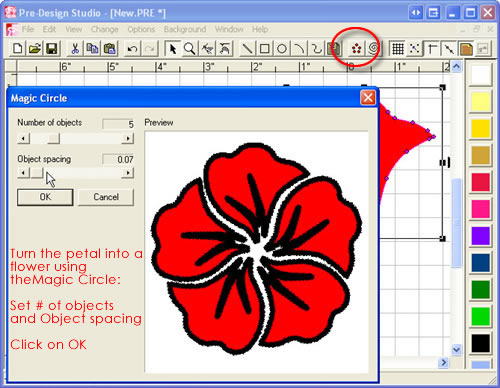
3. Take the Select Tool, select and move points to perfect the lines. Then select the petal, click on the Magic Circle button, move the slider bar to 5 objects and play with the spacing slider bar. Click on OK.

Let the Magic Circle do its Magic

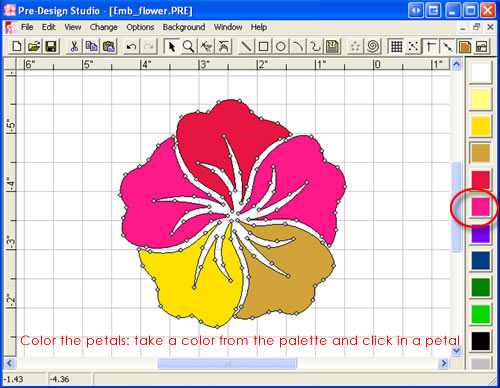
4. Color the flower: click in a color on the palette on the right and click in a petal. Use different colors for each petal, or one for all. That's up to you.

Color the petals

5. Hide the background image by clicking on the button in the right of the toolbar until the image is hidden. Then choose menu File > Export Color Bitmap.
Name the file "Flower_Lite.bmp" and save in My Documents. Keep the default pixel settings.

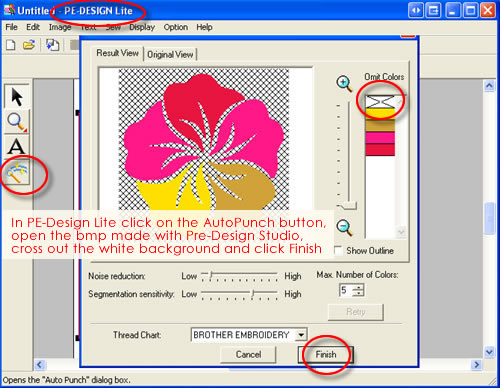
6. Start PE-Design Lite and click on the button AutoPunch. Open the "Flower_Lite.bmp" image you just exported from Pre-Design Studio. Cross out the white background color in the list "Omit Colors". You don't have to do anything else here, just click on OK.

Use the AutoPunch function in PE-Lite

Hide the background image via menu Image > Display Image > Off.

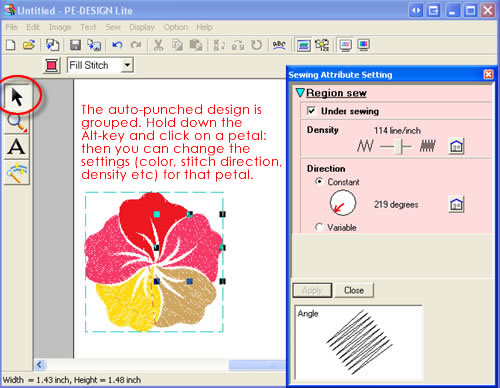
7. Resize the flower: the stitch count will automatically be adapted. The design is grouped and it is better to keep it grouped: you can reach all parts by holding down the Alt-key and clicking in a part: then change stitch direction if you like.

Hold down Alt and change settings of the parts

Save as PES file and keep PE-Design (Lite) open.

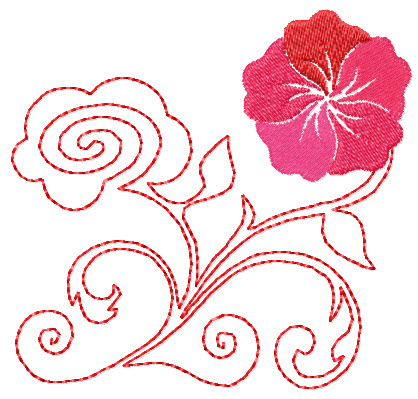
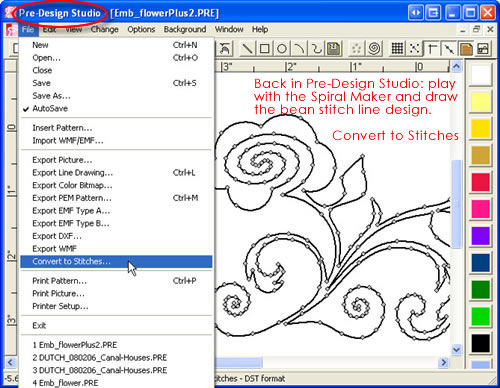
8. Go back to Pre-Design Studio and start a new file. Take the Spiral button and make a few spirals and swirls. Take the Curve tool and draw some embellishments. You could use the first image in this blog as a background: right-click the image and choose Save Image as. Save in My Documents and open that as a background in Pre-Design Studio.

Create a line drawing, as a continuous line. Be sure that you draw a full visible path, to prevent jumps. You can take the Select Tool and move points to perfect the lines.

Create a continuous line drawing in Pre-Design Studio

9. Select All, right-click and choose Size. Make sure the design size will fit inside a 5x7 inch hoop (or 4x4 if you don't have a 5x7 inch hoop). Click on OK.

Choose menu File > Convert to Stitches. Set a stitch size of 2.5 or 3 mm, bean stitch, a check mark for tie in/off stitches and Optimize Sequence. Click on Convert. Save in My Documents as "Flower_Lite_bean.dst".

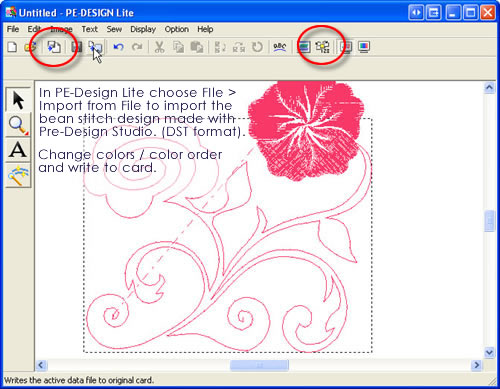
10. In PE-Design (Lite) choose menu File > Import. Import "Flower_Lite_bean.dst"  from the previous step. You may have to change menu Option > Design Page property and set it to 5x7 / landscape or portrait, depending on the drawing you made.

Select the filled flower from the first steps in this tutorial and move it to a nice place: you can resize it (stitch count will be adapted), you can change colors, stitch direction etc.

Change color, color order, save and embroider

Save and embroider :)

The above tutorial is also available as a demo movie on our website pre-designstudio.com. It's movie # 17. The combination of Pre-Design Studio and PE-Design Lite gives endless possibilities and is great for those who want to start digitizing their own designs.
Images made with Pre-Design Studio will allways work like a charm with the AutoPunch function in PE-Design Lite.
That makes PE-Design Lite a wonderful stepping stone digitizing program. Suppose you get totally hooked on embroidery digitizing, then it is good to know that PE-Lite can be upgraded to PE-Design version 7.

I will show this (and more) at the upcoming AnnTheGran Community Circle event in Orlando - hope to see you there!

Loes

Comments (1) -

WOW!  That is so easy.  I always like to have a photo and instructions that are detailed like this.


Perhaps it is time for me to get this Design Lite.


I cannot wait to see you in Orlando.


Pat


Please login to comment
AnnTheGran.com | Beautiful people make beautiful things

Embroidery Advisor Presents : Coffee Wrap Project

Materials: Coffee Wrap Saying or Type Designe.g.  Coffee Wrap Types In The HoopCoffee Wrap Sayings In The HoopCoffee TypesCoffee Sayings Coffee Wrap Template.pdf file (printed) Fabric 2 Pieces each 4.5” H x 13” W at least Quilting Fabric 1 P... [More]

Using a Stabilizer Window

When embroidering several of the same sized designs using adhesive tear-away stabilizer, you can save time and supplies by creating a stabilizer window. Hoop the adhesive tear-away like you normally would. Score the paper backing inside the hoop and peel it away. Embroider the design and ... [More]

Big and Beautiful...Embroidering Large Letters That Last

I love embroidering towels - they're my favorite monogrammed gift, and this past Christmas I really kept the machine humming with monogrammed towels for just about everyone. The challenge is that large letters have very wide satin stitches that can snag. In this video, I show you how to cre... [More]

Avoid Sinking Stitches

This week, I thought I would share some problems I had with stitches sinking into the design while creating the Scalloped Valentine project. I love to use wool felt in many of my projects. The cream-colored wool I used in the Scalloped Valentine projects was felted, meaning it had been washed in hot... [More]

Fancy Water Bottle Caddies

     I am having entirely too much fun.  I admit that freely.  Ever sinceI started creating my own motifs in my digitizing software, I have beenfinding ever more ways to use them.  My latest is this Cathedral Windowswater bottle caddy.  I created a panel that ... [More]

An Indispensable Tool

  We are excited to have Eileen Roche, Editor of Designs in Machine Embroidery share this content with you, which was originally posted on Eileen’s Machine Embroidery Blog I can’t believe how indispensable this tool is. Recently, I was stitching 24 onesies, a daun... [More]

Scalloped Valentine Hearts

Ann's readers can share the love. Last week, Pat shared links to three great free valentine designs [More]

Memory Hearts - Valentine Special

Valentine's Day is less than a month away, so here is a project with heart! Memory Hearts can be created for any special occasion: births, baptisms, engagements, marriages. These were made for a baby girl and baby boy. Actually, I made two sets of each so that the grandmothers, both first ... [More]

Snowflakes for Sandy Hook

Like many of you, my heart ached for families affected by the massacre in Newtown, Connecticut. So, after reading Pattiann’s post about making snowflakes for Sandy Hook, I deciced to stitch up a few. They were being collected by the Connecticut PTA and forwarded to Sandy Hook elementary for cr... [More]

The Advanced Embroiderer’s Bucket List

Continuous embroidery   Since we love embroidery, we also love LOTS of embroidery!  Filling a border or quilt strip with continuous embroidery is number one on the advanced embroiderer’s bucket list.  There are several ways to attack connecting designs end to end but they all ... [More]

Cutwork Snowman Gift Bag

I've had the idea for this design since this time last year, so it's well overdue! The design is part of the Christmas Cutwork Collection by Dakota Collectibles. I added two variations on this design. Originally, the thread colors were shades of blue and plum, but I had a piece of... [More]

Clippie Fun - Zipper Charm designs

I love to make things from embroidery designs that were not created for the purpose I have in mind.  Hair clippies are so popular, I thought of Dakota Collectibles' Zipper Charm designs.      I used these designs: Turtle Flower Frog Owl Penguin Ladybug Heart ... [More]

Snowflake Window Ornament

Applique designs are so versatile. They can be used as a traditional applique on apparel or a quilt and they can also be used as a stand-alone piece, much like freestanding lace. The Window with Snowflakes ornament (XM1791) from the Merry Christmas Ornaments set by Dakota Collectibles features ... [More]

Baby Activity Book Project

Individual designs can be found here, as described below.  The complete set is now available, t [More]

Happy Haunting October Fest

Don't be afraid to change up the colors in your embroidery designs. Just because it shows up as an o [More]

Painted Embroidery

Like to color? Add a new dimension to traditional embroidery with fabric painting. I first read about fabric painting in an Anita Goodesign newsletter. The idea is to stitch an outline design and color it, giving it a watercolor appearance. They used Copic markers and a Copic blending tool wh... [More]