The green writings are always tips or tricks I have learned. You might consider copying and pasting them into a document so you can search for keywords to find and refresh your memory for your project.
Last week I needed to create an order from my Etsy site. It was for Bride and Groom Spa wraps.
They are really great, dense, and of excellent quality. Since I don't do them often, the first one I did got ruined at my machine. Paying for another wrap with an $18.00 shipping fee was enough to get me to think about what I should do to prevent distortion again.
The first thing I knew the fabric was too heavy for normal methods of keeping it steady. I don't hoop the fabric because one side is velour and the other is terrycloth. Additionally, if I used binder clips, it could leave an impression on the garment. So, this is how I secured my project.
- For the bulk portion, I used accordion-style folds secured with safety pins. I ended up with 4 folds which I secured with a larger rubber band.
- For the elastic area, I taped an 18" ruler just below the gathers. Those draw areas need to be contained too.
- I placed a box the same size as the work area of my machine. Those pinned folds were very heavy, but the elevated box kept it steady. I did keep an eye on it but there was little or no movement.
- I pinned the embroidery area to my stabilizer. I considered using a cut-away stabilizer, but then I had a better idea. . .
My project was Navy blue and I had a left-over piece of cotton in just the right color. That is the easiest stabilizer I ever used. The cotton held tight, didn't add weight to the garment, and best of all, it essentially disappeared into the project. I did trim around the stabilizer, but it was quick and painless!
Of course, I will still use my Badgemaster, water-soluble, tearaway, and other stabilizers, but I have a new weapon in my arsenal and my thinking is to use on fabrics that will be on someone's body, a blanket, pillowcase, and many other items!
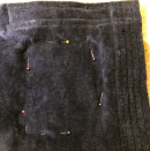
Here is the configuration for the fabric stabilizer. First I hooped the stabilizer, then pinned the backside of the wrap to create a single hoop and project.
When flipped over, be sure to pin the fabric to the stabilizer. You can also hand stitch a basting line for holding. I did not use a machine baste because it might leave an impression on the velour.
. 
I trimmed the stabilizer, and you may notice, this is how stabilizer is trimmed in professional items.
The proof is in the pudding, here is the finished product, lovely work even if it had a few issues along the way.'
For this time's Freebie, I am looking forward to 2022, but not doing 'belly dancing. . .'
Thank you for joining me, I know how busy you are! Remember - Joy that isn't shared dies young. Ann Sexton.