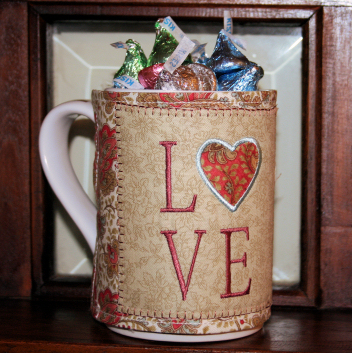
If your Mother is like mine she really, truly doesn't want anything for Mother's Day. And we kids all go together once a year and get mom and dad something they really want. This year it was a new floor for her big, country kitchen. That is supposed to be their present for all the year and she gets upset if we buy her more gifts. But I still want to remember her on Mother's Day and let her know how much I care. So something little is all I need. A mug filled with candy and a gift card to her favorite lunch spot is what I decided on. But to make the mug special I created a special wrap for it to keep her coffee warm. Here is her mug:
What you need to make a mug wrap :
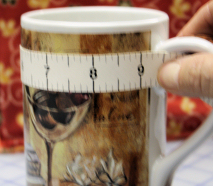
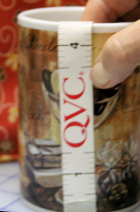
Note: my mug was 4 1/2" tall with a diameter of 3 1/8" and measured 9" around from handle edge to handle edge. So, first measure the height and then measure from handle to handle. Add 1" to each measurement to get your rectangle size.
Two rectangles of cotton (mine were 5 1/2" X 10")
One rectangle thin batting 1" smaller (mine was 4 1/2" X9")
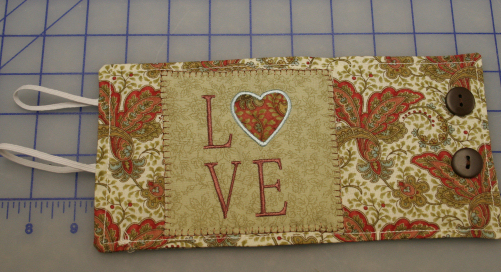
One rectangle for embroidery measuring 6" X 7"
small 2" square of fabric for the appliqué heart if using the LOVE design.
Two pieces of thin elastic 5" each
Two 5/8" buttons
Heat N Bond Lite 4'X4" square and 2" X2" square
Tear Away stabilizer
Embroidery snips
Embroidery Designs (you can download my LOVE one here)
What you do:
1. Hoop the stabilizer and the 6"X7" rectangle. Embroider the first color of the design.
2. Iron a small square of Heat N Bond lite to the 2" fabric square according to the package directions.
3. Embroider the first run of the heart. place the fabric square face up on top of the heart. Embroider the second run of the heart.
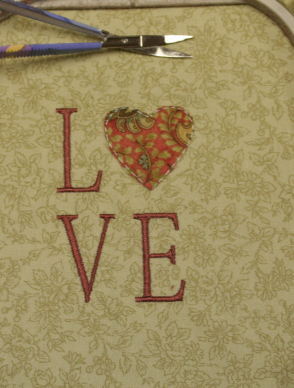
4. Remove the hoop from the machine and place on a flat table. Using the snips clip closely around the outside of the heart stitching. Place the hoop back on the machine and embroider the third run of the heart appliqué.
5. Remove the design from the hoop. Using a rotary cutter and centering the design cut down to a 4"X4" square. Remove the stabilizer from the backside.
6. Apply 4"X4" Heat N Bond Lite square according to the package directions. Set aside.
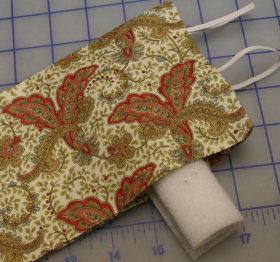
7. Lay one 5 1/2" X 10" rectangle face up on a flat surface. Loop the elastic and pin, with raw edges together so that it will fit through the mug handle close to the top. Repeat again close to the bottom of the inside of the handle.

8. Lay the other 5 1/2" X 10" rectangle face down on top. Align the raw edges and pin. Sew 1/2" seam around leaving a 3" opening at the bottom for turning.
9. Clip the corners, turn right side out and press.
10. Roll the batting and insert into the rectangle. Work it around into the corners and so that it is flat.
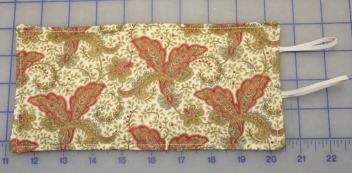
11. Topstitch all the way around.
12. Position the embroidered square as desired and press. Using a decorative stitch sew around the edges of the square.
13. Fold the wrap in half and mark the button location. Sew the buttons on.
Wrap around your mug, fill with candy kisses and a gift card and you are done. This would make a fun gift any time you want to make someone's day. Or maybe even centerpieces for a luncheon or casual dinner using recycled mugs and leftover test sewouts.
There are many more projects here that are quick and easy. Check out a few of these for starters:
No-tie Bandanas
Quick Wristlet
Easy Runners
Water Bottle Totes
Thanks so much for being part of the Annthegran community. Have fun with embroidery.
Take care,
DB