Paisley Neckline Embroidery

     Individual designs can be found on my Stock Design Page.  My designs are also
available in packs, as described in this blog.  Those can be found here.  For designs and
packs available in multiple sizes, choose the size you want in the drop down menu box.

     On a recent visit to my mother, I bought a very nice but unadorned t-shirt.
I thought embroidering along the front neckline would spice it up a bit. I have
been doing machine embroidery for 11 years now, but very little of that was on
clothing.  It was time to try something new.

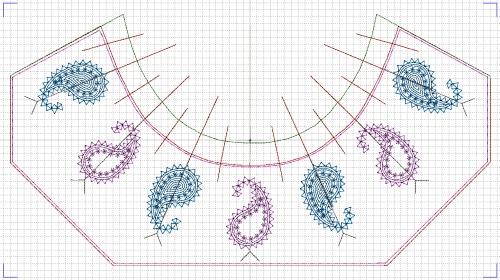
     After a little brainstorming, I decided that Contour Paisley Alphabet
Accents
would look very pretty on my shirt.  I rotated the 50mm paisleys into
an upright position.  I created a template from the shirt itself.  Marks along
the neckline helped me distribute the paisleys evenly, while vertical lines
("arrows") added to the paisleys helped me rotate the paisleys accurately.
Here is a picture of the neckline design I created.


     Before transferring the design to my embroidery machine, I deleted the
portion of the template with the neckline markings.  I also deleted the arrows
from the paisleys.  I stitched the outline of the shoulders and neck directly
on the stabilizer and then hand basted the shirt to that outline.  The template
also includes a fix-baste shaped to the shirt front, so I stitched that.  I am
glad that I thought of angling the bottom corners, because it would have been
difficult to stitch straight down the side and across the bottom.  There was
just too much shirt to keep out of the way.  Finally, I stitched the paisleys. 


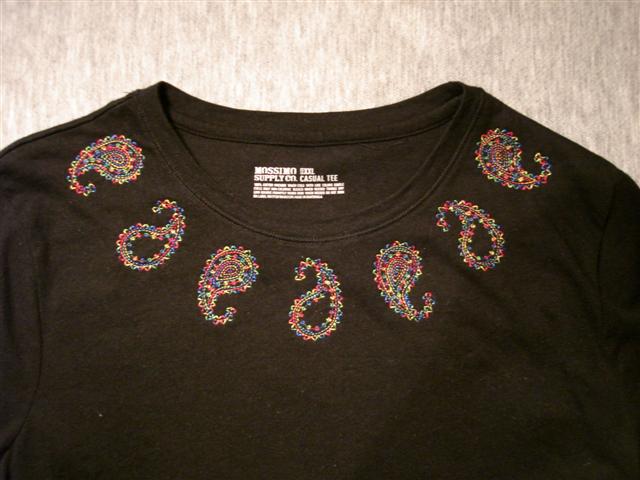
     Here is the shirt I stitched.  It is hard to tell from the picture that
the threads are variegated, but you can see in person.  I was quite pleased
with this embroidery experiment.

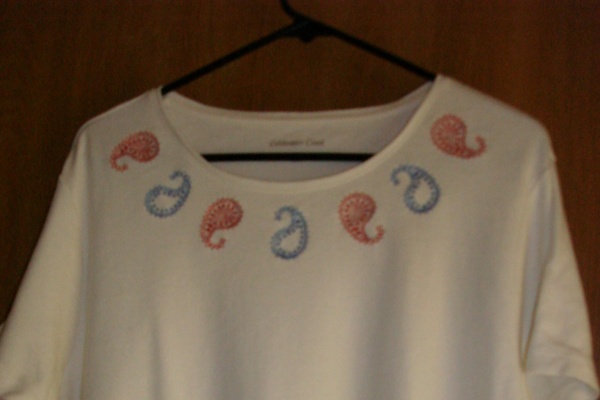
     I bought two more t-shirts but found they had a different neckline from
the first.  No problem, I just created a new template!  I took photos of each
step for a lesson.  Click here to download the complete lesson.  It includes
the two neckline template designs I digitized, the arrow design for positioning
elements around a neckline, the instructions, and printable templates for all
three embroidery designs.  The designs are available in all the formats that
permit designs in the sizes I needed.  The templates fit in a hoop 200 x 360
millimeters or bigger.

     You are welcome to use my neck templates if they fit the neckline of your
shirt.  To determine this, print the templates.  Fold your shirt front in half
lengthwise and lay it along the shoulder and neckline of the template.  If they
match, you are all set.  If neither template works for you, the instructions
will show you how to create your own.

     You will need digitizing software to do this, of course.  You will need
customizing software to add your paisley or other design elements to your
neckline.  A stitch editor will let you delete the arrows and the part of the
template that guides design placement.  You will also need a scanner for
creating the artwork for your neckline template.

     The shirt I used for the lesson is light blue with purple and dark blue
paisleys.  The black one shown here is my favorite of the three and I bet you
can guess why.  Yes, it's because the paisleys are variegated.  (You know me so
well!)

Comments (20) -

VERY NICE!


nancyevalyn 7/24/2010 9:48:50 AM

FANTASTIC! I too love paisleys.


Beautiful!  The variegated thread really does add a nice touch


Very ,very nice!


something different  -nice


Excellent!


Pat


Absolutely wonderful, Carol!


Thanks for sharing,


Pam


I, too, love the bright varigated thread on the black, VERY CLASSY!!!


Thank you for all the kind comments.  I hope you will try this project on your own shirts.  I still like making things from scratch, but it was also fun to personalize a shirt so instantly.


Carol


I WISH I COUL´D DO SUCH A BEAUTIFULL THING. THAK YOU FOR SHARING IT WITH US . YOU ARA VERY TALENTED. THI GO FROM MOZAMBIQUE IN AFRICA


I WISH I COUL´D DO SUCH A BEAUTIFULL THING. THAK YOU FOR SHARING IT WITH US . YOU ARA VERY TALENTED. THI GO FROM MOZAMBIQUE IN AFRICA


Can you tell me what kind of thread you used and what is the name of the color?


Susete,


You won't know whether you can embroider on a shirt until you try.  I was afraid to work on a finished garment, too, but it wasn't as hard as I thought.  Just take your time, and stay near the machine to prevent folded up shirt from getting stitched into the design.  You can do it!


Pinkpantz,


I used Superior Rainbows #813, Tapestry, for the black t-shirt.  That is my favorite of all the Rainbows threads I own.  I used #832, Rose Garden, and #815, Nautica, for the cream t-shirt.  I used solids for the light blue since I didn't think the variegation would show as well.


Carol B.


Great shirt. About your comment on staying close to your machine.... you are SO RIGHT. I embroidered a bear on my granddaughters shirt.She is two and already hates pink. It is hard finding cute things in blue and purple that are for little girls. (she takes after her gramma and loves blue and purple). Well, at the last, the hem got caught and... you guessed it. Well, because the design was a bear with sunglasses and a beach ball, I stitched another piece of fabric in the spot I had to cut apart. I embroidered a little bee and voila... a new design and a saved purple shirt.


thanks


cme


cme,


I'm glad you were able to turn a caught hem error into a bee "feature."  I'm sure your granddaughter was thrilled with the result.


The great thing about doing our own embroidery is that we can choose the thread colors we want to use.  It can be difficult to change colors when there are a lot of shades of the same color to coordinate (such as for a realistic design of a rose), but for many other designs we can use whatever we want.


I like blue and purple, too, and used them on the paisley shirt I stitched for the lesson available with this blog.


Carol


Tahnks for the info on the thread, guess I'm a dummy, but where can I find this thread?  Does AnnTheGran carry it?  I will buy some as soon as I find it.


PinkPantz,


You can buy the Rainbows variegated thread from Superior Threads.  The website has information about local suppliers, as well.


www.superiorthreads.com/.../">www.superiorthreads.com/.../description


Carol


Great idea.


YOU could leave the digitized template in the design you send to the machine and stitch that on the stabilizer. Then use it for placing the neckline of the t-shirt onto the stabilizer. Then do the designs.


Rose


Great idea.  Love the designs.


You could save the digitized template with the design. Stitch out the template lines on the stabilizer. Place the t-shirt neckline on the template lines, and then do the design.


Rose


Thank you, Rose.


I do leave part of the template in the design.  I stitch the outer line of stitching on the template for positioning, just as you mention, and then the next line of stitching serves as fix basting.  The machine's fix baste would be bigger so it would be harder to keep the rest of the shirt out of the way.


Carol


Please login to comment