Keeping It Simple - Water Bottle Carriers From Recycled Jeans

We have been out and about the last week or so with the grandkids in tow.  They love the park, walks by the lake and riding bikes around the neighborhood.   The weather has been great here (quite unusually so for March).  Of course we have to take along snacks and something to drink.  Somehow though I keep ending up holding all the water bottles and then trying to juggle them and help the toddler at the same time.  Since our youngest daughter is having a more difficult pregnancy it looks like we will have the girls quite a bit until mid-summer.  With this in mind I decided we should do something so that I will not have be the "bottle keeper".  Surely, we could make a water bottle carrier of some kind and have fun doing it.   Since we use refillable water bottles (to support going green) I decided to use old jeans and scraps from other fabric projects.  And of course there had to be embroidery.

Here are the ones we have made so far.

 water bottle carrier

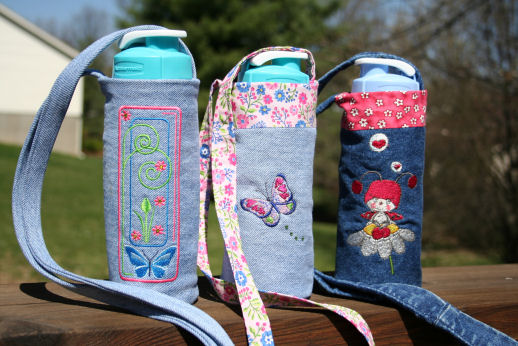
Now the girls are little so we picked the design and some fabric and they "helped" with the embroidery and a little sewing.  Most of the construction I did after they went home to bed.  The carrier will hold a 20 oz. Rubbermaid bottle so it should be good for a standard 500ml purchased bottle of water.  The instructions are as follows:

What you need for the full size carrier:

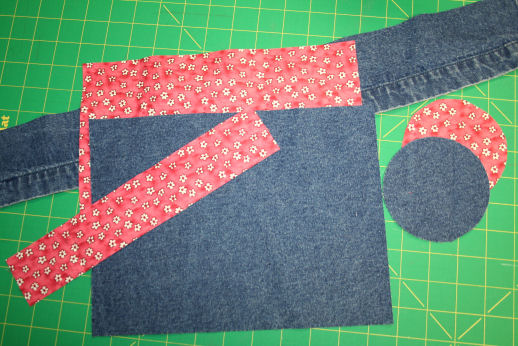
An old pair of jeans or denim fabric.  From this cut:

             a rectangle 10 3/4" wide x 8" tall

            a circle 3 3/4" in diameter (my 6oz  custard cups were just right)

            two strips for the strap 2 1/2" wide x 25" long

Accent and Lining fabric.  From this cut:

            a rectangle 10 3/4" wide x 8" tall

            a circle 3 3/4" in diameter

            a strip for the accent edge if desired 10 3/4" x 2"

Embroidery design of your choice

            We used:

            a bookmark design from Amazing Designs

            a butterfly from Morango Hearts and Butterfly

            a cute ladybug from AnnTheGran

Stabilizer (cutaway or tear away)

Embroidery and sewing threads

What you do:

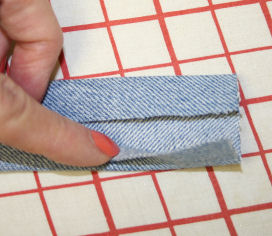
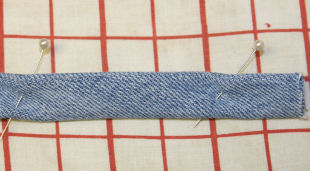
1.  Make the handle.  With right sides together sew the two strips together to make on long strip.  With wrong sides together fold in half lengthwise and press.  Open and place wrong side up on the ironing board.  Fold the sides into the center crease and press.  Fold closed and press again.  It should now be 3/4" wide x 49" long.  Pin and sew just inside open edge all down the strip.  Sew again along the folded side.  Set this aside.


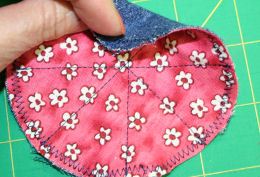
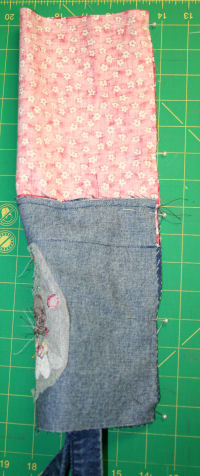
2.  Make the carrier bottom.  With wrong sides together sew across center of the circle.  Rotate 45 degrees and repeat. Now sew between the others creating a pie look.  Zig zag all the way around the outer edge of your circles.  Set this aside.

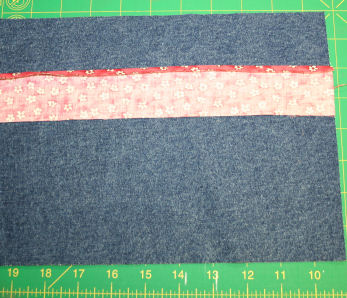
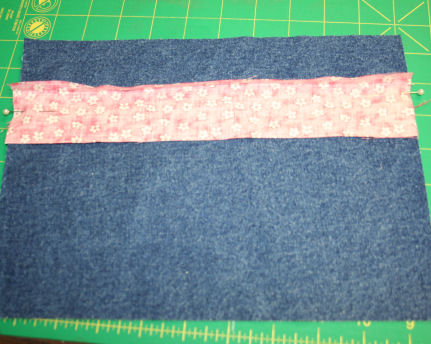
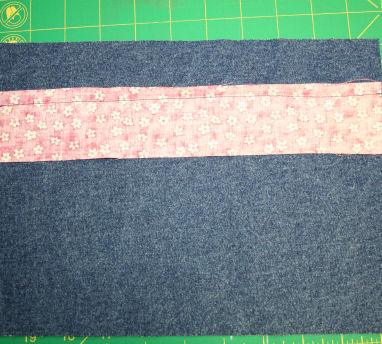
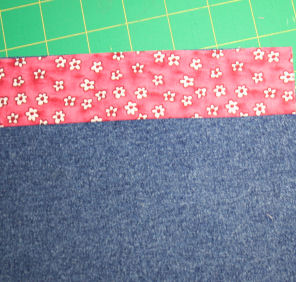
3.  Add the accent border.  Wrong sides together, press a 1/4" crease on the long edge of the 10 3/4" x 2" strip.  On the denim rectangle measure down 1 3/4" from the top and mark on both sides.  With right sides together align the crease with the marks.  Sew along the crease.  Turn up and press.


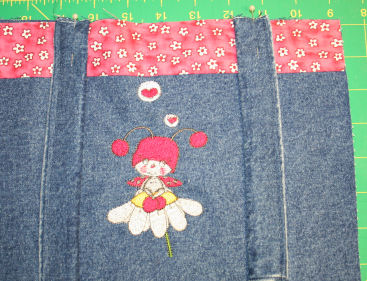
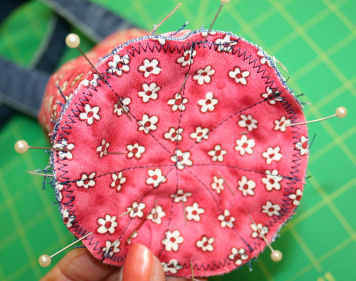
4.  Embroider the design.  Mark the center of your design on the denim rectangle.  Hoop your denim rectangle and stabilizer.  (Depending on the design placement and size of your hoop the denim might not hoop at the top and bottom.  You can place a small pin in both places to help hold it or use a little temporary adhesive.  My hoop was tight enough that I did not do either.)  Embroider your design.  Remove the excess stabilizer.

5. Lay the embroidered rectangle face up. Measure and mark 2 3/4" in from each side. Pin the ends of the strap aligning the raw edges with the top of the embroidered rectangle.


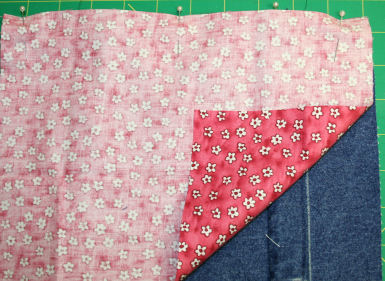
Lay the line rectangle face down on top aligning all edges.  Pin across the top and sew 3/8" seam.  Sew along the same line a second time to reinforce the straps.  Press open.


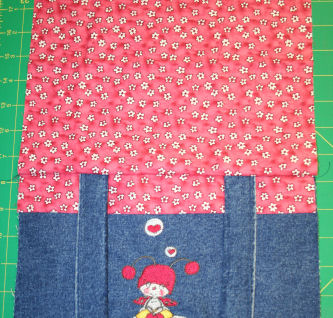
6.  With right sides together fold the whole piece lengthwise.  Pin and sew the long side using 3/8" seam. 

Pull the front to the inside so you have a tube that is inside out with the front on the inside and the lining on the outside.

7.  Pin the circle to the bottom of the tube.  Clip the edges of the tube bottom if needed to help fit the circle but not more than 1/4" deep.  Sew the around the circle through all layers using a 3/8" seam.

8.  Turn the carrier right side out. 

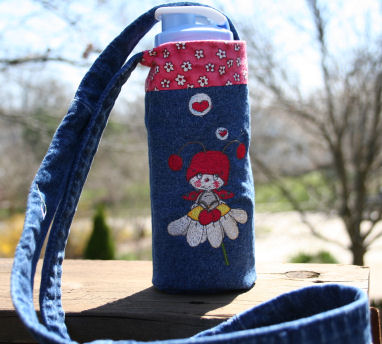
Embellish with  crystals if desired.  You are ready to go traveling with your water bottle carrier.

Note:  I made the straps on the ones for the little girls 40" instead of 50". 

Now if I stuff these with some shredded green fabric and a few chocolate eggs I have a useful Easter gift that the kids can use all summer long.  What fun!

Take care,

DB

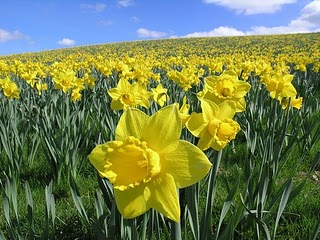
PS:  Here are the daffodils that so impressed my grandaughter. 


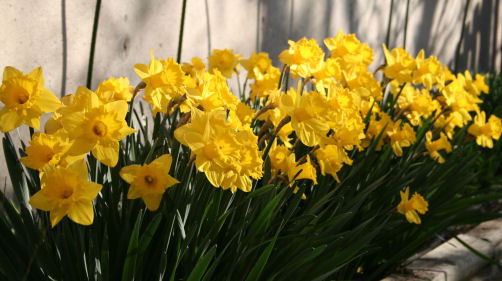
"Meese, these are sooo beautiful and glorious!", she said. "Why did God give you so many?"

I wonder what she would say if she saw this:


Click here to learn more about this real garden.


Comments (4) -

I have been trying to engineer water bottle carriers for about a month now, so THANK YOU THANK YOU THANK YOU.  Yours are so much prettier than anything I've been able to produce so far!  Your instructions are easy to understand & follow, and the pictures explain everything!


suendoug2004 4/3/2010 4:50:38 PM

I've made the water bottle carriers for my DH several times, as he wears them out relatively quickly; but the one he liked the best included a thermal layer between the two layers of fabric, as well as on the bottom. Sometimes part of the ice that he puts in his carrier in the morning is still frozen in the evening when he brings it home after work.


The water bottle carriers are neat!  Love the flower garden.


thecomputerist 4/3/2010 6:47:34 PM

I love how you made the bottle carrier so simple.  If it has 30 pattern pieces, I am not going to do that project!


I too love the daffodils.  What says smile more than a yellow flower?


Pat


Please login to comment
AnnTheGran.com | Beautiful people make beautiful things

PMS Thread Colors

You may have had a friend or client ask you to stitch their company or school colors on apparel using PMS colors. Typically, the mere mention of PMS strikes fear in the hearts of many. Here, PMS refers to Pantone Matching System and how it helps with color consistency in embroidery thread. Panto... [More]

My #1 secret to successful machine embroidery applique

We are excited to have Eileen Roche, Editor of Designs in Machine Embroidery share this content with you, which was originally posted on Eileen’s Machine Embroidery Blog:   I’ll let you in on a little-known secret – I hate to remove the hoop during the embroidery pr... [More]

How To Hoop Onesies

  I get lots of questions about embroidering onesies. I see lots of embroiderers floating them on self-adhesive stabilizers, but most projects will have better results if the onesie is hooped in a hoop with cut-away stabilizer. Watch this video to see how I like to hoop onesies. I demonst... [More]

Free Basting Stitches

Here is something no embroiderer should be without: basting stitches. Especially when they are FREE. Overall, basting files place a running stitch around the outside of the design area, temporarily securing the hooped fabric and stabilizer together. Some machines even have a basting feature bu... [More]

The Value of Hooping Correctly

We are excited to have Eileen Roche, Editor of Designs in Machine Embroidery share this content with you, which was originally posted on Eileen’s Machine Embroidery Blog:    Our friends at Baby Lock have excellent advice for achieving beautiful embroidery on any machine... [More]

Fancy Window Pouch

     A few years ago I made for myself a messenger bag style purse, with one of [More]

Bobbin Basics

Bobbins are the cement that holds embroidery stitches together, so they play an important role in the outcome of every machine embroidery design. Here is an overview of what you need to know about bobbins. Bobbins are not one-size-fits-all. They are available in three basic sizes for home embr... [More]

One Sassy Lady!

We are excited to have Eileen Roche, Editor of Designs in Machine Embroidery share this content with you, which was originally posted on Eileen’s Machine Embroidery Blog:   September 18, 2013 By eileenroche Katherine Artines   We introduced Stipple! Sass... [More]

"Mod Olives" Tutorial

To watch a tutorial on how to cut and piece curves using the Quick Curve Ruler go here.    Fabric Requirements for above layout:  *Optional revision to tutorial can be found here. -(48) 6 x 8 rectangles prints (center diamonds) or -(8) Fat Quarters (you wi... [More]

Tear Away or Cut Away. Which Stabilizer Should You Use?

Lightweight tear-away stabilizer (top) and heavy cut-away (bottom).   Like the foundation of your home, stabilizers support the stitches you place upon them. If the foundation is not good, the structure isn't either. With all of these different weights of stabilizers, which do you use? ... [More]

Well, here I am, once again

Well, here I am, once again trying to think of something about which to write. It’s been more than five years since I’ve touched a sewing machine for anything other than to put up a hem or repair a seam. I was never an expert on anything sewing or embroidery related and now the bit o... [More]

Fancy Shoulder Purse

     Do you remember this purse?          I showed it to you in my October 2009 blog, Be Productive.  In that blog I encouraged you to keep a record of your sewing projects so that you could see just how much you are accomplishing.  Have you d... [More]

Embroidery Studio Organization in 6 Easy Steps: The Stitching Sisters’ Practical Guide

We are excited to have Eileen Roche, Editor of Designs in Machine Embroidery share this content with you, which was originally posted on Eileen’s Machine Embroidery Blog:   Marie and I are known as the Stitching Sisters. Not only are we really sisters, we are also the best of... [More]

Embellishing Embroidery

  Machine embroidery is so versatile it becomes a palette with enormous possibilities when you add simple embellishments. Embellishments add interest by making embroidery three dimensional, introducing textures, and adding sparkle. Hot fix crystals are one way to accentuate embroidery designs... [More]

Pinteresting Embroidery

  Pinterest is probably the greatest digital scrapbook ever created. Essentially a collection of images linked to websites, Pinterest is a one-stop way to connect to whatever your interests may be. With more then 25 billion pins, the site is a treasure trove of ideas, but for the purpose of th... [More]

Fancy Chess and Checkers Set

NOTE:  The design sizes as described here and in the Stitch Counts documentavailable below are correct.  Determine which design size is right for you based onthis information.  I used 130 x 180 mm, 150 x 240 mm, and 200 x 260 hoops for Small,Medium and Large designs respectively. ... [More]

7 Ordinary Towels – One Fabulous Gift Part 2 of 2

 We are excited to have Eileen Roche, Editor of Designs in Machine Embroidery share this content with you, which was originally posted on Eileen’s Machine Embroidery Blog:  Add the Icing In case you missed the first installment of this 2 part series click here: &... [More]