If you have been following me for a while, you know
that I have been learning and working on how to digitize. My first attempts
were mostly rather primitive, and I was delighted to get to the point of
anything that would show actual embroidery.
I’ve been looking at the tutorials and found directions on how to do fringe. It sounded easy. I am excited that my freebie will be a fringe. As with any unique stitch, there are tricks you need to follow.
I really don’t know if other embroidery programs can do fringe.
One trick you will need to determine is how to set your bobbin tension. In my blog a few weeks ago, I showed you how the bobbin thread alignment for sewing purposes is different from the bobbin thread alignment used in embroidery sewing.
I am not an embroidery program expert, but there are things I have learned and want to share that understanding.
When I practiced this motif, I must have completed more than 30 discovery sews before I felt comfortable. Adjusting the bobbin to a looser size helps make this more comparable to the other fringe flowers, assuming you are using this design multiple times.
In this case, check your owner’s manual to determine which way to turn
the dial that actually governs the upper thread tension. For this application, you want the bobbin thread slacked, therefore, you will be making that number higher NOT
lower.
As you are doing your practice attempts, I recommend you use a single
color fabric perhaps muslin, with the upper thread being very dark or perhaps bright red or orange and the bobbin color, white. This allows you to see and make your small cuts on the underneath side.
Remove
the hoop from the machine but leave your fabric in the hoop. Turn the project upside down and with very small trim scissors, or nippers sever white
bobbin thread. I cut about 2 or 3 mm at a time so that I didn’t cut into the actual fringe.
Turn
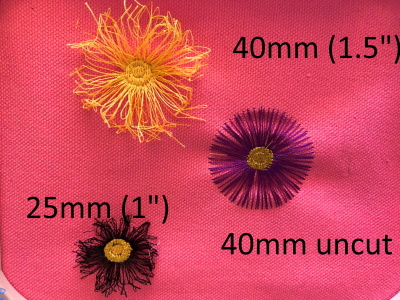
to the top side and with a butter knife (or similar), fluff the thread. I think the looped thread is terrific. But if you prefer a straight-edged fringe, before you fluff, gently cut
the loops. Either looped or not, you may lose a few threads but with practice, you will be happy with the results.
One
of the design styles is 25 mm (1”) and the other 40mm (1.5”). I would discourage changing the size as your results may vary. Live dangerously at your own
risk. (LOL)
If you trim the outer stitches, you will have a fringe that is not looped. You need to consider for whom and what purpose your project is aimed. For an item that will be washed frequently, fringe can be too delicate to survive heavy use. Loops could catch tiny fingers and toes and generally not suitable for a baby project.
Will Rogers said it so we could laugh out loud - The only difference between death and taxes is that death doesn't get worse every time Congress meets.
American Actor born on November 04, 1879, died on August 15, 1935, William Penn Adair "Will" Rogers was an American cowboy, vaudeville performer, humorist, newspaper columnist, social commentator, and stage and motion picture actor... And that was in his spare time!!
I don't know about you, but I needed a good laugh these days. I promised myself never to get political, but I could not pass this one up. . .