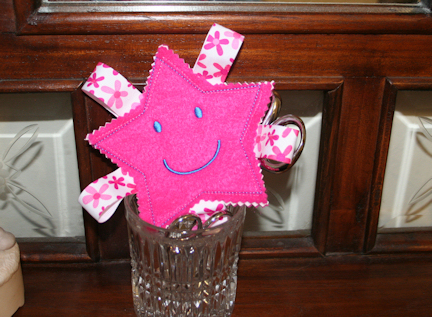
Our 5-year old granddaughter wanted to make something for a friend’s
as a gift for her new little sister that is coming home soon. Now this granddaughter is one of those
children who cannot sit still for more than 5 minutes at a time. Her
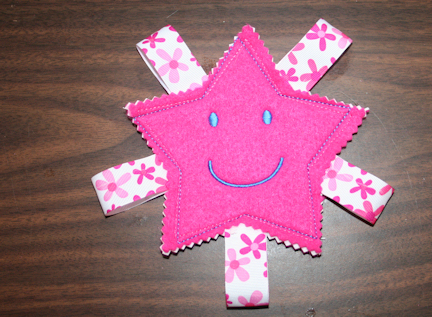
focus is ever-changing and she has an energy level that is enviable. And she is only five. So we decided to make a happy face star ribbon
toy. Of course ours had to be pink. Here is the one she made:
Here is what you need
for the star ribbon toy:
Two squares of felt that are about 6
Five pieces of ribbon 4” long
Tear away stabilizer (for optional step 1)
Pinking shears
Soft Cut-away stabilizer
Embroidery thread
Happy Star design (you can download the design at the bottom of the blog)
Lapel stick or other temporary adhesive
Here is what you do:
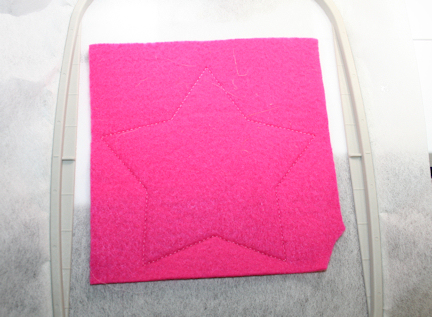
1.
This step
is optional but makes it easier to cut the shape. Hoop stabilizer in a 5x7
hoop. Center one square of felt on
top. Load the happy star design and
embroider only the first run. Using the
pinking shears cut outside the run.
Remove the stabilizer and set aside.
Save the other felt square for later.
2.
Hoop cut-away stabilizer in a 5x7 hoop. Load the same color thread in both the top and bottom for best results with this project. Start the design over and embroider the first
run on the stabilizer.
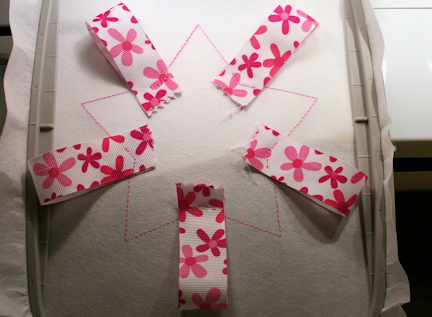
3.
Fold your ribbon wrong sides together and place over
first inside corner (top right) so that a half inch or so is inside the line. Adhere using a lapel stick if desired. Embroider the run. Repeat for all inside corners going clockwise
around the star.
4.
Lay the cut star on top aligning it over the
star placement and embroider the tackdown run.
Change the thread and bobbin if desired and then embroider the face run.
5.
Remove the hoop and turn face down on a stable,
flat surface. Use your square over the star placement lines. Change the thread and bobbin back to the original color if needed. (we were giggling and forgot to do this.) Carefully slide the hoop back onto the
machine and embroider the final run.
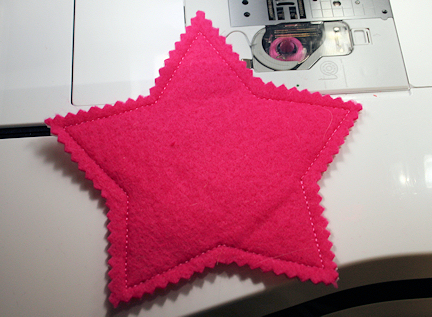
6.
Remove the design from the hoop. Using pinking shears cut around the back and
stablizer matching up with the front star shape.
We will be making a couple of burpies to go along with the
toy for an easy gift. If you have a baby
to sew for try any of these cute projects:
Heart Flower Burpies https://community.annthegran.com/post/2011/03/04/keeping-it-simple-heart-flowers-burpies-and-nursing-covers-
Minkys and Binks https://community.annthegran.com/post/2011/05/06/leftover-minky-and-those-elusive-binks-
Embroidered Photo block https://community.annthegran.com/post/2011/02/11/keeping-it-simple-oh-so-popular-embroidered-photo-blocks-
Cool Summer Baby Ts https://community.annthegran.com/post/2010/04/23/keeping-it-simple-embroidered-baby-t-shirts-for-cool-summer-fun
Easy Treat bags (These are a favorite) https://community.annthegran.com/post/2013/01/25/keeping-it-simple-easy-treat-bags-for-valentines-day
Whatever you make be sure you are having fun.
Take care,
DB
Happy Star.zip (191.5KB)