October 15, 2010
djones247
Not rated yet
Christmas season always brings requests for embroidering names on stockings. This may make you wish that you could crawl into a cave and hibernate with the bears until Spring! Yet stockings can be conquered and in doing so, you bring happiness and create heirlooms. For this reason, I have always tried to fulfill these requests. Narrow-top stockings may seem impossible, but the first thing to try is to turn the stocking inside out and adhere it to a base of self-adhesive stabilizer. You may also need to use pins to help secure it.
All stockings have their own challenges, but one thing that you should always do on any stocking - mark it. When I say mark it, I mean for position and direction of the embroidery. Some stockings have cuffs and some don't. To avoid becoming confused about the orientation of the embroidery, place a piece of masking or painter's tape on a straight line, and mark an arrow pointing in the direction of the top of the embroidery. You could also use a target sticker, which include an arrow already printed on them. Target stickers are included in the Perfect Placement Kit, that I created along with Eileen Roche.
Some stockings have furry cuffs that can bury your embroidery. Of course you will want to use a water-soluble topping, but when it has been removed the fur still creeps back on top of the embroidery. To make the embroidery stand out, use a Peggy's Stitch Eraser to gently sculpt around the stitching. Don't try to shave the fur bedfore applying embroidery - rather carve around the lettering or design after embroidery has been applied.
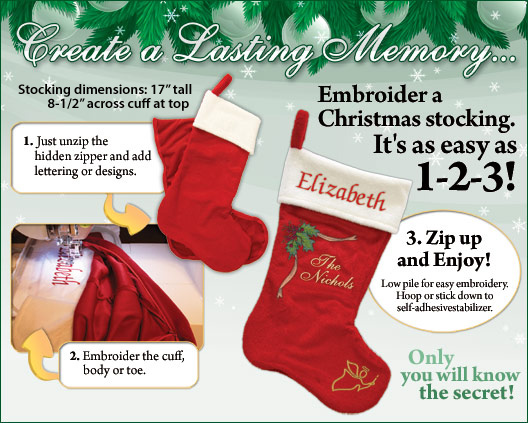
To make stocking embroidery really easy, you can buy stockings made especially for embroidery. With a zipper hidden along the side, they open for easy embroidery on the cuff and even the body or toe of the stocking. The soft but low pile makes embroidery easy. Check them out at www.myembroiderymentor.com