 First of all, I want to say thank you to everyone who sent in feedback about my Community Circle event in April. It was a deluge! So many people responded that we needed to step back and re-plan the event to make it bigger. We're almost there; I'll be announcing all the details, along with registration, in my post next Saturday. Stay tuned!
Practice makes perfect in any well loved craft. Gnara Greene shares how to take a tried and true pattern and come up with something new and excitingly different each time it is used. Not afraid to dive into the project, she gained valuable experience and knowledge while creating a special piece of wearable art. Will she delve into another new area? I'm betting that she will!
Gnara’s Description
I started out sewing at age 6. I designed my own dolls and doll clothes. I loved shopping at a place in Arizona called SAS were you could buy fabric and notions by the pound. For as long as I could remember, I have embellished my clothes (purchased or hand made), with lace or hand embroidery, beads or patchwork. At 12, I combined an art class and what would have been a disastrously boring home economics class. I combined the sewing project, (making a top), with my art class, (batiking technique), and created an abstract batiked fabric with which to construct my top. The batiking technique was used to make various other clothing and hangings as well. I have always had a hard keeping to one art medium. I paint and hand crocheted 27 yards of lace for a Victorian costume I made.
I was born and currently reside in Colorado, USA and have used Ann The Gran’s free embroidery designs since purchasing my Husqvarna Designer I back in 2000. I’ve completed projects spanning the gamut from table runners to Judaica, ceramics to linoleum cuts, Jewelry making to painting, clothing to window coverings, designer pillows to my latest 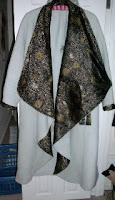 venture, lace making by machine. This project is very dear to my heart since I’m able to enjoy the fruits of my labor every time my husband and I step out during cold weather.
Step by Step
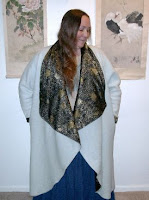
With this Jacket I started with an old, but well loved, Butterick pattern 5848. I made this jacket two other times for myself, once out of an old blanket that had a great wavy edge border and another time with a combination of purple upholstery fabric and multi-colored wool. It was a hit but I wore them out. This time, I chose green wool fabric and made the basic jacket.
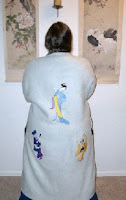
After the jacket was complete, I decided I wanted to make it oriental. The middle geisha was the free design that came with the Designer I machine. It was too large to fit into any of my embroidery hoops. I was eventually successful in sewing a split pattern using a giant hoop. This was also the first time I used sulky thread in an embroidered design. Once the middle geisha was finished I wanted to create a more balanced look. I found the Gigi Niederer geisha with the Lute from Ann the Gran’s website in the oriental section. Because of the very comprehensive links, I was able to locate the geisha with the horse puppet from here. Due to my experience with the giant hoop, splitting designs and using Sulky thread, these second two designs went much quicker. I wore the jacket for a couple of years before deciding to incorporate just the right silk pocket trim and lapels. I have learned so much since then I look at this project now and see how hard I made everything.
All of the training I had using the giant hoop and splitting designs was trial and error with a few frustrated phone calls to good natured Husqvarna sewing center employees thrown in for good measure. We lived too far away from any formal training so this presented quite a formidable challenge. I highly recommend taking as many hands-on training classes as you can afford in order to avoid the long and costly process of learning “by the seat of your pants”. I am currently developing a business focused on wearable art and unique home décor.
 What Makes This Project Special
This project was special because it was the catalyst to using my Designer I embroidery machine. I never thought anything would take the place of hand embroidery, or crocheting for that matter. Every thing I have made using this machine I have given away. This is the sole piece I have kept and I wear it a lot as part of my advertising.
Skill Level
For me everything is a challenge. I know any one who sews can make the jacket in one or two afternoons. The challenge for the designs is knowledge of your machine, good software and correct choice of embroidery materials. My estimation is the overall project would be great for an intermediate sewer who’s had some training on the Designer I. This was the first project I attempted and my lack of knowledge and experience with the machine was the hurdle to overcome.
Products
Machines:
Husqvarna Designer 1
Bernette serger for all my edging
My old Kenmore sewing machine for sewing through all the layers of material. The Husqvarna was not well suited, (many broken needles), for all the layers of material, especially when putting on the lining.
Materials:
Six yards of wool fabric, (I can’t recall the exact name of the material).
Approximately 1,000 yards of Sulky thread, (combined), of various colors.
Tear Away stabilizer – 1 yard
Three yards of silk trim for the pockets and lapels.
Time Investment
Making the jacket took approximately 6 hours. The embroideries took between 7 to 8 hours total and the lining was another 6 hours. Altogether the project will take around 20 hours. For me, I dragged this project out over a few years, (LOL).
Why I Love This Project
My husband I made a little money from a real-estate deal and we bought what I considered “this extravagant thing”. In retrospect, if I had done some research, I probably would have purchased a dedicated embroidery machine that has 12 heads and uses bigger hoops. I do love the Mega Hoop, but I usually embroider designs that are much bigger than the hoop and require one or several splitting operations.
I have become more interested in digitizing with this unit. I’ve purchased Diane’s lace making videos from “The Lace Place” and have been teaching myself digitizing and the lace making processes. I have done some really unusual commissioned work that took me a couple of years to digitize. Overall, the Designer I machine is high maintenance and my husband says so am I, so we are a good fit. I plan to make this jacket again and do something completely different next time.
Send Us Your Creations
Do you have any creations that go with a great story? If so, we'd love to hear about them, and see them! If we choose to post your project, you'll get a free $25 gift certificate to use in the AnnTheGran.com online store. Click here for details on how to submit your creation.
What Would You Do?
Gnara learned by doing as she designed her special piece. Have you ever tried a new technique "by the seat of your pants"? Tell us how it went. Click on the Comments link to share your story.