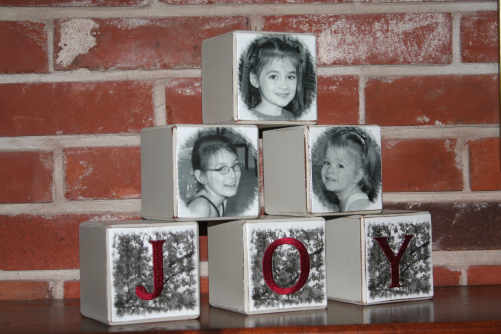
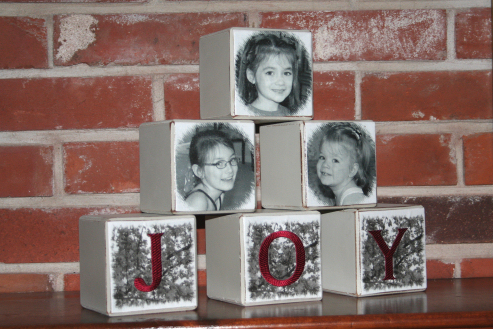
Have you ever just had an idea that kept calling out to you? This is one of those projects. More than a year ago I found this pile of blocks in the clearance section of a local department store. The packages had been broken open and a couple of the lettered blocks were missing. Someone had thrown them all in a basket and priced it at almost nothing and I just had to buy them. Surely, I could make something with all those blocks. I took them home and put them away in my sewing room closet where they have sat until last week. When I opened the closet they just seemed to call out to be used. An idea that almost instantly popped into my head was a Christmas photo display. My oldest granddaughter was here when I was selecting pictures and when I mentioned what I was doing she said "Let's surprise my mommy." So, this quick and easy J O Y photo display is for her mother:
Here is what you need:
Ink Jet Fabric sheets
Wooden Blocks
Lettering Designs to fit your blocks (Download the J O Y lettering below)
Pictures sized to fit your blocks (We used Paint Shop Pro)
Cutaway stabilizer
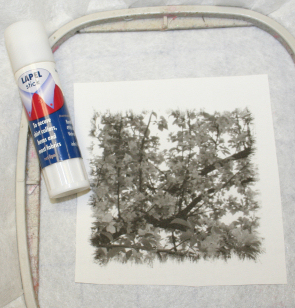
Lapel stick or other temporary adhesive
Mod Podge (Matt finish)
Rotary Cutter, mat and ruler
Embroidery thread
Here is what you do:
1. Crop and re-size your pictures to fit your blocks or slightly larger. I just used Paint Shop Pro to do this. It is very affordable and easy to use for basic editing. I also changed them to black and white. For the lettered blocks background I did the same thing using a picture of a tree that I had taken in the spring. Take the picture into Paint Shop Pro. Change it to gray scale or Black and White film. Crop to the area you want to see on your block. Resize the image to slightly larger than your block face and save it as a new image.
2. Print the photos and background pictures on printable fabric sheets and follow the directions for setting the image on the fabric. Roughly cut the pictures out. The background pictures become custom fabric for your embroidereed lettering.

3. Print a template of the letters. Hoop the cutaway stabilizer. Align the lettering template on top of the fabric picture and center in the hoop. Using the temporary adhesive, adhere the edges of the backside of the fabric picture so that it is secure on top of the stabilizer.
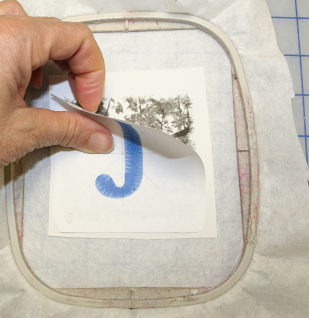
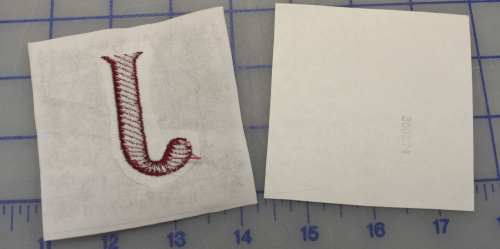
4. Embroider the letter. Cut away the excess stabilizer. Repeat for the remaining embroidered letters.
5. Make a template for the area on the face of the block that you want to cover. Center the picture under the template and trace.
6. Cut each out and lay on the block fronts to see your final layout.

6. Cover the block face with Mod Podge and press the pictures in place smoothing as you go. Let dry a few minutes then evenly cover the pictures with Mod Podge. For the embroidered blocks we just brushed the Mod Podge on top of the fabric around the letters and left the embroidery uncovered. (On the couple of places it got on the edges of the letters it did dry clear and cannot be seen though.) Let the blocks dry completely. Stack and show your display or wrap and smile because you have one Christmas gift ready to go!
You can download the J O Y designs here.
This set was done to go with Andrea's Christmas décor but a block display like this would make a great addition to you décor for any time of the year. I have lots of blocks left and am looking for some fun pictures to do a larger display with L O V E blocks at the bottom. You can create these larger, pattern-filled letters in Alphabet Xpress or ELS-1 Embroidery Lettering software. My blocks are 3 1/2" square and I did the letters at 2".
Here is another fun photo sewing project done using printable fabric. Any new mother would be sure to love one of these.
If you make either of these or anything else that has been calling out to you be sure to post what you have done in the Gallery. There are lots of Annthegran readers who would love to see what you have done.
Take care,
DB