Fancy Shoulder Purse

     Do you remember this purse?


outline swirl purse


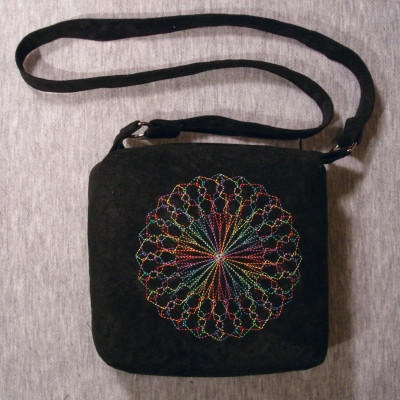
     I showed it to you in my October 2009 blog, Be Productive.  In that blog I

encouraged you to keep a record of your sewing projects so that you could see

just how much you are accomplishing.  Have you done this?  Are you impressed

with what you have been able to do over the years?


     Here is another purse I made recently, using this Fancy Swirl in the 5.5 x 5.5

inch size.  The fabric for this purse is poplin.  (I had used doe suede for the first

purse; although I still like the rich look of the doe suede, I believe that the

flatter surface of the poplin lets the embroidery stand out more.)


V swirl purse


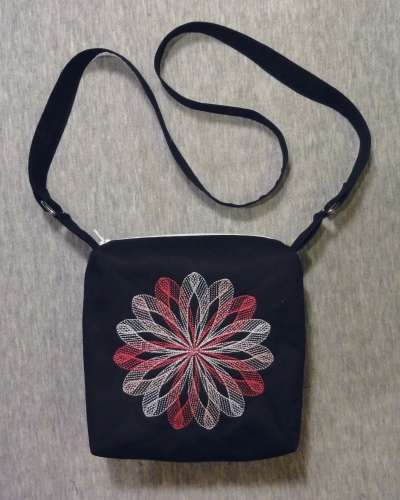
       Both purses are 7" wide by 7" high by 3" deep with a zipper at the top.  Tabs

with D-rings are attached at both ends of the zipper and a shoulder strap is attached

to the  D-rings.  Once the purse is finished it is easy to attach one end of the strap

to a D-ring and then try on the purse to decide the length for the strap before

attaching the other end.


     The instructions, available here, include a pattern for this size of purse and

instructions for drafting other sizes.  They also include a section on adding pockets

to the lining.  Here is a picture of the lining panels with pockets attached.


lining


     After I made the sample lining with pockets for adding photographs to my

instructions, I decided to use the lining for a pouch.  I used my Contour Cut-out

alphabet for the lettering.  The size I used is a little bigger than the smaller size

available at Ann the Gran.  I happened to have the design on my flash drive.  When I

want to do a project, I want to do it NOW, so I used what was at hand.  The same design

arranged in Contour Cut-Outs 35 would be 75 mm high rather than 80 mm.  It would still

look very nice on a small pouch like this one.  The pouch is 5 1/2" wide by 4" high by

2" deep.


CC CAB pouch


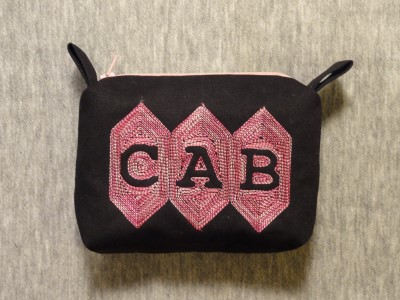
     Omitting the strap turns the purse into a pouch.  I did keep the tabs because they

make opening and closing the pouch easier; they give me something to grasp.  How about

a lingerie bag for your suitcase?  Or a pouch for your GPS device and power cord?  For

this use I would attach a wrist strap to one D-ring and put a plain tab at the other

end of the zipper.  What other uses can you think of for a purse or pouch like this?

Please login to comment
Finish it Like a Pro - Trimming Tips

Finish it Like a Pro - Trimming Tips

trim_topHave you ever wondered whether it matters if you first trim the top or the bottom of your machine embroidery work?

It’s best to trim the top first, so that when you trim the back, you can gently pull on the bobbin tails to secure the trimmed thread end inside the fabric for a neater appearance. Incidentally, this is one of the advantages of automatic trimmers on multi-needle machines. The trimming is actually done by blades that are beneath the needle plate, accomplishing the trimming from below. The mechanism that you see on top isn't cutting, rather it is pulling the trimmed thread into a holder.


If you used topping, resist the temptation to rip away the topping material as soon as you remove the hoop from the machine. The topping is still doing its job. When you are trimming jump stitches, the topping acts as a buffer to protect delicate fabrics from being nicked by your trimming scissors.

Trimming the Back

Long jump stitches over 1/2" between letters and design elements should be trimmed to prevent them becoming snagged.

 It also prevents the wearer from wondering if they should trim these stitches or worrying about snagging them.

The stabilizer should be trimmed about 1/8 to 1/4" away from the embroidery. Leaving more can create an outline of backing that is visible through the fabric. Leaving less can cause the embroidery to have a sunken apperarance. leave quarter inch

trimsee back


To avoid nicking the fabric while removing cutaway stabilizer, keep the fabric visible at all times during backing removal. Some people accomplish this by holding the item by the stabilizer, allowing the item to "hang" during trimming. I also suggest using short blade (5 inch) embroidery sicssors rather than larger shears.

If the item will be worn by an infant or child, contains metallic thread or has threads that aren't completely secured, seal the embroidery on the back with a soft, permanent fusible covering like TenderTouch by Sulky.

tender Touch


Comments (1) -

irishrose379 1/14/2012 8:39:57 AM

This was a wonderful article.. Things were addressed here that are never addressed in any instructions. I think it is taken for granted that people know this stuff . The info re: front and back jump stitch trimming was excellent. Thank you so much for all the info.


Please login to comment