Trust me when I tell you that hankies are not a left-over relic from the fifties! The handkerchief category continues to be a strong one for us especially around holidays and wedding season. Personally, I love to take a hankie to weddings and I haven’t met a bride yet who hasn’t appreciated a personalized one for her to tuck into her bouquet as she walks down the aisle.
I run into lots of people who share stories of having several of their own grandparents hankies tucked away in a drawer. Now is your chance to create something special to be handed down to future generations. And get out those treasures and use them---that’s how we honor the memories they hold!
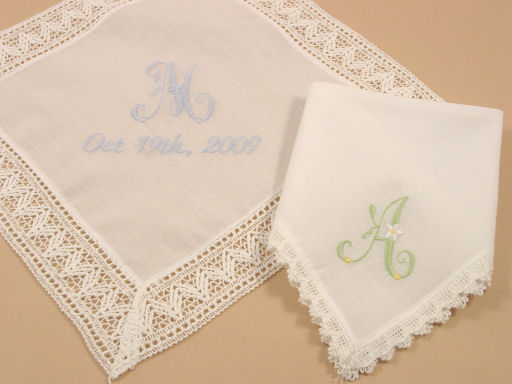
We had several new styles of hankies arrive this week. There is no better place to “introduce” these pretty little pieces than right here in the AnnTheGran community. My blog is all about making gift-giving easier, and you won’t find a quicker and easier gift! I created the two beautiful gifts you see here, ironed them, and packaged them in less than 30 minutes. Now that’s quick! And….two more gifts off my list! (yes…you do have to iron but only for a brief minute!)
If you’ve not used a wash-away stabilizer before, you’ll want to be sure to read the section below under the heading “Wedding Hankie”. Here is discuss some helpful hints for using a wash-away stabilizer on hankies.
The supply list for this week is super short:
--A pretty handkerchief
--Stabilizer of choice (see below for more info on this)
--Thin straight pins
--Temporary Adhesive Spray
--Size 75/11 Embroidery Needle
--A selected embroidery design/monogram. For our project today we used the “Daisies” alphabet from AnnTheGran.
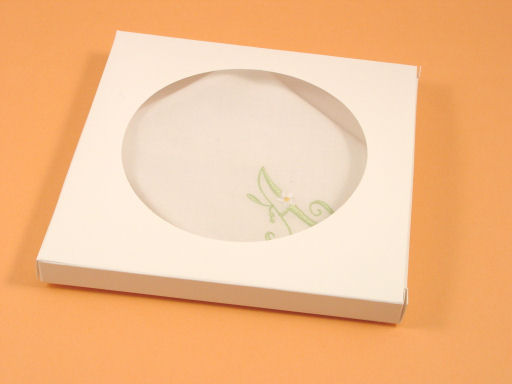
--Hankie Gift Box (optional)
Simple Monogrammed Hankie
1) I used the letter A from the Daisy Alphabet collection. I found the original size of the design to be a little too large for my hankie, so I resized it to about 2” tall. When working with hankies, I think you will find a 2” monogram to be the most visually appealing.
2) If you’ve been reading my blogs, you know how much I love paper templates to help you with design placement. Print off your paper template and cut it out. Then visually decide where the design looks best in the corner of the hankie and stick it onto the hankie using a touch of temporary adhesive spray.
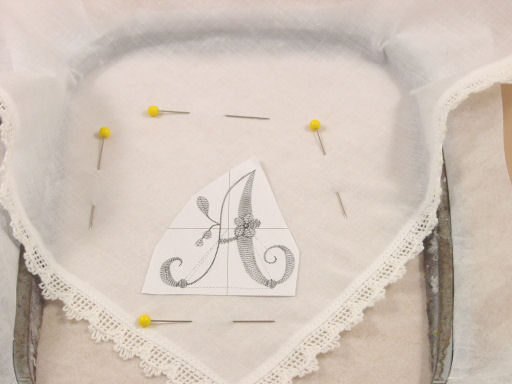
(Yes--that is my messy embroider hoop you see there. I know it's tacky, but I prefer to think of it as "sticky-tacky" and it helps keep the items I'm embroidering in place! Don't judge me...LOL)
3) Finally, hoop your stabilizer. I choose between two types of stabilizer. If my design is a simple monogram without a lot of lacy areas to pick stabilizer out of, I will choose a tear-away stabilizer. This Daisy Alphabet is a perfect example of a design that works well with a tear-away. This is always my first choice because I don’t like to have to get my project wet if I don’t have to. For times when the wash-away is appropriate, see the project below.
4) Once the stabilizer is hooped, spray it with temporary adhesive spray. Put the handkerchief down onto the hooped stabilizer and pin it around the edges for added stability. Stitch the design! (I prefer a Size 75/11 embroidery needle—it’s slightly smaller and works well on delicate fabrics)
5) Once the design is stitched, remove the extra stabilizer gently so you don’t tear the cotton or linen hankie. Iron with a hot steamy iron from the back so your monogram is “raised”. You may find the cotton hankies tend to draw up with the hot steam, but keep pulling at it while pressing and it all lays right back down into place with little or not bother.
Wedding Hankie
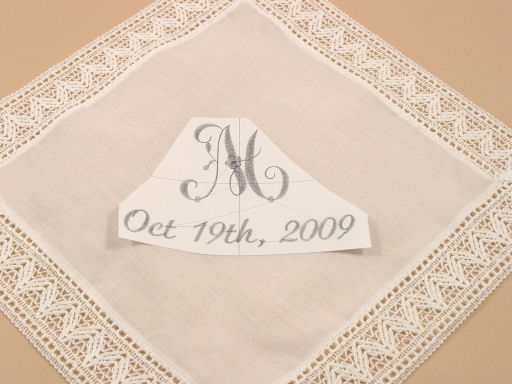
I love giving hankies as bridal gifts! I’ve not met a bride yet who doesn’t treasure one that’s monogrammed with her initials and their wedding date. For today’s project I once again used that beautiful Daisy Alphabet font but this time I stitched it in all one color. It’s still just as pretty, isn’t it?!? I added the wedding date using a built-in font in my embroidery software. I chose a solid blue color so the bride would have “something blue”. It’s just as pretty in all white or the bride’s favorite color. The choice is yours!
Regarding design placement: I find with wedding hankies it “looks” better with the design in the middle of the hankie. Print your paper template and play around with the placement until you find something that looks right to you---but I think you’ll find the middle looks best.
For this project, the instructions are all the same except I used a wash-away stabilizer. The reason is because with all that lettering in there, I didn’t want to risk tearing the hankie by pulling out all that stabilizer. I needed to use something that would rinse away.
When you have stitched the design, cut away what stabilizer you can. What cannot be cut away can be easily removed by rinsing the hankie out under running water in your kitchen sink. Rinse it until ALL the stabilizer is gone and then do it for another 5 seconds after you think you’re done. Wring out the excess water and then roll the hankie into a terry towel and wring some more. This will leave the hankie just damp. Take it immediately to your ironing board and with a very hot steamy iron gently iron from the back. The cotton hankies will try to draw up on you…just keep adding steam and keep pulling and pressing until the hankie is dry. It will do JUST fine---promise!
Congratulations! You have a few more gifts knocked off your list! 26 days remaining until Christmas!
Get to stitchin'!
Susan
| Special Offer - To save 20% on all embroiderable hankies in our store, click here and when ordering, enter promotion code HANKIE to apply your discount. |