It seems the art has 100 colors, what is a digitizer to do??!!

I just had one of those embroiderer and 'can't make up her mind' customer interactions.

The antagonist of the story, played by the customer, is a great water color painter -- if you don't believe her, just ask her -- and, she brings in 3 water color paintings.  Well, I couldn't tell if two were water color paintings, or an attempt to use EVERY color in her Brookstone's, Bob Ross Paint-by-Color set that she received for Mother's Day.

These paintings would have made Claude Monet wish he were a house painter, or maybe a matador!  However, one of them did catch my eye, and I thought to myself, "wow, she really can paint."  And, at just the moment I'm thinking that, she tells me, "these two are mine, the one you like was my inspiration, and, painted by my sister-in-law.  THE LIGHT BULB WENT OFF!  Her sister-in-law's painting used a few, but effective colors.  They were neatly blended into a beautiful, impressionistic resemblence of the exterior of a gardener's shed.  It was so well done, you could almost smell the potting soil and the musty wood floor.  In an interview late in his life, Monet even mentioned the few colors he used in his paintings, "I use white lead, cadmium yellow, vermilion, madder, cobalt blue, chrome green.  That's all."  All that inspiring art in just FIVE COLORS!!  You kidding me??!!

Back to our story .. Ms. Color-icious wants me to digitize the art that SHE created so it can be embroidered on organza and framed.  Her idea is to paint someone's house and landscape and have it embroidered and framed.  Then she is going to sell it to them.  My reply was, "what a great idea, now, tell me, what are we going to do about all these colors?"  She asked, "Oh, what do you mean?"  Now, my life flashed back to my time at the University of Florida when I registered for an Art Appreciation class.  I can distinctly remember asking myself WHY would I EVER have any reason for taking this class other than the fact that I needed one last elective.  Alas, THIS was the time it came in handy, and, I was ready to seize the moment .. Carpe Diem, O Captain, My Captain.  I went on for 10 minutes about the age of minimalism and the transition from realism to impressionism and the difference between Monet and Manet .. yes, there was a difference, and not just one letter.  However, just when I thought I had her understanding me, she went on to a dissertation about the artist's eye, and the artist see's this, and the artist expresses that, and the artist has the hand, and the artist and the artist .. and the artist ..

.. and the artist ..

So, I cut to the chase.  The cost of her wishes.  Well, the look on her face when I told her the digitizing fee, the actual embroidery fee and that my machine ONLY holds 15 colors, and, if she wanted me to manually change the threads during the run the price increased by X .. her look brought me back to a more simple time, a more innocent time ..

.. all I can tell you is her look was the same look as my mom gave me when I told her that we super-glued Richie Cotrels head to the garage door to see if he could hang there like the man on the Super Glue commercial. 

Hey, we were 10 years old .. stop laughing, his hair grew back .. though, I believe his DNA became an eternal part of that garage door on Dravis Avenue in Girard, Ohio.  Oh, we would look at it and laugh later in life .. it acted as a gentle reminder of how lucky we were not to kill each other with our hair-brained ideas.

Further drifting from the purpose of this blog .. another part of that story just came back to me .. it's 1993, my 10 year high-school reunion, and Eddie Sprovorio brings out a recipe card sized hunk of white paint and wood 'taken' from THE garage door .. and, there was still hair in it!!  When he was able to liberate that from the garage door, no one knows, and didn't ask .. but, what a story.  You can't make this stuff up!!

So, getting back to the point of this blog .. so easily side-tracked, we are! 

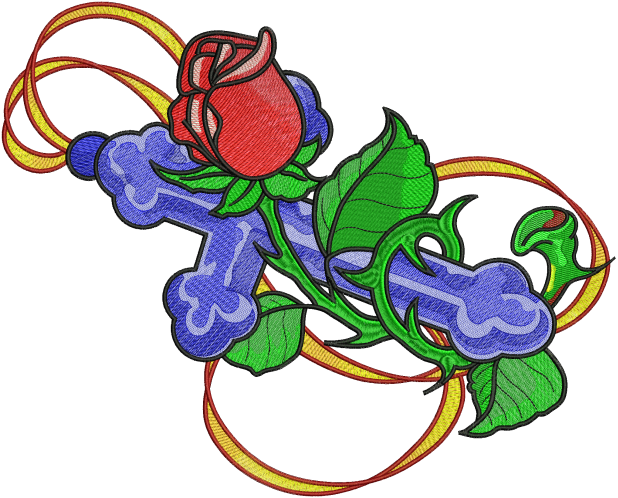
Just as good art is minimalistic and impressionistic in it's presentation, so is good embroidery.  The more colors you add, the more confusion you add to your embroidery.  Here is a good example.  When I create leaves, if there is room for 2 colors, I only use 2 colors .. but, I change the stitch direction on both sides of the leaf so I give it some direction and the light catches the thread at different angles creating the look and feel of more than just one or two colors.  Stitch direction, stitch length and how it reacts to the light can highly influence the look and feel of the design.  The second color of the leaf is used for highlights.  The second color is usually in the same color family of the leaf, just a bit lighter.  I use the same technique when it comes to flower petals, as well.

Look at the embroidery below.  Notice how gentle the secondary color is added.  Notice the stitch direction changes and the subtle highlights.  If you use the "less-is-more" philosophy, you can create beautiful embroidery very easily.  Many reds can be reduced to ONE or TWO reds, and the same goes for any design with a plethora of colors.

Hope you enjoyed reading this as much as I did writing it ..

Best regards,

Rick Macali / 407 509-2400

www.inhousedigitizing.com

www.embdesignsnow.com

Tattoo Flower Crucifix

Comments (4) -

This is an interesting take on colors.  I will be rethinking my view of designs.


I would look at this design and feel it might be a little too 'cartoony' for me, but after hearing your discussion, it makes more sense.


It isn't that someone only uses a few colors, it is how they apply and cause them to react that matters.


Pat


believe it or not, this was someone's tattoo .. the tattoo artist nailed it perfectly with his blending of just  a few colors, and I was commissioned to make this a jacket back for nylon jackets .. I think I did alright, if I say so myself!!  And, I can't believe Pat didn't mention the "Super Glue incident of 1975."  


Best regards,


Rick Macali / 407 509-2400


www.inhousedigitizng.com


www.embdesignsnow.com <-- coming soon


I'm late about reading you blog, but I do agree with the principle of less is more.  Often, we get so mired down in the detail of making sure ALL the colors are just right that we lose what we went for in the first place.  If we keep it simple with few colors, we wil oft time come out all the better for it.  


Stitches to you,


LaRue  (Jone)


Love your story, and will, hopefully, remember that less is more!


Please login to comment
What Makes Us Different – How We Assemble our Furniture

What Makes Us Different – How We Assemble our Furniture


Special Offer - For free shipping within the contiguous United States and Canada, click here to view these cabinets in our online store.

810 CabinetFurniture makers agree on this – spend the extra effort to do things right the first time and you won’t have to go back to fix or repair later.  Glued and doweled joints instead of staples or screws is an example.  A wood dowel joint is well suited to the panel products used in the sewing cabinet industry as it adds significant structural strength to our Sylvia Sewing Furniture cabinets.

Let me explain it like this: when two pieces of wood are crafted to be secured at their ends, the craftsman can choose to secure these joints in a number of ways.  One of the very best ways to do this is by glue and dowels.  We first drill a hole in the end of the wood.  Drilling provides a smooth hole that is just a smidge smaller than the diameter of the dowel to be used.  This ensures a tight fit for the dowel.  The dowel is a wooden pin that is also textured and it’s this texture that allows it to hold more of the glue needed to secure the seam.  The dowel then fits into the hole drilled in the wood.  Dowels used in the construction of Sylvia furniture are made from quality hardwood.
Dowels
Why does Sylvia glue?  Since ancient times, glue has been used to assemble furniture and it's not difficult to see glued pieces that are hundreds of years old.  When applying the glue to two porous surfaces and placing together, it creates a sealed, solid and secure bond.  When using a dowel as I described previously, you have the advantage of surface area and strength.  Basically, joints that will not fail. 

A significant advantage of using dowels as opposed to screws is that once the cabinet is assembled, the dowels are invisible at the end of the process. The end result is very clean and unblemished cabinet panels.   When done properly (as by Sylvia), a wood dowel joint also helps to ensure that the cabinet pieces are aligned in the correct position when assembled.

Staples can literally work loose and result in wobbly furniture.  Screws placed in the end of the wood such as particle board, movement of the furniture or cabinet will make cause movement in the screw holes making the screwed joint less secure.  Stripped holes and loose joints can be the result.  Because both of these methods are fast and cheap to use, these are found in furniture of lesser quality than Sylvia. 

We use modern CNC (Computer Numerical Control) technology to machine our cabinet parts, ensuring accuracy throughout the entire process and consistency over the long run.

At Sylvia, we’ve taken care to determine where stresses will be put on the cabinet during regular use. Using this information we’ve designed the cabinet parts to fit together in such a manner that once Sylvia Cabinets logothe cabinet is glued together it is remarkably solid and resistant to these stresses. This makes for a structurally sound cabinet that will hold up for many years.  As you can see, Sylvia is committed to quality construction for a quality product.

Until next time,
Horst


Special Offer - For free shipping within the contiguous United States and Canada, click here to view these cabinets in our online store.

Comments (4) -

I have purchased other furniture items that did not have the glue and dowel configuration and frankly, after a short time, drawers and doors don't close and soon you have a work area that doesn't work.


Thank you for the information!


Pat


gatortail32730 12/1/2008 11:44:35 AM

no model number for cabinet shown


Gatortail32730 - Good point. The cabinet shown is the 810 Sewing Cabinet, found at www.annthegran.com/Product.aspx?t=1&i=25630">www.annthegran.com/Product.aspx


Actually, the cabinet shown is the 810Q Sewing/Quilting cabinet found www.annthegran.com/Product.aspx?t=1&i=25624">here.  This cabinet is similiar to the 810 with the exception of the back leaf extension for support of the larger sewing/quilting projects.

Please login to comment