Quilting with Embroidery

AccuQuilt Rag Quilt

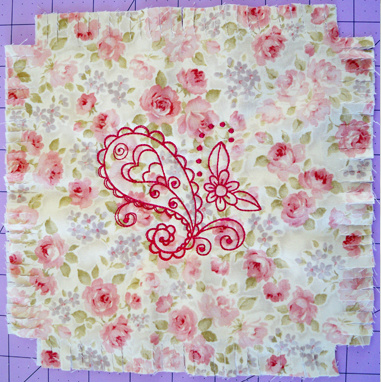
My eldest favorite daughter (I also have a youngest favorite daughter) decided she wanted to make a rag quilt. They are shabby chic, typically created with muted colors, fringed all around and stitched with ragged edges showing on one side. The more they are washed, the more comfortable they become.

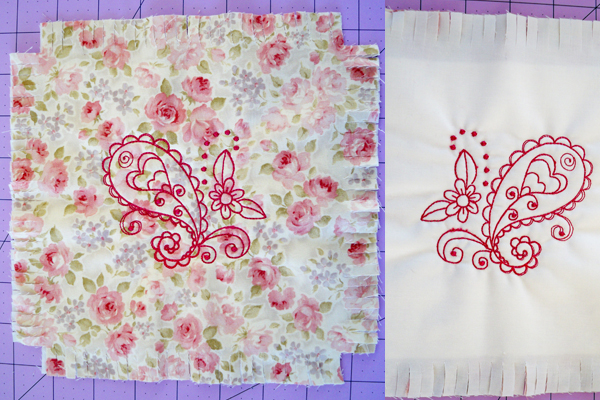
Rag quilts are assembled with a front and back square and a piece of batting in between. Typically blocks are quilted by stitching an "X" through the layers from corner to corner. Because one of the fabrics was a delicate paisley, we decided to use a paisley redwork design to "quilt" some of the blocks instead. (We used another fabric print here as a test stitch-out.)

For me, hooping layers for quilting is a challenge. It's nearly impossible to hoop two squares, with hundreds of fringed fingers, and batting together and keep everything aligned perfectly. So I created a quilting framework, using cut-away stabilizer, to hold the blocks.

Creating the Quilting Framework

The designs we chose were sized for a 4x4 hoop so, to have the opening large enough to accomodate embroidery, I created the quilting frame to fit a 5x7 hoop

Using eight-inch wide cut-away stabilizer, cut two pieces 16 inches long and two pieces 12 inches long. I could have used cut-away large enough for the 5x7 hoop but purposely used a smaller size. Two pieces are needed in each direction. Perpendicular arrangement of the stabilizer framework further reduces the chances of stretching.

Lay the 16-inch pieces horizontally, so it measures 16" wide by 12" tall. Apply temporary adhesive, or lapel stick, to the overlap areas to help keep them in place. I also used painter's tape to secure the pieces to my cutting mat while arranging them.

machine embroidery quilting

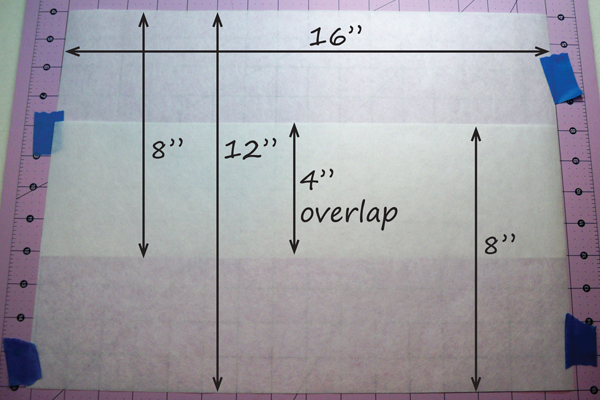
Lay the 12-inch pieces vertically on top of the 16-inch pieces, one inch from left and right so they overlap about 2 ¼”. Use adhesive spray or stick to help hold them in place.

machine embroidery quilting

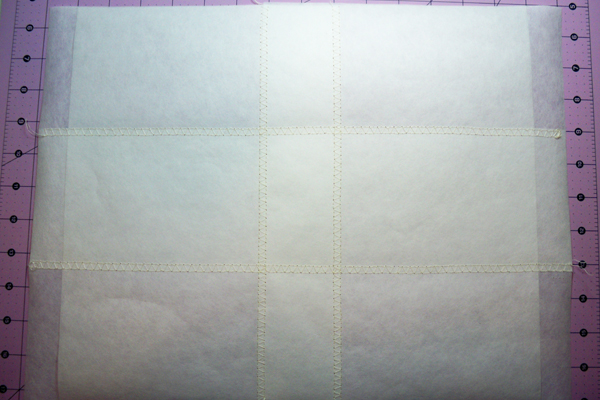
Use a flat seam utility stitch to secure each place where stabilizers overlap. The idea is to prevent any stretch in either direction so that, when the window is cut, it holds the layers for quilting in place without movement.

machine embroidery quilting hoop

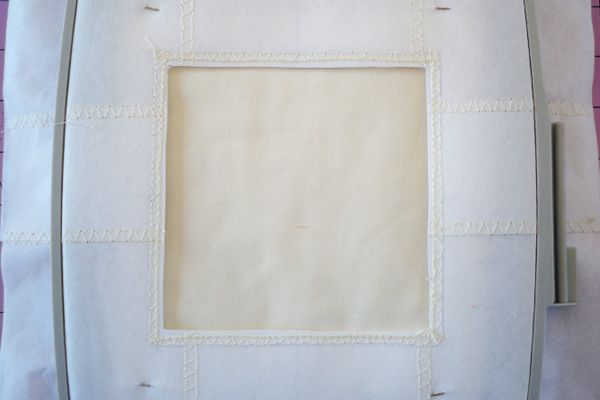
Hoop the reinforced cut-away in a 5x7 hoop.

machine embroidery quilting hoop

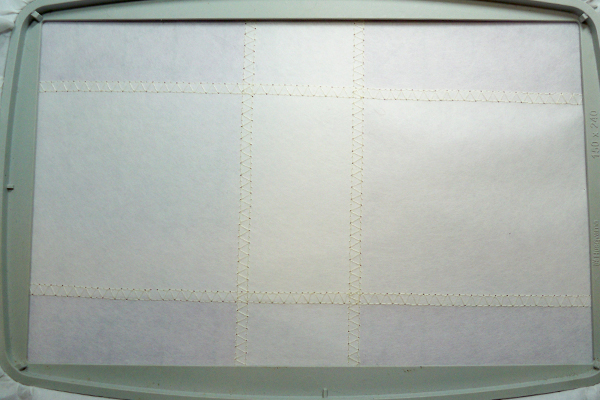
Use your hoop template to mark the center dot and crosshairs. Draw intersecting center lines.

machine embroidery quilting hoop

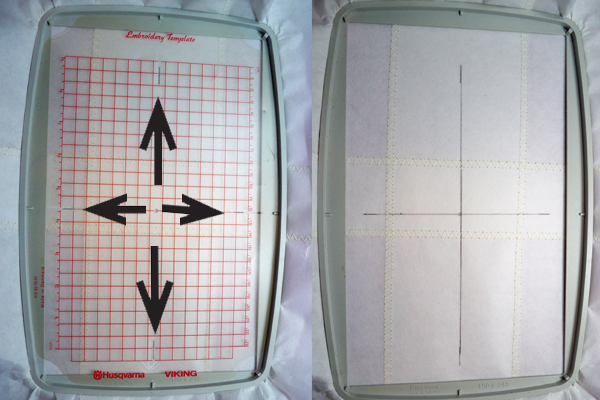
Measure a 4 ½” square from the center and another square 1/4" outside.

machine embroidery quilting hoop

Stitch the utility stitch in the area between the squares (see arrow), then stitch a triple stitch along the inside edge of the utility stitch to reinforce the window.

machine embroidery quilting frame

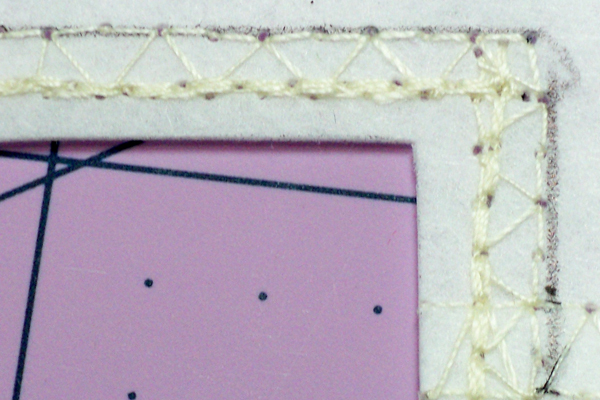
Cut along the inside line to create the window.

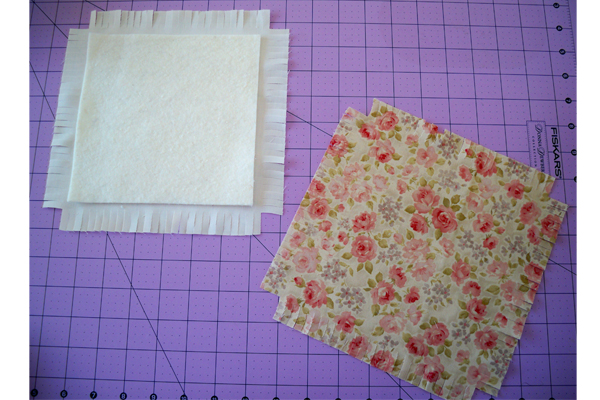
Lay a back square right side down. Spray a batting piece with temporary spray adhesive or basting spray on both sides. Finger-press it to the center of the back piece. Place the front square, right side up, on top of the batting, lining up edges. Finger-press to secure.

accuquilt rag quilt block

Center the quilt block in the hoop. Pin four corners and sides to the stabilizer quilting frame. Curved safety pins work well and don’t need latched.

machine embroidery hoop quilting accuquilt rag quilt

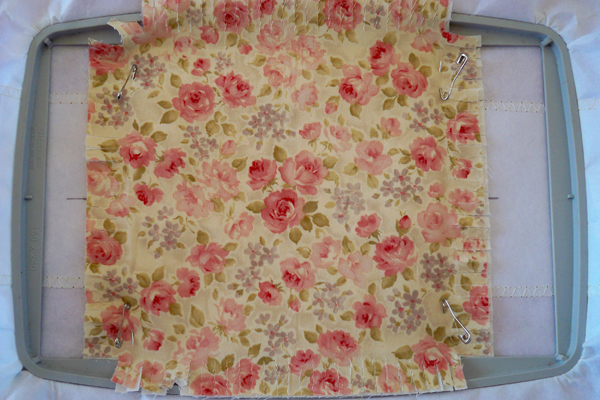
The back window allows designs to be stitched through both layers of fabric and batting.

accuquilt rag quilt machine embroidery

The Designs

Designs were created for a 4x4 hoop but will be stitched in a 5x7 hoop. Depending on your software, you need to either save the designs for a 5x7 hoop or change the hoop size in your machine options screen. Otherwise, your machine will tell you the hoop is not correct.

The designs stitch out beautifully and are much more attractive, on the front and back, than the standard "X" in the middle.

Quilting AccuQuilt rag quilt blocks in the hoop

Un-pin the block but leave the quilting framework in the hoop. Pin the next block and continue stitching.

You may need to re-hoop the stabilizer framework if it starts to sag. It's relatively easy as the hoop marks are already in the heavy cut-away stabilizer. Just be sure the crosshairs are aligned with the centering marks in the hoop so the embroidery stitches centered in the square.

More details and photos later as this project develops!

Debbie SewBlest


Comments (2) -

SUPER BLOG!  I don't do quilting but this is really great!


Pat, The Avid Embroiderer


Thanks, Pat!


That's quilting the easy way, anybody can do it!


Please login to comment
Polka-dots, Stipple Blocks and Creativity, Oh my! Part 2

Polka-dots, Stipple Blocks and Creativity, Oh my! Part 2

We are excited to have Eileen Roche, Editor of Designs in Machine Embroidery share this content with you, which was originally posted on Eileen’s Machine Embroidery Blog : 

If you missed Part 1, click here.

I was making excellent progress this afternoon—stitching block after block.  I have quite an assembly line going!  Then I heard the dreaded Low Bobbin Warning beep with the accompanying sad face on the machine.  I always appreciate that the machine feels my pain.  Maybe it’s also a signal it’s time for chocolate.

Denise’s Must-Haves

Pre-wound Bobbins are the greatest invention since sliced bread!  They are the no-muss, no-fuss way of making sure you keep stitching!  When you hear that dreaded Low Bobbin Warning—you don’t have to worry about stopping to wind a new bobbin.  Just be sure you purchase the right type for your machine.  Consult your favorite local dealer for advice or open up the manual that came with your machine!

Or you can take the Always-Prepared-For-Every-Emergency-Approach and before you begin stitching wind a bunch of bobbins so you’re ready.  Either way works—you’ll be glad you have them handy.

As I mentioned in Part 1 of this blog—I like to focus on one or two blocks and make as many variations as possible changing fabric, thread colors, etc.  I decided to use 5 Flower 5_small for my quilt.  I hooped a quilt sandwich using Snap-Hoop Monster and stitched a series of blocks.  Like snowflakes, I decided no two blocks would be alike.

To add variety I layered the applique fabrics in a different order and sometimes I got daring and skipped some applique steps and just stitched the outlines.  I kept my assembly-line process—and continued to stitch block after block without trimming away the applique.  This was a good idea and also a learning experience.  The finished blocks wouldn’t be unveiled until I trimmed them—talk about a fabricated surprise!

Using Snap-Hoop Monster makes it easy to lift the frame and slide the fabric to make room for the next block.  Love that!

I ignored that voice in my head that cautioned against layering light colored fabrics on top of black fabric.  I ignored that voice in my head that warned against using light colored thread on light fabrics.  After all, my goal was to be a free-spirit and create however I wanted.  I stand by that goal of creating and experimenting to see firsthand if something works… or not.  Who’s to say it does or doesn’t work but you, the designer?  Besides, it’s a valuable learning experience….

Denise’s Tip #1

Go ahead and experiment with colors, layering different applique fabric, working with busy prints, etc.  Make a note of what works and what doesn’t so that you can improve next time.

Learning Experience Block 1

I admit it was laziness that inspired me to not change thread colors.  I started out with white thread and figured I could stitch the entire block with white thread.  But if I had changed the thread to black when stitching the polka dot and the white fabric, the block would have been more attractive because the detailed stitching would have ‘popped’ more rather than blend in.  Sometimes, you do want everything to blend in… so there’s no hard fast rule.

Learning Experience Block 2

Light colored fabrics can be placed on dark fabrics.  You just have to place a second layer of light fabric underneath.  Notice how the black fabric affects the vibrancy of the orange polka dot fabric in Block 1 above.  For Block 2 below I used two layers of white fabric on top of the black.

More Experimentation!

After stitching a set of blocks using white and black solid fabric as a background I decided to experiment by using the orange polka dot fabric as the background.

Denise’s Tip #2

Remember to hoop the base fabric straight when working with printed fabrics.  If this is a challenge—then you’re not using Snap-Hoop Monster!  Snap-Hoop products have a flat top and bottom frame making it simple to adjust the fabric by giving it a tug.

Time to Play

I enjoy Stipple collections not only because they produce results quickly and flawlessly but I get to play!  I love stacking my quilt blocks then arranging them—and rearranging them and …  you get the idea.  There are countless ways to lay out the quilt blocks—go ahead and set aside some time to play!

It’s also a fun to get others involved in the creative process.  I asked Editor, Eileen Roche to rearrange the blocks.  I like what she’s come up with!

Looks like I’ll have a tough choice deciding layout.  Plus I’ll need to come up with some extra blocks to fill in!

Thanks for reading!

Reprinted with permission from Eileen's Blog.

Please login to comment