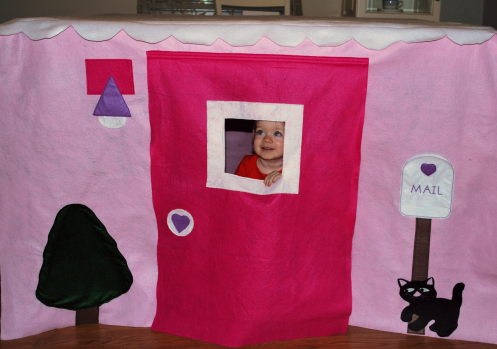
Finished! And with a little time to spare. We decided to just button down the sides instead of sewing them. It will make removing it from the table and folding it up for storage a little easier. Kate got to see it during the final fitting since she is doesn't talk much and is too young to remember. She loved it and was not happy when we took it back off the table. Here is the front of the finished house:
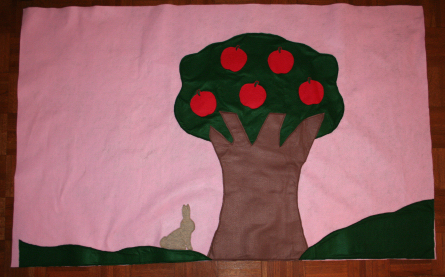
Here is the back wall before I trimmed it up and sewed it on:
If you missed the side walls you can see them here in part 1.
What you need for the front and back walls:
Heat and Bond Ultra
Embroidery thread
Bobbin thread
Sewing thread
Felt from the bolt
1. Light pink for the Walls: Measure the table sides and from the very top to the bottom Add 2 inches to the height and width for double seams for the four walls (ours was 56"X 56" X36" tall- yes, she has one of those bar stool style tall ones - so my pieces were 58"wide X 38" tall for each of the four walls.)
2. Green and brown for the tree and bush: Decide how much of the wall should be taken up by these and draw them freehand. (I just looked at a clip art picture and drew mine.)
3. Dark pink for the door: Take your front measurement and subtract 4 inches. Divide that number by three for the door width. For the height I just subtracted 4 inches.
4. Various colors for the elements (red, white, gray, green, black): We used red felt squares for the apples, some scraps from the other pieces and projects for the rest.
5. A big piece of white for the roof. Measure the table top and add 6 inches to each side if you are making a scalloped edge.
You can download the outline designs for part 2 here.
What you do:
1. Cut the Tree out. Cut strips of Heat and Bond Ultra and iron them on. Let cool and remove paper.
2. Pin the tree top in place and iron on. Sew around the edge. Repeat for the trunk.
3. Embroider a bunch of the apples: Hoop felt squares (I did not use any stabilizer on these.) Embroider the apples Remove from the hoop and cut around the apples.
4. Trace the apples on Heat and Bond Ultra. Cut out and iron on. Let cool and remove the paper. Position the apples on the tree and iron per the Heat and Bond Ultra instructions.
5. Use leftover felt to create grass at the bottom if desired. Adhere using strips of Heat and Bond Ultra and sew around the edges.
6. Embroider the bunny. Cut around the stitches.
7. Trace the bunny on the Heat and Bond. Cut out and iron on. Let cool and remove the paper. Position the bunny and iron per the Heat and Bond Ultra instructions.
8. Cut the bush out. Cut strips of Heat and Bond Ultra and iron them on. Let cool and remove paper.
9. Pin the bush top in place and iron on. Sew around the edge. Repeat for the trunk.
10. Embroider the light. Cut around the stitches. (I decided it was a little small so I cut a rectangle out of a scrap and added it behind the light to make it larger.)
11. Trace on Heat and Bond Ultra. Cut out and iron on. Let cool and remove paper. Position the light pieces and iron per the Heat and Bond Ultra instruction.
12. Cut a strip from brown felt to make the mailbox post. Trace on Heat and Bond Ultra. Cut out and iron on. Let cool and remove the paper. Position the post and iron per the Heat and Bond Ultra instructions
13. Embroider the mailbox. (I embroidered the outline twice and the words and heart only once.) Cut around the stitches.
14. Trace the one without the words on the Heat and Bond. Cut out and iron on. Let cool and remove the paper. Position and iron per the Heat and Bond Ultra instructions.
15. Pin the front mailbox piece on top and sew around the sides and bottom creating a pocket for mail.
16. Embroider the door handle. Cut around the stitches.
17. Trace the handle on the Heat and Bond. Cut out and iron on. Let cool and remove the paper. Position handle on the door and iron per the Heat and Bond Ultra instructions.
18. Cut a square of white for the window. Cut out the center creating a window frame for the door. Cut strips of Heat and Bond Ultra and iron on. Let cool and remove the paper.Position the window on the door and iron on. Carefully cut the felt out of the window frame creating a window.
19. Position the door. Sew across the top at least three times to secure. Mark 2" in on each side of the underneath felt and cut out the felt underneath to create the door opening.
20. Mark and cut scallops on the roof piece making sure you do not cut in more than 2 1/2". (I just used a small plate for this.)
21. Mark the sewing line on the inside top of each wall. Mark the roof inside all the way around. Lay the roof out flat on the floor with the inside facing up. Pin a wall face down matching sewing lines. Roll up and secure the rolls like you would a large quilt. Sew along the line leaving the inch at the overlapped corners open. (If you are making one this large sew again about 1/8" from the first seam for extra strength.) Repeat for each wall.
22. Secure the sides. If you are making a smaller card table size playhouse you might just sew down the sides. Ours was so big that we just put a couple of buttons and button hole on each side to make it easier to put on and take off.
Note: The kitten on the front came from an appliqué quilt pattern so I cannot share it. Here is a set of twenty free ones you could choose from.
Well, Christmas has come and gone and the girls are having a great time in their new playhouse.
If you have boys make a gargage or a stable or an army fort. I may make the stable (not in such a big size) for my house since the playhouse was such a hit.
I hope you had a great holiday and wish you a blessed new year in 2012.
Take care,
DB