August 28, 2009
db1921
Not rated yet
This was not the original project that I planned for this week but was inspired out of necessity. I am forever trying to do more than one thing at a time and this morning was no exception. I was going along answering emails, downloading some items that I needed and eating breakfast all at the same time - then my yogurt went and dumped itself all over my mouse pad. Yuck! Because of the protective surface on my desk I cannot work without one. So, after cleaning up the mess, I went downstairs to the desk in the family room and pulled out a couple more. They had certainly seen better days. My first thought was I better put a new mouse pad on the shopping list but then I wondered and here is what that wonder produced. I can think of at least 3 more people who might like one of these.
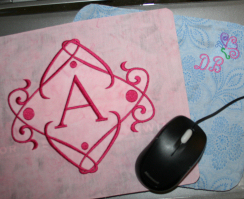
The first one I did for my own desk. Then I did one for Andrea. Here is how they came out.

The little butterfly is from the Starbird Springtime Swirls collection and you can use any lettering software or alphabet you like. The fancy framed A was made in Pacesetter BES Lettering software.
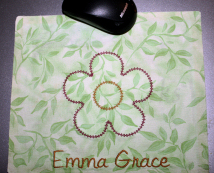
I had one more that looked pretty awful so how could I resist redoing it since I was already in the mood. Here is what I did.
You will need:
- One mouse pad
- Embroider design of your choice (Here's the link to download the flower design I used below)
- Tear-away Stabilizer
- Embroidery thread
- Rectangle of fabric larger than your mouse pad
- Fabric glue
- Fray check, if using fabric that easily frays
- Rotary cutter, ruler, cutting mat and scissors (Scissors only should work but wait for the glue to dry well)
Steps:
- Hoop the stabilizer and fabric making sure to place the area of your embroidery in the hoop center if embroidering an edge or a corner.
- Embroider the design. Trim jumps and remove the stabilizer.
- Cover the top of your mouse pad with a thin coat of fabric glue (Finger painting is allowed here and works best for smearing it all over evenly or it takes forever to dry).
- Place the wrong side of the fabric over the mouse pad with design positioned as desired. Press in place and smooth out any wrinkles.
- Turn embroidered side down on a cutting mat. Align the ruler along the edge of the mouse pad and cut the fabric even with edge. Repeat for all four sides.
- With scissors (or a tiny rotary cutter) cut rounded corners even with the pad.
- Add fray check to the edges if desired.

Done -a revived mouse pad and a fun gift that they surely do not already have. Now if I can find another I will have Emma do a fishing one for her Dad's Birthday next week. It might also be a great way to use a larger test sew if you have one lying around.
Have fun and if you get the chance show off what you make in the gallery and tell us here so we can all see it. Have a great week.
DB