Metallic Thread, 2/13/09

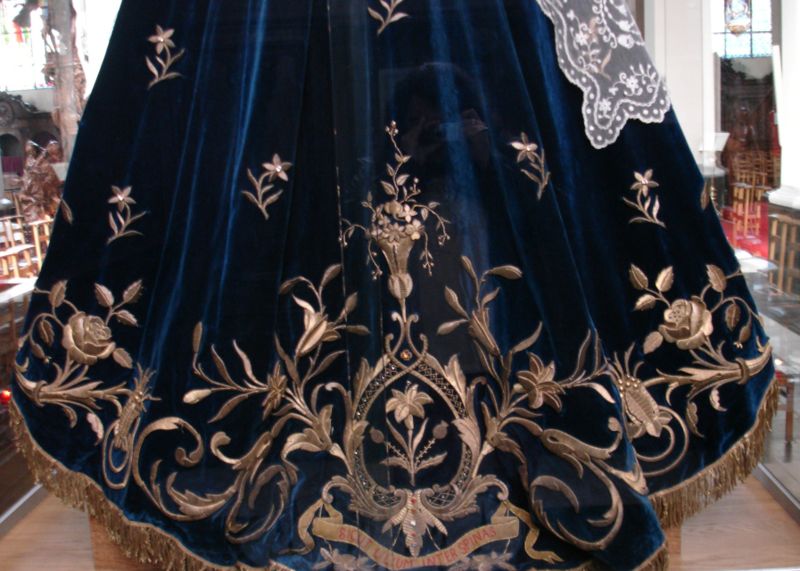
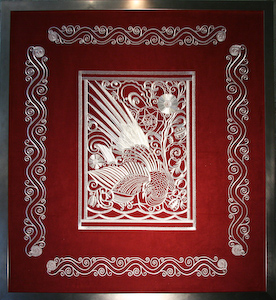
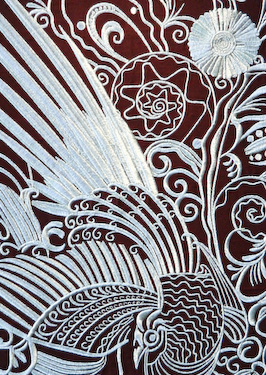
Some embroidery items are more breathtaking than others.  I don’t remember where or when I got this photo, and with apologies to the owner of this photo, I present to you a little something you can whip out in a few hours.

This might be a wonderful sumptuous table topper; whatever it is, it has a grandeur all its own.  The second photo is Courtesy of Robert Young, and has an amazing 281,000 metallic stitches.  It certainly is one impressive piece of artwork.


This blog will not be a comprehensive metallic thread discussion because I have not been able to try so many of the metallics on the market.  In addition, new thread comes out so often that it is difficult to keep up with them.  I am only going to discuss some of my observations, readings and personal experiences.

I think that there are several things in the metallic world that we might agree upon.  Some of them are:

  • Always use a new metallic needle.  These needles are made specifically for metallic thread and have a larger eye than standard needles.  Some might have a coating and/or a shaft to help move the thread.  They are a little more expensive than embroidery needles, but well worth the few extra cents.
  • I usually only use metallics in very small amounts such as an accent color in a pattern.  For instance, I did a Minnie Mouse once and used the metallic on just her hair bow.  That probably did not use up more than 3 yards of thread, making it less problematic.
  • I normally will watch the thread very carefully as it comes off the spool.  In my current project, I had the gold thread nesting under the fabric.  It was spinning wildly and that told me there was a problem I could not see on top of the design.  Underneath was a big mess and I had to carefully remove the nested threads and restart, not a fun thing to do.
  • Slow down your machine’s speed.  I did my metallic part of the design at 350 stitches per minute (spm) which was really slow!  But, when the metallic was done, I returned to the sewing speed of 800 spm.  It changed the overall time for the design from 25 minutes to about 35 minutes and I can live with that.
  • Avoid designs that are really dense or have over lapping stitches.  Any friction can be a problem for the metallic thread.  If there are very small stitches, that could be detrimental to your project as well.  Some designs may be marked for metallic thread in the color chart and that indicates that the digitizer made adjustments for any areas that include metallic thread.
  • Make sure you have enough time to do this particular feature in your embroidery.  If you are under a deadline, it is probably not the time to experiment with metallics.  You need time to work with it and patience to get to the end of your project.

I have read so many other bits of information but these don’t make a great deal of sense to me personally.  I don’t mean to say they are wrong, but I have given my reason for discarding them as viable rules for metallics:

  • Watch your tension.  Many ME’ers feel that the tension should be reduced.  When I had the nesting problems, I actually had to increase the tension for better results.  You need to test your machine, thread and design to see what will work best.  Don’t assume that any of the rules are carved in granite.
  • Freeze the thread.  This one has confused me from the first moment I read it.  How would freezing metal help?  It seems to me that freezing it, even for a short time, would cause the thread to be less flexible and possibly brittle.  If this one works for you, great.  I personally think it is illogical.
  • Another idea that I have heard was to run the thread through a ‘packing peanut.’  That one was curious to me because it had no rationale as to why the peanut would help.  Perhaps there is some logic there, but I am unable to see it.  If you try this, let us all know about the outcome. 
  • Use a special thread stand.  I have a theory about thread stands – if the engineers who designed this fantastic machine thought it needed a stand, it would have placed a little stick of plastic in the box.  How expensive could that stick be??  They would have had a place to put that stick on the machine, possibly on the side not too near the wheel.  The engineers did not do that, and they went to school for a long time to be called engineers.  Do I have a thread stand?  Yes, the store convinced me that I needed it and so I paid my money.  I use it now for a paper weight for my notes I have near my machine, so, yes, I do use it.
  • Put the thread in a container behind the machine.  Huh?  See previous information.

The bottom line is, use it if you feel it has value.  This information is just my humble opinion.  I may be wrong, I remember being wrong once before (rolling on floor, laughing to the point of tears). 

I did find a few interesting things during my project.  These made sense to me and I have explained why they seemed prudent:

  • I used water soluble stabilizer (wss) for the backing.  I did this because cut-away stabilizers are too structured and rigid.  I feel tear away stabilizers did not have enough stability for the metallic thread.  I did feel that the wss has ‘give’ with stability.  I did not wash it, but I did cut most of it away.  I felt it has the best of both worlds.  As you may be aware, I do use Badgemaster most of the time.
  • My fabric was soft rayon and I felt that its properties were very right for metallic thread.  I prefer soft and natural varieties of fibers for all my projects.  An unyielding fabric may present problems that rayon does not.  However, when time permits, I will be trying to work with other fabrics and metallics to see the issues and results.  As previously noted, I don’t think any rule is carved in stone.  Give other fibers a try and let me know about how it goes for you.
  • I did reduce my percentage of stitches by 5%.  I felt that would not interfere with the density and avoid any stitches that were too close or stitched from the same spot.  Since my very first two colors were metallic, I was able to stop sewing after the metallic, cancel the design, reset the design (putting it back to 100%) and go to thread color number 3. 
  • I have been experimenting with some metallics and have found some to be badly lacking in quality, sheen or usability.  I did use Coats and Clark in the copper color and Sulky in the gold color.  I found both of them to have a real metallic quality, excellent sheen and very easy to work with.  One thing that I liked about them was that they were both were much like a strand of colored aluminum which is how I feel metallics should be.  Some metallics are fabric with some metal thrown into the mix and those just don’t deliver in my opinion.
  • Did I have breakage with both threads?  Yes, I did.  But I did make this observation and test:  The copper (first thread) worked smoothly for the first 1,300 stitches.  The distance was approximately 5,000 stitches, and after that first success, the thread started breaking about every 600, or less, stitches.  The same thing happened with the gold (second thread).  There were about 2,100 stitches and the first about 1,000 stitches were just fine.  Well, I got to thinking about that and saw a possible hint in those numbers.  I considered that the top most thread on the spools was uncompressed by a layer above them.  I took the gold thread and spread a line of it across my room twice.  I let it relax for about 30 minutes.  I gently rewound the spool and when I went to sew with it – success, no more breaks.

Do I think I found the best method to keep metallics from breaking?  I don’t know.  I do know it seemed to be reasonable to let it rest.  Please let me know if you try this and your own outcome.  This may just be another method in the arsenal of tips for machine embroidery.

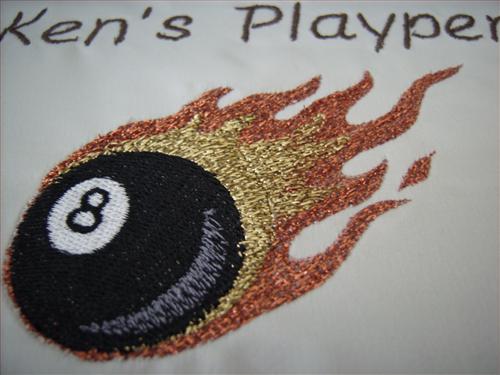
Here is my humble piece of metallic.  There were over 7,000 stitches for the metallic thread and I am pleased with the outcome.

Comments (16) -

Lots of great advice, Pat. Metallics can be a beast. About the packing peanut, that's to keep the thread from tangling or kinking. And my machine does have a plastic stick that fits over the bobbin winder for when I want the tread to spool off horizontally rather than vertically. Can't say I've used it, but it did come with the machine,


I had to wonder about that packing peanut.  I just did not understand what the benefit might be.  


Keeping metallic thread from tangling or kinking can be a full time job!  Thanks for the input!


Pat


pppp


I agree, Engineers do go to Engineering school, but when they put our wonderful machines together, they are not about to worry what thread we will use - I use a stand (and my machine does have a "stick" for vertical thread) for metallic thread and I have no problem, I will admit I do use good quality, I agree with  you that you need to find a metallic thread which does not have a core.


I have always used "Yenmet"  metallic thread.  I have always kept my metallic thread in a sealed plastic bag.  I use the metallic needle.  Both thread and needle are expensive.  But at Christmas I did "The Infant of Prague" total number of metallic stitches in this design by Zundt was 24,475 stitches without one breakage in thread.  I sew at the lowest speed.  I had tried many metallics over the years, but now I only use Yenmet.  Hope this helps.  Ede


I have 2 of the new "luxury" machines I won't give the brands here. With one I was having trouble with thread breakage of all brands and types of thread, it has now been fixed with a free upgrade. The other, very little. My observations were that if the thread is let to spool off the end horizontally it "winds itself  up" and breaks.  I have found a little gadget on another embroidery website which my dealer is now importing to Australia.


I have not mentioned the name of the website here unless I get permission from Ann to do so.


Fayette


quiltembwrite 2/15/2009 4:59:54 AM

Hello Pat


I have discovered a metallic thread that I buy here in the UK.


It is a Japenese metallic thread called King Star Metallic.


It is amazing, you use embroidery needles and it is recommended you put it on a stand behind the machine.


you get 1000 metres and larger, I have used it  on lots


of projects and it has never snapped, it is quite expensive.


If you go to        www.lordsewing.co.uk


you will be able to see why I love it so much.


Shirley.  ( quiltembwrite)


What great input!  I can see that many of you have conquered the thread breakage issue and I am so pleased that you took the time to share your information.  


My blogs are my experiences, and I know there must be other excellent ways to work with metallic thread.


This illustrates exactly what I appreciate about this site, we can disagree and share so that everyone wins!  


Thanks again, and if you want to show us some gadgets and/or threads, we are always open to different ideas, sites and suggestions.  If a product is really good, ATG will place it on this site for everyone to purchase and use.


Pat


I am a mechanical engineer and I still can't work out why my machine snaps threads sometimes but I think the thread stand helps because it holds the thread up higher and it is less likely to get caught up in the tension wheel.  Engineers don't always make the right decisions.  The horizontal pin may work for standard threads but when you use different brands or metallics, the machine may work better with a thread stand.  In the end, the engineer's decision isn't only based on what works best, but also what is cheaper, more aestheticly pleasing, etc.  A lot of factors go into a design decision and unfortunatley what works best doesn't always win out when there is a budget and marketing group to disagree.


notagrannieyet 2/15/2009 7:46:29 PM

Hi, I did my first metallic embroidery this past week and it was a mess.  I am new at machine embroidery so I am not disappointed.  I truely enjoyed everything everyone has said regarding metallic embroidery.  I will put the suggestions to use and try again.  I wonder which metallic brand Ann the Gran sells?  


Thank you so much for sharing.  I have been using metallic threads almost exclusively since I started embroidering.  For the most part (on satin and silk fabrics) I never use any stabilizer at all.  The key I have found is to reduce the density of my designs, always use a metallic embroidery needle, and slow down the speed at least by half.  I also use pre-wound bobbins as I find the thread is finer.  The only time I wind a bobbin with metallic thread is, of course, if both sides show.


If I use a stabilizer, I only use a water soluble one.  My thread almost never breaks and I never get the bird's nest in back.


I have a thread rack mounted on the back of my machine and, since the spool is upright, it feeds very well.  I usually put the spool on the last left-hand stick, loop it through the loop right above it, send it to the next loop (or even a couple down) and only then feed it through my machine.  This works very well for me.


Even so, I never walk very far away from my machine, just in case the thread starts to twist back on itself.  If it keeps doing it, I turn the spool upside down and the twisting back usually stops.


I'm a bit slow about getting to your blog this time.  I love that you talked about metalics.  So far, I haven't used metalics at all. I have found that the beauty and luster of light grey thread for silver and several gold threads that I use have used (all polyester) satisfy my desire for metalic look so far.  I may find a design that I feel really requires the metalic I have thus far talked myself out of using.


Stitches . .


LaRue


Thanks from the engineer!  I had not thought about costs from that perspective.  


Turning the spool upside down is a great idea because I have noticed that sometimes the thread starts to twist and upside down will reverse the problem.


I love learning from all of you.


Pat


karenwalltrott 2/17/2009 8:26:06 PM

I too have experimented with metalics.  Metalic needles are a must.  I let my thread "relax" by using a thread stand quite a distance from my machine, running the thread through as many thread hooks as possible.  This give the thread some distance to relax and not kink so much.   I find thread stands wonderful and they work better for me than the engineered holder on the machine.  I have 2 and will run the metalic thread through all the little hooks on each one.


My actual thread may be as far as 2 feet away from my machine.


I make certain that I have lubricated my needles.   I use Sewer's Aid by Prym-Dritz.  I love this product and use iy all the time.  You can put some on your finger then rub it on the needle.  It helps the thread run through the needle with less friction.


I father was an engineer and common sense on how something was actually used, was not  always his strong suit.


I mean no insult to Engineers.  


Brother has a set of metalics that I have found to be superior to any of the others I have used.  I am always trying new metalics hoping to find some to make life easier and the Brother metalics are the best I've found.


Hope this helps a bit


Karen Trott


I also use Sewer's Aid, and forgot to mention that in the blog.  


If you don't have some of that, you can run your fingers through your hair and if you have a small amount of oil, you can use that for needles to be more smooth as well.  I remember my grandmother telling me that - it has worked for at least 80 years in my family!


Pat


Hi Pat


Good advice about using metallic thread - it can be a beast & I think you hit the nail on the head with your discovery that the thread needs to "relax".  The strangest advice that I ever received for using metallic thread was to put the spool in a coffee cup beside the machine and thread it through from there.  Strange, but it worked - perhaps because it helped the thread relax as it worked its way up to the machine?  I love Karen's post but had to smile when I pictured metallic thread winding it's way through two feet of thread stands and space in my tiny sewing closet.  Great tips from everyone!  Thank you.


Please login to comment