Embroidered Greetings Cards

Our international trend continues this week with a project from Jean Isley in England. Growing up du [More]

Christmas Tree Skirt from Table Runners

To take a simple or plain idea and mold it into something personal and unique is always rewarding. Michelle Gauthier created a special Christmas tree skirt to become a focal point for holiday cheer in her home. Without spending a lot she gave of her time and love to bring special smiles to those aro... [More]

Simple Baby Quilt for Cold Northern Winters

Creating keepsakes for loved ones is such a joy for those who love to sew. With her simple blankets, Sue Kerlin shows us how she continues her love of giving to family even when life is too full for intricate details.Sue's Description:I picked this pattern of baby quilt because I am not a detail... [More]

A Little Treasure - Should I Or Shouldn't I?

  Hi, Folks,I'm in a bit of a quandary. When I set up this blog, I made it clear to the team here who help me get this to you that I really wanted the blog to focus on projects contributed by the AnnTheGran community. So far, you've all been great with that, and we've seen some gr... [More]

The Perfect Gift - Embroidered Wine Bottle Bags

Tuck a bottle of their favorite beverage inside a festive wrap - no wrapping paper required. Trisch Rosema's embroidered gifts of wine got rave reviews even though they were quick and easy. What a lovely hostess gift one of these custom wine bags would make! Or you could do as Trisch did and mak... [More]

Race Car Themed Quilt for "Big Boy Bed"

Every child's first birthday is exciting and every mother wants to create great memories of the event. This race car themed quilt was created by Gina Martinez to complete her son's graduation to a "Big Boy Bed" and give him a special birthday memory to cherish for years to come.Gen... [More]

Blown Away By Baby Blankets

This project was submitted by Kim Yunkun. I chose to post this one because it is simple but beautiful and any level of embroiderer can do it. Not everyone is an expert, but everyone can share the sense of pride that we all feel when we've accomplished something. Sometimes, when we've been do... [More]

Share Your Creations with our Community!

Our creations are like our babies! The amount of time and care we expend on a cherished project makes those products of our hands and our hearts feel pretty special.You are currently resting your eyes on my new blog. If you don't know what a blog is, don't worry about it. Neither did I until... [More]

Quick Project - Blackwork Placemats

We wanted to create a design collection that you could use to add some classic style to your project whether you are embroidering evening accessories, elegant linens or an heirloom piece. My Blackwork collection is a versatile set of ornamental designs, professionally digitized for beautiful results... [More]
Piggyback Hooping

Piggyback Hooping

     Individual characters (letters, numbers and punctuation marks) from my alphabets can
be found on my Stock Design Page.  My designs are also available in packs, as described in
this blog.  Those can be found here.  For designs and packs available in multiple sizes,
choose the size you want in the drop down menu box.

     Machine embroidery is an expensive craft.  We have to buy our embroidery
machines, then designs and/or software for creating and adapting designs, special threads,
and finally stabilizers.  It is difficult to reduce expenses on most of these necessities and still
get good results, but I’ve figured out a way to economize on stabilizer.  I would like to share
this technique with you, and have written a lesson (see below) for this purpose.

     I named my technique Piggyback Hooping because one design rides right behind another. 
The technique—in which multiple designs are stitched in a single hooping—not only uses
the hooped stabilizer more completely, but reduces the number of times we must hoop in
order to stitch the same number of designs.  Moreover, the amount of stabilizer that sits
outside the hoop is not wasted multiple times as it would be if we hooped each design
separately.

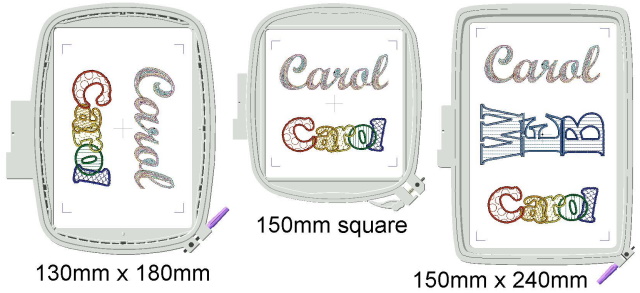
     The figure below shows examples of some common hoop sizes.  Note that two or more
designs can fit in the hoop, depending on the size of the hoop and the sizes of the designs. 
For the Piggyback Hooping lesson I used the 150mm x 240mm hoop and the three designs
you see pictured in it.  However, you can easily adapt my instructions to any size of hoop.


     To decide if my technique will help you, here are some things to consider when you set out
to embroider.  First, each design must use only a small portion of the available hoop area. 
This is just a matter of real estate!  If one design nearly fills the hoop, there will be not
enough room for another design.

     Second, the fabric must be open and easy to maneuver in the hoop.  It is easier to sew
designs on two pieces of fabric for tote bags than it is to hoop two tote bags.  I would not
suggest Piggyback Hooping for embroidery on winter coats, quilts, or other bulky items.

     The hoop would not be able to support the weight of all that fabric and it would be very
hard to position the second design.  You will need to move the excess fabric aside after
em-broidering a design, in order to make room for the next piece of fabric.

     Finally, the same type and weight of stabilizer must be appropriate for all the designs and
fabrics.  Tearaway, cutaway and washaway stabilizers work best for different types of
embroideries and fabrics, as we sometimes learn the hard way.  There is no economy if our
designs stitch out poorly.
   
     The embroideries you will see in the lesson are for my Zip-Around Eyeglass Cases.  (I plan
to tell you more about those in a future blog—please stay tuned!)  However, the Piggyback
Hooping technique is just as useful for many other small designs and projects.  For
example, the pillowcases and the double pockets projects I shared in the past are suitable for
small embroidery designs; I’m sure you’ll think of many other projects, too.  In fact, with all
the money you save on stabilizer, you’ll be able to acquire more of my alphabets! Smile

     You will need the following items:

  • Embroidery thread.
  • Embroidery designs such as my Fancy Jumbles, Pinstripes, and Contour Script alphabets.
  • Stabilizer
  • Fade-away or Wash-away marking pen or tailor’s chalk (for marking right side of fabric).
  • Fabrics required for projects.
  • Flexible plastic ruler with 1/8” grid (available at office supply stores).
  • Finally, you can download the complete instructions here.


— Carol


Comments (16) -

This is such a good idea, Carol. I think I'm going to make up a bunch of bookmarks this way.


I am new to this embroidering, but as I cut away stabelizer from finished embroidery I felt that I should be able to use more of it in the hoop.


What I have done is place two of leftovers together and sew them on my regular machine, then hoop them.  this does use larger pieces.and works fine.


It looks like I would save more by using a larger hoop and doing more than one embroidery in it at a time  Northwnd


serenemachine2 11/1/2008 3:09:46 PM

I have found that this method works really well doing the sucker covers and other FSL designs.  I will keep this!


measurecutsew 11/1/2008 3:22:56 PM

I can't download the instuctions by clicking on "here".


that is a great idea. I have done several fsl bookmarks with this method. Sometimes, tho, you have to keep an eye on things, because the stabelizers will tear and therefor the registration will be off.


As you said, make sure the stabelizer will hold up to the projects you do.


great idea


cme   8^)


Years ago I bought a box of waxed paper squares.  I hoop the waxed paper square and then use adhesive to attach the small amount of stabilizer needed for the project.  I then use adhesive again to attach what I am working on.  This works great when you are not doing mutliple projects and cannot use the piggyback method and saves alot of $$$$ on stabilizer.  It took me three years to use a big roll.


Ann and CME, bookmarks should be very easy to piggyback since there isn't even a lot of excess fabric to worry about.  FSL types wouldn't have any fabric and even fabric ones would be fairly compact.


CME, you are right that some stabilizers might tear from the weight of multiple projects.  I mostly use cutaway types so don't have a problem.  I haven't tried FSL projects so don't know how the stabilizers for those would perform.


Shutterbug, I have joined pieces of stabilizer, too.  When I cut a project out, I don't cut from the edge of the stabilizer, but start the cut next to the design and just cut away the rectangle.


On occasion I trimmed the rectangle a little bigger and zigzagged a new piece of stabilizer into the window.  I cut the patch big enough to allow some overlap but keep the overlap away from where the stitching will go.


serenemachine2, are the suckers you cover lollipops?  I haven't seen anyone embroider covers for them but they sound cute.


measurecutsew, have you been able to download pdf files from other sources?  I was able to make the download myself, so the link is active.  What did happen when you clicked on the underlined word "here"?


drr270, I am amazed that the waxed paper wouldn't tear when you press down the inner hoop.  The waxed paper itself would give an additional layer of stability, and the cost would be minimal for the stabilizer you do use.  Do wax bits ever get into your sewing machine bobbin area?


Carol B.


I would like to know if any of the embroidery software can take an image from computer design software like autocad and use it for the foot print of its design?


You see I just got my first embroidery machine, I have been sewing and doing embroidery for 46 years by hand. My occupation is E/M designer where I use Autocad and Inventor all day, so I want to put the two together in the computer just like I do by hand.


I hate to ask this, but, What are FSL designs?


M


pwdesign, there are software programs that will convert an imported image to an embroidery design automatically, and others that will let you make the design using the image.  I prefer to control the design myself because I like to play with fills and textures rather than have solidly filled designs that look like girl scout patches.


I do not know if the formats used by Autocad and Inventor will be compatible with embroidery software, but the software can use common formats like .jpg and .bmp.  If you can convert your image to one that the software recognizes you will be all set.


Here is an autodigitizer alone


www.annthegran.com/Product.aspx?t=1&i=2206">www.annthegran.com/Product.aspx


and bundled with other products


www.annthegran.com/Product.aspx?t=1&i=2207">www.annthegran.com/Product.aspx


Your embroidery machine manufacturer will also offer its own brand of software.  I suggest you learn all you can before deciding what is right for you.


motsmith, FSL stands for FreeStanding Lace.  The designs are embroidered on dissolvable stabilzier but hold together even without a fabric supporting them.  Here are some examples:


http://www.annthegran.com/Search.aspx?q=lace">www.annthegran.com/Search.aspx


Carol


I have done this by moving the design to one side or top or bottom of hoop.  I do have to pay attention that I don't stretch it.  I find myself saving the used pieces of stabilizers & use when I am not in a hurry (which is never it seems HA!).  Wouldn't it be nice to go away & just get to do all the projects you would like? What a vacation to have meals delivered & just sew!!!!!


dj


I am happy you are on board.  I love learning.  I am interested in everything (which is a distraction).


dj


LDiane,


I also keep stabilizer scraps.  I sometimes use the tearaway kind for sewing buttonholes, but mostly just keep them so I don't feel I'm wasting resources.  I mean to use them for my 40 mm spring hoop but never seem to use that hoop.


I thank you for your welcome.  There is so much to learn and so much to embroider.  It would be wonderful if our other responsibilities would just take care of themselves.


Carol


jalcumbrack 11/4/2008 3:54:10 PM

Hi Carol,


I have been doing this for a long time, I just assumed other's did as well. I did it more to save on product than anything. You have some wonderful ideas and I will be keeping them in my file for future use. thanks for helping us to understand so clearly. Looking forward to more of your wonderful blogs.


Judy


Judy,


I expect that other experienced embroiderers would also find a way to economize on stabilizer.  I presented this lesson for the newbies who visit and might like learning a trick the easy way.  Sometimes we don't realize how much we know until we see it in print, too.


Thank you for your kind words about my blogs.


Carol


motsmith  FSL is free standing lace


Please login to comment