A customer suggested that I provide puzzle outlines so that she could add her own
picture designs to them
. I thought it was a great idea. I know I enjoy making new
puzzles with subjects that are special to my own grandchildren, so completely understand
that others want to do the same. Now I am writing to tell you about the resulting newly
available designs.
Let me first remind you that the original puzzles are still available in four sizes:
100x100 mm, 130x180 mm, 150x240 mm, and 200x260 mm. Each puzzle purchase includes two
designs: a design for creating the puzzle itself, and another for embroidering on a pouch
to contain the puzzle. The puzzle designs have full color pictures, triple stitch outlines
of puzzle pieces, and cutlines for using special needles to cut apart the designs. The
designs for creating the pouches have running stitch outlines of the picture and of the
puzzle pieces. See my previous
blog for more information about those puzzles.
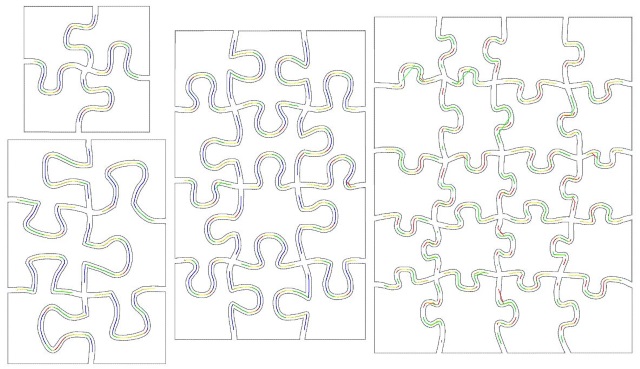
The new puzzle designs have all of the same stitches except the pictures (see following
photo). Therefore, if you have already purchased my Embroidered Jigsaw Puzzle designs,
then you need not purchase these new designs; you already have what you need for creating
new puzzles.
Software that will allow you to create your own designs will most likely also allow you
to delete colors from a design. The software I use, 6D Extra, makes this very easy to do, as
described below. If you use other software, the steps will likely be similar but their
details will be different.
1. Open 6D Extra. Set hoop for the size that fits your embroidery design.
2. Open the full color puzzle design.
3. Go to the Edit tab.
4. In the thread list, remove check marks from the last five colors in the design. These
colors are gray, cutwork needle red, cutwork needle yellow, cutwork needle green, and
cutwork needle blue. You will see the puzzle outlines and cutwork lines disappear from
view.
5. Select everything on screen. You can click a Make Block from Visible Area tool, or
surround the design with a selection box.
6. Click Delete or Cut. The part of the design you had hidden should now be displayed; if
not, you may need to click a tool to Display All.
7. Save the remaining design with a new file name that shows the type of outline and the
size of the design (for example,
Cutlines_100x100 or
Puzzle_100x100).
8. Clear the screen (click New).
9. Open the outline design in 6D Extra.
10. Go the Edit tab.
11. In the thread list, remove the check mark from the last color in the design (gray).
12. Select everything on screen. You can click a Make Block from Visible Area tool, or
surround the design with a selection box.
13. Click Delete or Cut.
14. Save the remaining design with a new file name that shows the type of outline and the
size of the design (for example,
Outlines_100x100 or
Pouch_100x100).
Repeat these steps for each size of puzzle you wish to create. In case you don't have
all the puzzle sizes, the designs are available
individually as well as in a
complete set.
Each purchase includes the
Cutlines_ and
Outlines_ designs for the size(s) purchased,
the instructions for making the puzzle and pouch, and a listing of all designs with their
dimensions and stitch counts. In this document you will see that many of the stitches in
the puzzle designs are actually thread-less.
Now let's talk about the pictures for your puzzles. The first thing to consider is
the size. Refer to the document that lists the dimensions and stitch counts, also available
here. I recommend making the picture at least 5 mm smaller in each dimension. This is
especially important if you include a decorative frame in your design.
Puzzle_Outline_Stitch_Counts.pdf (25.3KB)(If you can't download this file, please try a different browser.)
Another thing to consider is the types of stitching in your design. Even though the
puzzle piece outlines anchor the picture's stitches where they overlap, cutting the pieces
apart does lead to some fraying at the cut. My solution was to use open fills rather than
solid pattern fills. I also used no satin stitching in my designs. If you want to try
solid fills and satin stitching, I suggest you do so with the smallest size of puzzle, and
please do show me pictures of the results. I may be anticipating problems where none exist.
Once you have your picture design ready, open it in the appropriate hoop in your
customizing program. Make sure the design is centered or positioned as you want it. Now
insert the
Cutlines design, center it, and then save the combination with a descriptive file
name. If you plan to embroider on a pouch for the puzzle, repeat these steps with the
corresponding picture and
Outlines design. See the stitch counts document for advice about
rotating and flipping the puzzle designs.
In preparing to write this blog, I thought it would be fun to show another way to
use only the puzzle outlines. I printed a photo onto printer fabric and fused it to a
piece of felt. So far, so good. Unfortunately, I had almost continual thread breaks. It
might have been the texture of the printer fabric shredding the thread, or roughness in the
fusible web that I used. It was the "light" version that can be sewn, but perhaps not by
rayon embroidery thread. The triple stitching with very small stitch length may have added
to the difficulty, too. I did change my needle, and my embroidery machine is not having
trouble with other designs. I can't honestly recommend an experiment that went so wrong
for me. A better bet will be to paint a picture on felt with permanent fabric markers or
dilute acrylic paint (heavy paint may cause thread breakage, too). Watch my blog for more
about this idea.