On this sunny, beautiful, but cold day in Alabama, here’s wishing you a March that goes out like a Lamb. Since much of the USA saw a snowy and cold first day of March, It must have come in like a Lion, so it should go out like a Lamb. To all of you in the southern hemisphere, there may be some kind of weather prediction for the month of March. Down there, I guess you are going into fall and the temperatures are getting a bit lower as the days go by.
First off. I have a little something to Gripe about, and a little advice to go with it. Recently, I received an email with what “appeared” to be a good discount on my choice of a product from a web site that I have used only once before. When I finished my browsing, I settled on a ME book that looked like it would give me new ideas on things I might like to add decorative stitching to. When the book arrived, I was profoundly disappointed. It wasn’t even worth the cost of the postage I paid, not to mention the high price, even after the discount. After the disappointment waned, along came the frustration and then the anger. Just because you get a 25% discount, it doesn’t instantly become a bargain. I often use the web sites that I know will let me look through a few of the pages before I hit the checkout button. Well, this site didn’t give me that option, and I yielded to the 25% sign that flashed through my brain. I guess it was my fault, but it sure felt like someone was out to get me that day. I Should have returned it. But with the high cost of postage, I decided not to. Now, I’ll just curb my frustration to all of you by giving this little bit of advice . . . Don’t let the 25% sign cause you the dreaded Brain Freeze. Yield, instead, to your common sense that tells you to hit that delete button and forget that 25% off. You’ll be $$$ ahead. (Hmmm, that sounded a little like the musings of our dear Ann, of ATG fame.)
Now, back to quilting. Have you finished squaring up those quilt blocks, just in time to put them all together for the border? Someone asked a while back for me to talk about the size that borders should be. As far as I know, there are no rules as to the size of borders, added to your quilt. I, for one, am a fancier of no borders at all. I love the look of a quilt that looks totally finished with only blocks. However, I have done them both ways. My particular preference is a small inner border with two larger borders. For instance, I like the first one to be 1" to 1 1/2", cut size 1 1/2" to 2". Then make the second border 2" to 2 ½". Cut size 2 ½" to 3". The third would be one inch larger, cut and finished size than the second border. Now, this is just my preference. I have seen them done many ways. It just depends on the nature of the quilt, the color combination, etc. If you are making a quilt with all coordinating fabrics, be sure that you purchase enough fabric in the beginning for the borders to match the fabrics used in the quilt.
These are photos of several kinds of borders:
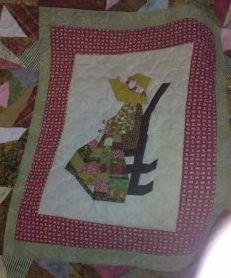
There are many kinds and styles of borders. Sometimes, adding a really nice border can make the difference between an average but nice quilt into a really great quilt. Whether your border is pieced, appliqued, mitered or just a straight border, it can give new personality to your quilt. Books have been written on borders alone. There are many ideas about quilts on the internet. Two web sites that give good quilting ideas are dummies.com and howstuffworks.com. Do a search for quilts when you get there. These are two links specifically about borders.
https://www.dummies.com/how-to/content/framing-your-quilt-with-a-beautiful-border.html
https://home.howstuffworks.com/quilt-border-patterns.htm
One of the borders should be made of your focus fabric, usually a large print for the widest border. If you are making a scrappy quilt, you can use any fabric that goes well with the scrappiness of the quilt itself. But it’s a good idea to look at the entire quilt to see if there is a dominant color. If so, you might make a border of that dominant color with other borders of fabrics that coordinate.
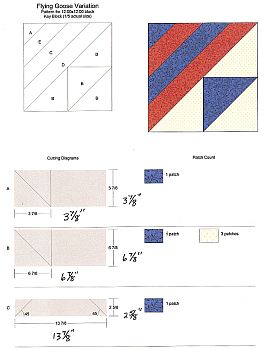
I prefer print fabrics for borders on most quilts. The only times that I have used solid fabrics, it just seemed like something was missing. Printed fabrics just seem to have a “go-together” feeling to me. But I prefer quilts that don’t have a lot of solid fabrics, so I guess that goes for borders too. The red and blue quilt below has solid navy blue block sashing that appears to be part of the border because it joins with the borders.
Since I haven’t read any specific rules about choosing borders, I can only tell you what I personally like, and what I’ve seen that is pleasing to my eye. For instance, I mentioned scrappy quilts. I really prefer scrappy quilts with no borders. I guess it’s because scrappy quilts come from scraps and usually, scraps aren’t big enough for borders. So, it follows, that if you have borders on scrappy quilts, you must have gone out and purchased fabrics just for borders.
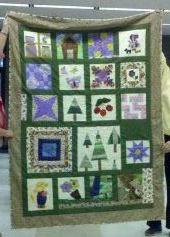
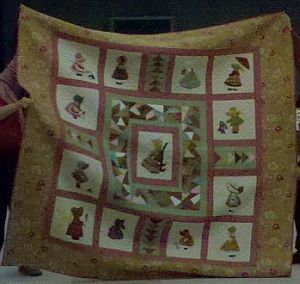
The only thing that I would consider to be a rule when adding borders is Plan Ahead. Know ahead of time what you want to do before you start cutting border fabric. Measure your quilt carefully. Now that doesn’t mean measure along each side and each end. Those measurements may not be exact. Measure your quilt six times. (This is my rule, that I use for myself, I heard it somewhere) Measure once across the center width of the quilt. Then measure twice more, once midway above the center, and once midway below the center. Now average those three measurements. That is the width measurement for your border. Next, measure the length three times. Once at the center length and once to each side of center. Then do the same as you did for the width. Using those two numbers, cut your borders, two for the sides and two for the top and bottom. Use the directions on the websites for sewing the borders to the quilt. More quilt border photos:
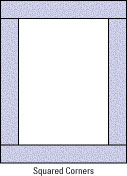
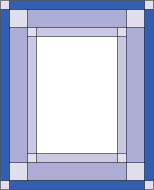
There are many kinds of borders to choose from. These basic borders are a place to start. Check out some good quilting books or classes to go on from here. You need to decide whether you want to make borders with squared corners or borders with squared corners, and corner squares, and the third choice is mitered corners. Squared corners are easier to do, but let your preference and ability guide you. Sometimes the style of the quilt dictates the kind of border you need. The square corners is a bit less formal to me than the squared corners. But If you are making blocks that have a square look to them, like a log cabin, the square corners might be the better choice.
I tried out my computer drawing skills to make these drawings of borders. But unfortunately, they wouldn't copy into the blog, so I give credit to dummies. com for the illustrations. The last one is a quilt that has cornerstones or corner blocks on the squared borders.
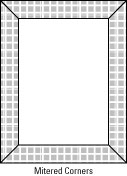
I have tried with little success, to think of a way to tell you about the mechanics of actually sewing mitered corners. Since it is more challenging to me to write about it, I think it’s best to let you find your own way. Click here for a Google search for adding borders.
I feel like I have left out a lot on the subject of borders. There are some things that just don't lend themselves to words as well as they do to illustration. That is the reason that I have links for you to use to fill in the spaces. I hope you are having as much fun with quilting as I do. There is a lot of enjoyment and personal pleasure in making items that will endue for years to come.
Stitches to you,
LaRue