To begin this time, I want to relate a very “telling” experience. This experience told me that you very well can become a really good quilter if only you practice, practice, practice. My husband and I went to my daughter’s house last weekend to attend our grand daughter’s band competition. While we were there, we slept on our grand daughter, Lauren’s bed. Right away, I noticed a quilt that I had made before my daughter was married. I didn’t pay much attention right away, but I knew the quilt well, and also knew how long ago I had made it. Before the weekend ended, I did a short critique of my long ago work. I was not impressed. The colors weren’t great. The black fabric in it stood out against the other rather pastel colors. The backing was awful. I don’t know what kind of fabric I used, but it had grown thin and it had “pilled” very badly. It was white, not a good color to enhance a quilt top unless the quilt is mostly white. The binding was way too wide for the seam allowance inside the binding, leaving an unfilled space on the edge of the quilt. (That space on the edge can wear out) So, why do I relate my tale of woe? I’m telling you all this, just to let you know that even you can become a great quilt maker. That’s not to say my quilts are great. I have seen much better. But I know that the years of making quilts with quality fabric, taking classes, attending quilt guild meetings and lots of practice have been well worth the time and effort. I now have a pile of quilts about which I will be happy to have my grand children exclaim, ”my grandmother made this, I love it.” You can get there too.
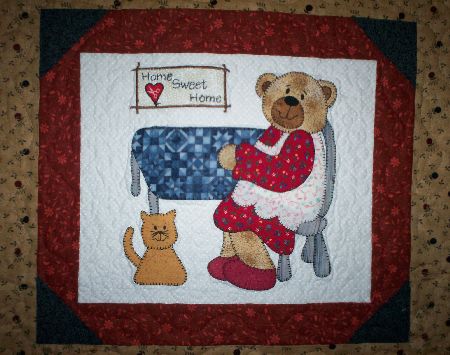
This is your fix for this time. When I saw athis pattern, I just had to do it. But it was several years until I got to it. You will notice that one of the Teddys is a quilter.

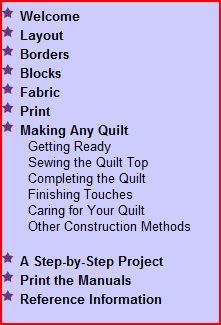
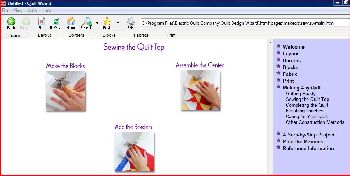
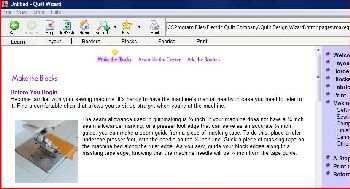
I have been looking into the Quilt Design Wizard program a bit more, and I thought I would tell you more about it. It really is the most informative program for beginning quilting that I have seen. When you open any of menus that are shown, each choice takes you to a sub menu. For instance, one of them is Making Any Quilt. Under that menu, you can go to other sub menus that lead you step by step through each process of making a quilt, even to caring for, cleaning, and storing the finished quilt. Under that menu, you will find Sewing the Quilt Top. It shows each step of making a quilt top, with closeup pictures of measuring your seam width and sewing different types of quilt blocks. It even shows you a final step of making a computer generated, personalized, labels for the quilt you have made.
These are just a few screen shots from Quilt Design Wizard.
I have already given you some things to remember about using a rotary cutter. You are now ready to put those things to use. When you are cutting, make sure to hold the cutter so that the blade is vertical or perpendicular to the cutting mat. It will not give as good a cut if you hold the cutter at an angle or slant.
After preparing your fabric, you need to make sure that your sewing machine is set up so that the seam allowance in your quilt will be consistent throughout the quilt. Most quilt patterns are based on a 1/4 inch seam allowance.* A 1/4 inch seam allowance is so important in a successful quilt. There is no other basic skill that I could stress more. Think about it . . . if there are approximately 12 to 14 threads in the distance of 1/8th inch of fabric, you can see that two threads either side of a needle can add up to several inches when multiplied by many times for each seam across the width of a quilt.
Let me explain that another way. In a log cabin block, there may be 10 seams across one block. If the seams are sewn too narrow by 1/16 of an inch, that means that each seam totals 1/8th inch. If that 1/8th inch is multiplied by 10 times for the number of seams in the block, that block alone is 1 1/4 inch too narrow. There is usually some inconsistency in the seam allowances from block to block. But with practice, your seams will come out close enough to make measurement problems minimal. Some small variation in the size of blocks can be adjusted as you sew blocks together.
So, how do I make sure my 1/4 inch seam allowances are consistent? You need to measure the width of your presser foot. Some machines come with a 1/4 inch foot. Don’t take it for granted that a foot is exactly 1/4 inch. Get out your best ruler or seam gauge. With the needle in the down position, place the ruler against the needle and compare the ruler’s 1/4 inch mark to the presser foot. If the mark is more or less than 1/4 inch, make a note of where the 1/4 inch mark is to the ruler. Adjust yourself, or your brain, or your presser foot. (whatever is easiest)
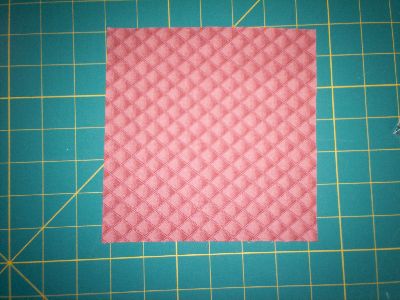
You can also check the accuracy of your 1/4 inch seam after measuring the presser foot. Cut two 3 inch squares of fabric. Sew the squares along one side. Press the seam to one side. Measure the distance across the width of the two squares. You should have a measurement of 5 ½ inches. The seam takes up 1/4 inch on each of the two squares, making it ½ inch less than the total 6 inches.
Some machines can adjust the needle position, letting you adjust the width of the seam allowance. This is hard for me, because I have gotten used to sewing with the needle in the center of the presser foot. Use the method that is most comfortable for you.
Stitch length: set the machine for about 10 to 12 stitches per inch. That is about 2 to 3 on many machines. Make the stitch length close enough to hold the fabric together, but long enough to make them easy to remove (Frog stitch)* in case you make a mistake.
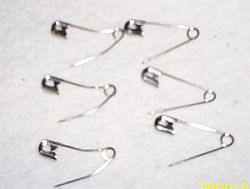
Pin your squares together. Use the pinning method that you are familiar with. Pinning parallel to the fabric edge somewhat prevents sewing over a pin. If you pin into the seam, perpendicular to the fabric edge, you risk sewing over pins. It’s easy to hit the pin while sewing. Remove pins before you get to them to prevent breaking the needle or one of the pins. That can cause damage to the machine. Anyone who is experienced in sewing knows that a broken machine needle can fly anywhere, causing injury or damage.
When beginning a seam, hold the needle thread and bobbin thread with the left hand. Two annoying problems occur by not holding the threads. A tangle of threads can happen on the under side or the fabric can be pulled down into the needle hole of the throat plate. You can also turn the hand wheel to eliminate these problems. Another way to solve these two problems is to sew through a small scrap of fabric, leaving a space at the end of the seam, then sewing into the first seam of a block.
It is usually not necessary to backstitch at the beginning and end of a seam. If you need to leave a small space at the end of the seam, it may be best to backstitch to secure the small seam allowance.
Use your right hand in front of the presser foot and your left hand behind to guide the fabric. Don’t try to pull the fabric through as you sew. Just gently guide the fabric and let the machine take the lead.
If there is a small difference in the length of the seams, pin at the beginning and end of the seam, and distribute the difference evenly along the length of the seam. Sew with the longer piece under the shorter piece. The feed dogs will do the work and make pieces come out even. Don’t try to ease a lot into a small space. It will cause unsightly puckers and sometimes you will have extra fabric at the end of the seam.
If you have not done a lot of sewing besides ME, it might be a good idea to do some practice sewing. Try sewing straight lines. Using a marking pen, mark lines on a piece of fabric about 12 to 15 inches square, about ½ inch apart. Make your lines similar to the diagram here.
 Practice sewing just straight lines, sewing as closely on the line as possible. Sew to the end, stop and pivot--sew to the end, pivot and sew the straight line again. If you have trouble sewing on the lines keep practicing until your sewing is perfect or nearly so. If you feel you need more practice, cut two more squares, draw a pattern again and sew it again. In my first Home Ec. Class in the seventh or eight grade, the teacher handed out paper sheets with spiral lines from the edge to the center. It was good practice in how to sew, following the lines precisely. (It’s harder to sew a circle than to sew a square)
The picture here shows how easy it is to piece many small patches in a line. It’s called chain piecing.*
Much of the information I used in this blog is taken again from Alex Anderson’s book, Start Quilting, 2nd edition. Her books are very well written and informative. They are varied on the subject of quilting. They will soon be available in ATG shopping. Check them out when they get here. I’ll keep you posted. By the way, I just discovered that you can download Alex Anderson’s quilt show on the internet and her podcasts on iTunes.
You know, it’s so exciting to me to be able to tell you how fun it is to make quilts. I have always enjoyed helping people who want to learn a new skill. I hope all of you have as much fun with quilting as I have had. Don’t get discouraged. It’s your quilt, and there are not “quilt police”, only friends who want to see you succeed. Keep me posted with your progress.
Stitches to you,
LaRue
Quilter’s Jargon
1/4 inch-The standard seam allowance for quilts
(Frog stitch)-Rip-it Rip-it
Chain Piecing-piecing many small patches in a line