Easy Trick or Treat Bags

Hello all!  I am Virginia, an embroidery enthusiast and an educator for Dakota Collectibles.   I love creating things with embroidery and thought it would be fun to share my projects and ideas with others, so I am entering the world of blogging.  I use Dakota Collectibles' designs for my projects.  Dakota Collectibles design collections can be found on Ann the Gran's site here . This is my first blog with Ann the Gran, so please let me know what you think about what I have shared here.


Easy Trick or Treat Bags

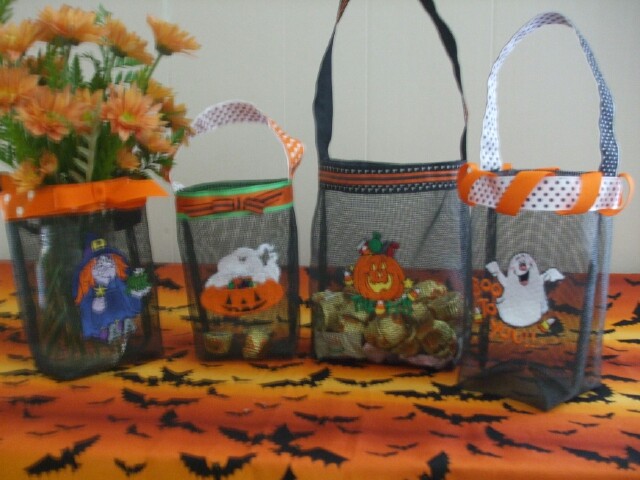
Halloween will be here before we know it.  One of my favorite projects is trick or treat bags made from vinyl replacement screen that you use for windows or doors.  It is available at most big box hardware stores and also at some Wal Marts.  You can purchase it in large amounts or small amounts or sometimes by the yard.  Be sure you get the vinyl and not the real wire screen.


Supplies needed for the bag:

Vinyl screen

Black tear away stabilizer

Ribbon in amounts to decorate the bag around the top and to form the handle

Halloween embroidery designs.  (Mine were from Dakota Collectibles packs Halloween #970206 and Glow in the Dark Pack #970313) .

Bags can be made in any size.  For the largest one in the picture above, you need the screen cut  22” h x 11” w.  Measure down from top 8 inches.  Draw a horizontal line with my favorite marking tool (leftover slivers of soap from the shower).  This line will be the bottom edge of the bag. 

To center the design, make another horizontal line half of that distance – 4 inches.  Then mark the center of the width of the bag with a vertical line - 5 ½ inches.  This will give you the center mark for your embroidery design.


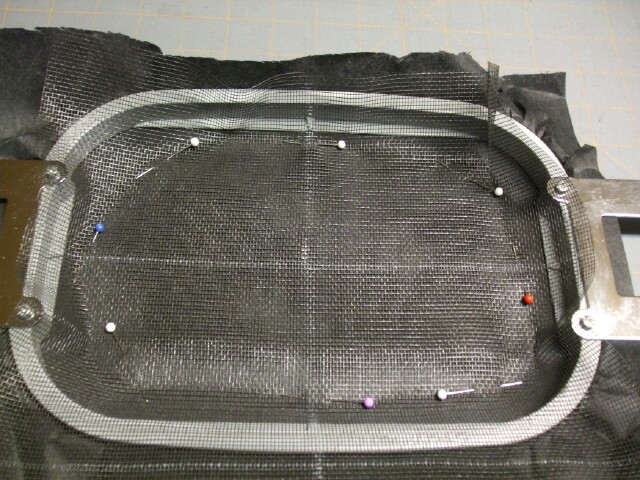
Hoop the black tear away stabilizer only and pin the marked screen to the stabilizer, lining up the markings with the center notches on your hoop.  Be sure the pins are well outside the embroidery design area.

Embroider the design, remove from the hoop and tear away the stabilizer.

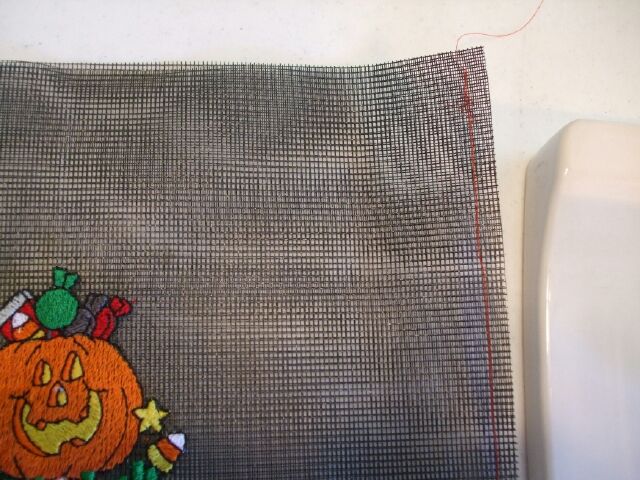
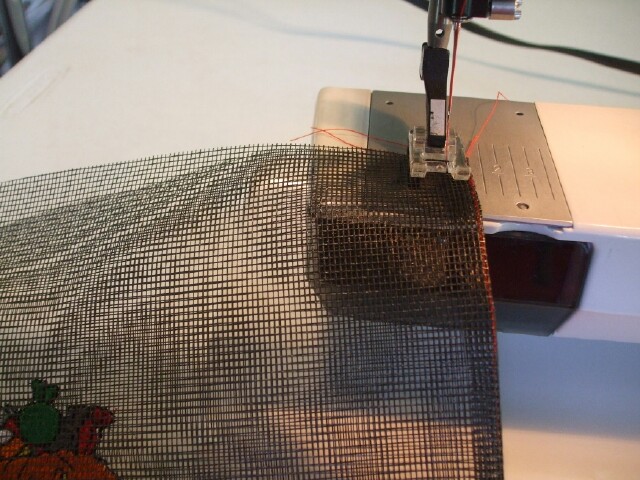
The side seams of the bag are sewn next.  I use a French seam as it helps to strengthen the sides of the bag and a little one will not be stuck with the “pokies” on the sides of the screen.  It will not actually stick into their fingers, but might give them a little sticking sensation.

If you have forgotten high school home ec classes, to make a French seam fold the bag with WRONG sides together and sew a quarter inch seam down both sides.


 Then turn the bag wrong side out, finger press the seams and sew another seam down the sides just wide enough to encase the previous  seam.


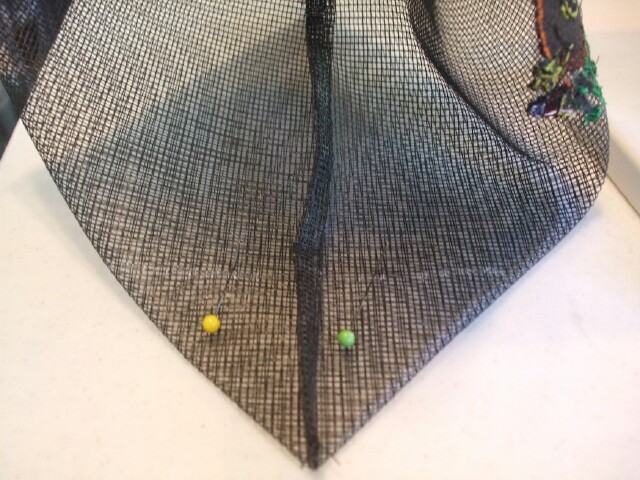
Leave the bag wrong side out and fold it with the side seam down the center of the side of the bag forming a triangle.  On this size bag, we planned a 4 inch wide bottom.  Measure across the triangle finding a 4 inch width.  Mark the place with a soap line.

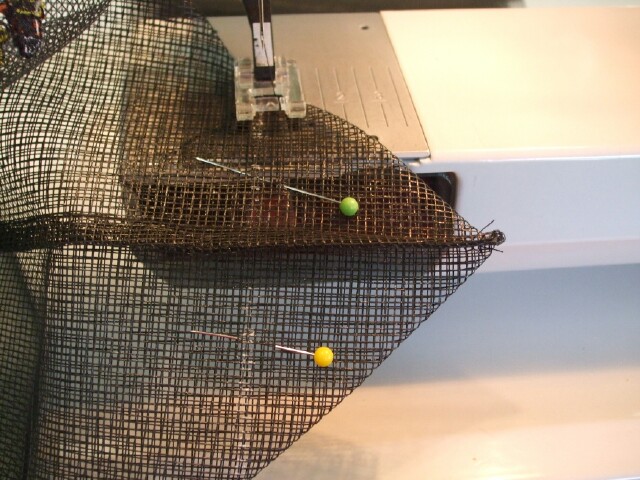
Stitch along the line.  Repeat on the other side.  Then turn the bag right side out.  The work is done and the fun begins.


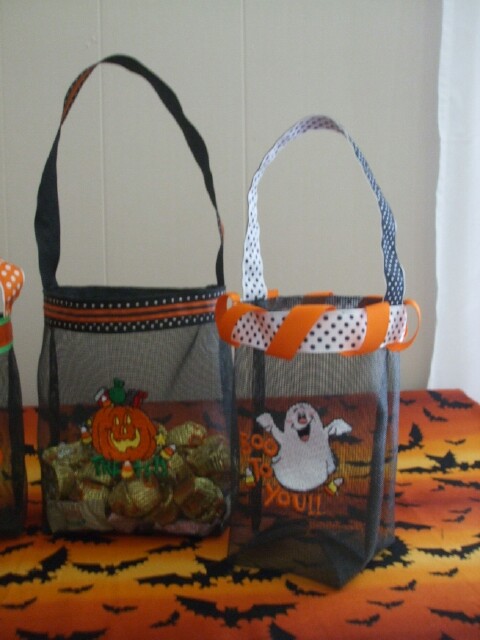
Turn 1/2 to 1 inch of the top edge of the bag to the outside and finger press. The amount you turn down depends on the width of the ribbon you plan to use.  Turning it to the outside allows the ribbon trim to cover the raw top edge.  Make a handle for the bag.  I used two different colors of ribbon back to back top stitched down both sides of the ribbon. You can make the handle the length you prefer.  Mine was 17 inches long.   Center the ends of the handle on the side seams far enough down so that it will be stitched into place with the decorative trim around the top of the bag. Pin into place.                                       


Use your favorite Halloween ribbon and top stitch both sides of the ribbon to the top of the bag.  Add bows, decorative buttons, or any other trim you like.  These are mine!!


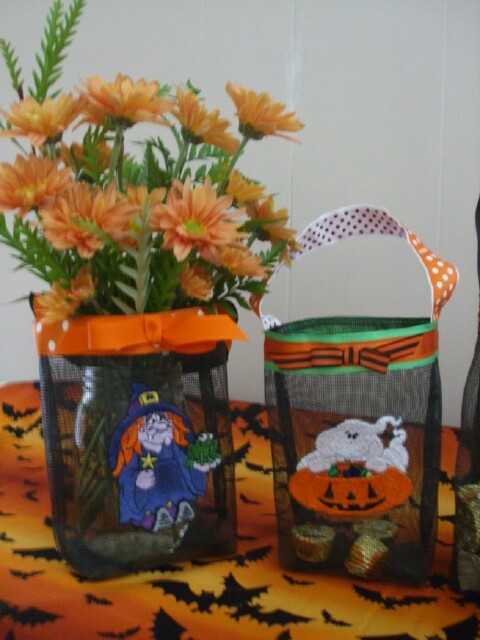
If you don’t have any little ones to trick or treat, they make great decorations for Halloween or with other embroidered designs for  Thanksgiving or Christmas.  I used one on my desk last year to hold candy canes during the holiday season.


HAPPY HAUNTING!!


Thanks for reading my blog.   Virginia.
 

Comments (6) -

Thank you for taking the time to share your projects with us! It's always fun to see new items.


Vicky in Louisiana


Very clever!  Thanks so much.


tourlady522 10/2/2011 12:52:15 PM

I have made bags like these but lined them with cotton and added pockets but now I will try them with out lining and would they not make a great beach bag.


These little bags are so cute.  I have some of this screening in my sewing room.  Got it several years ago when I thought I would make a vest using it.  I might still make a vest but do machine embroidery on it too.  Thank you so much.


audreyphilips 10/2/2011 5:09:05 PM

I think the bags are cute, but I really like the comment from MirBol. My daughters and I go to an arts and crafts festival in McIntosh, Fl each year at the end of Oct. We have worn matching vests for years, easy to spot and vendors help us keep track of each other. This idea would make a neat vest, as well as being cool (sometimes it's still in the 90"s during the day here.) Thanks for sharing! AtomAnt


Does anyone know if you can use fiberglass screen? I have not been able to find plain vinyl screen. I have found some called "pet screen" but it is heavy.


Please login to comment
Love Your Machine? Then Show It Some Love!

Love Your Machine? Then Show It Some Love!

We are excited to have Eileen Roche, Editor of Designs in Machine Embroidery share this content with you, which was originally posted on Eileen’s Machine Embroidery Blog:   

Today’s embroidery machine are hi-tech honchos and we love them!  They run and run and barely ever whimper under the stress of all those hoopings. If you want to keep them humming along, then just follow three simple steps:  Keep them clean, use them and turn them off.

Keeping them clean is easy. Remove the plate.Clean1BL

Remove the bobbin case.Clean2BL

Fold a pipe cleaner about 2” from the end and wrap it around itself to create a soft point.Clean3BL

Use the soft point to swipe away dust from the feed dogs.Clean4BL

Bobbin basket. Clean5BL

And nooks and crannies.Clean6BL

Then shudder at the gunk that comes out of your machine.Clean7BL

This example is a machine long overdue for a cleaning. Don’t let your machine get this messy. I worked really hard to get this shot!

Reassemble all the parts and get back to stitching. Of course, read your manual. Manufacturers have different recommendations for everyday care. Many machines require a daily drop of oil while others leave the oiling to the professional technicians. It’s best to read the manual and FOLLOW the instructions.

Using your machine is good for your machine, you won’t wear it out. It was made to run and running them keeps them lubricated. Don’t be afraid of your machine – remember you own it; it doesn’t own you.

Lastly, turn off your machines when it’s not in use. It’s a good idea to unplug them. I have to admit, I don’t unplug them all the time but when there are thunderstorms in the area or if I’m leaving town, I pull the plug on all of my machines. It’s peace of mind.

How do you care for your machine?

Thanks for reading!

Reprinted with permission from Eileen's Blog. 

Please login to comment
All posts tagged 'thread'

Threads vs. Backgrounds: Contrast or Blend?

  Because they resemble hand quilting, redwork embroidery designs work great as a quilting motif. Finding the correct amount of contrast (or not) is the key to an embroidery project that pops. Using a fabric sample called Elm Creek Quilts: Sarah's Collection by Red Rooster, I want to sh... [More]

PMS Thread Colors

You may have had a friend or client ask you to stitch their company or school colors on apparel using PMS colors. Typically, the mere mention of PMS strikes fear in the hearts of many. Here, PMS refers to Pantone Matching System and how it helps with color consistency in embroidery thread. Panto... [More]

Bobbin Basics

Bobbins are the cement that holds embroidery stitches together, so they play an important role in the outcome of every machine embroidery design. Here is an overview of what you need to know about bobbins. Bobbins are not one-size-fits-all. They are available in three basic sizes for home embr... [More]

Great Gifts for Mom

Mother's Day is just around the corner. Don't panic if don't have any good ideas. Here are some [More]

Decorative Crazy Patch Embroidery Stitches

Embroidery machines revolutionized hand stitching. What once took days or weeks to prepare now varies from minutes to hours. Embroidery designs aren't the only things you can stitch out. Some of the easiest embellishments are made with decorative stitches. Regardless of your embroidery mac... [More]

It All Comes Down to Color

Color plays such an important role in our lives from what we wear to the vehicles we drive. As embroiderers, we have artistic license to experiment with color. The possibilities are virtually endless when you mix fabric and thread combinations. I'm using the same design in several different way... [More]

Winners in the African Folklore Embroidery $500 Challenge

  The entries in this year African Folklore Embroidery $500 Challenge, were spectacular. Congratulations to first place winner, Roberta Peterson from Woodland, Washington. Roberta attended an African folklore Embroidery class that I taught at Monica’s quilt and bead shop in Palm Spri... [More]

Threads from Africa- 30% off till Feb 9th

Thread colors and names inspired by African Savanah  From The COLORFUL world of African Folklore Embroidery we bring you a complete selection of multi-colored hand dyed variegated threads from House of Embroidery, South Africa.  Our exquisite hand-dyed threads are suitable for all types... [More]

Winners in Creativity for African Folklore Embroidery

And The Winner is………   Over twenty thousand people viewed the African Folklore Embroidery entries at the International Quilt Show in Long Beach.  As many of my readers know I travel around the country lecturing and teaching African Folklore Embroidery. I am always a... [More]