Here is how I recover almost designs that have hopped out of the hoop.
1. Walk away for a moment. Calm down and begin to work on getting it fixed.
2. Find some running stitches that are on a curve or angle. If you don't see any, you may need to remove some stitches covering them. For example, lettering would have running stitches on an angle that are used as underlay or to walk from one part of the letter to another. 
4. Hoop a piece of self-adhesive stabilizer
5. Using the forward and backward commands on your machine’s control panel, move to the point in the design for the curved or corner running stitches that you have decided to use as your reference point.
6. Place the hoop in the machine. Place the item to be repaired on the self-adhesive stabilizer in a position that you have judged to be closely lined up with the pick-up point. If your machine allows it, lower the needle to ascertain that you are as close as possible.
7. Thread the machine with a color that is very visible against the garment. Don’t be concerned whether it is the proper color for the design at this point. You need to be able to see it clearly.
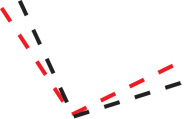
8. Start the machine and watch closely as the running stitches stitch. Checking to see if the angle of the new stitches matches the angle of the original stitches. It is likely that the stitches are not aligned on the same angle as shown here.
9. Gently lift the item from the stabilizer and reposition it using your best judgment to a new position that will be in better alignment. Back up the machine and stitch the test stitches again.

10. Repeat until the stitches are on top of the target stitches on your garment. Change to the correct thread color for the design and you are set to complete the entire design.
This method assures that all outlines and other elements from this point will be on track. Even objects that were stitched early in the design will have outlines that match up because you took the necessary steps to assure that the item was repositioned at the precise angle as the original hooping. This is the key to garment recovery.
During the recovery process, the garment is only adhered to stabilizer, rather than being held in a hoop as it originally may have been. For this reason, keep a close eye on the item as the embroidery proceeds. If you notice that the item appears to be puckering or drawing in, slide one or more pieces of light, crisp tearaway stabilizer between the hoop and he machine bed to provide more support.
Check out the best Mother's Day Gift ever at my site, www.myembroiderymentor.com