Keeping It Simple - Quick and Easy Monogrammed Kindle Cozy

My friend received one of the new smaller Kindles for Mother's Day.  She loves crafty things but has little time right now and she just couldn't bring herself to pay the price for the one she liked.  As you know I have lots and lots of scraps in my sewing room just waiting for little projects like this.  I told her to email me the measurements and I would see what I could do.  Here is the finished case:
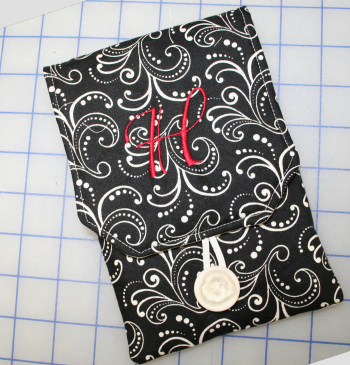
Here is what you need:

Note: This is for the new smaller Kindle.  At the bottom are the fabric requirements for the original one.

One rectangles of cotton fabric 13" X 5 1/2" for the outside.

One rectangle of cotton fabric 7" X 5 1/2" for the outside.

One rectangle prequilted fabric 13" X 5 1/2" for the lining

One rectangle prequilted fabric 7" X 5 1/2" for the lining

three inch length of 1/4" wide elastic

One large button

Sewing thread

Initial that is about 1 1/2" high ( I made mine in Alphabet Xpress using the Precious Font)

Cut away stabilizer

Lapel stick or other temporary adhesive

Embroidery thread

Here is what you do:

0. This is optional but is what I did.  Layer the two 13" X7"  pieces and cut the top two corners at an angle using a choice from your quilting ruler so that both sides are the same.  If you prefer a square top flap you can omit this step.  If you want a curved top use a CD and trace the edge and cut it.

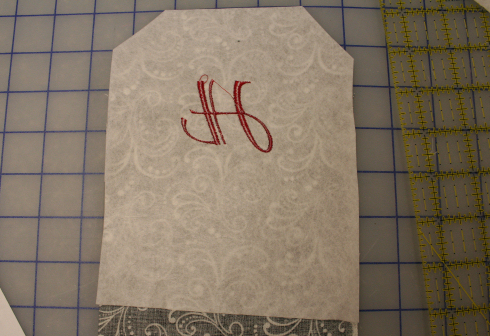
1.  Lay both outer pieces face up, with bottom edges aligned on your workspace.  Fold the longer piece down about 5" and center your design here. (In Alphabet Xpress you can print a template to use.)  If using a template pin it in place through the top layer of the folded fabric.  Open the fabric flat.
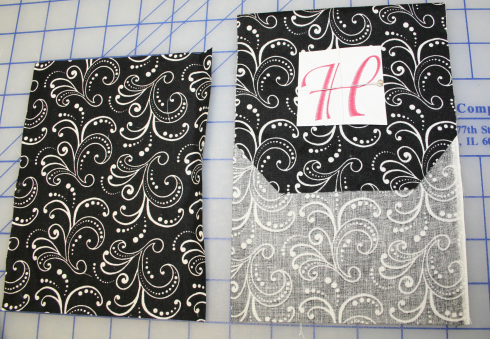
2.  Hoop your cut away stabilizer.  Center your fabric with the template and use the lapel stick to adhere it to the stabilizer.  Slide the hoop onto your machine and make sure the needle is over the center of the template.  Remove the template and embroider your design.  Remove from the hoop and cut away the excess stabilizer.
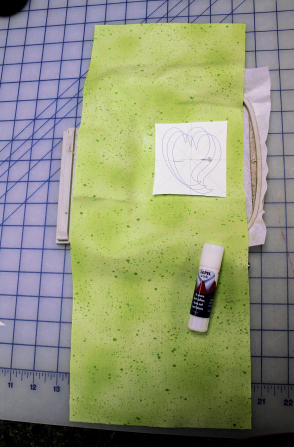
 

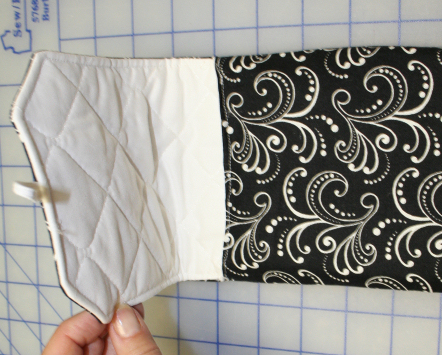
3. Place the embroidered rectangle face up with the embroider at the top on your workspace.  Fold the elastic in half.  Center and align raw edges along the top edge and pin.  Sew in place about 1/8" from the edge with several passes to secure.
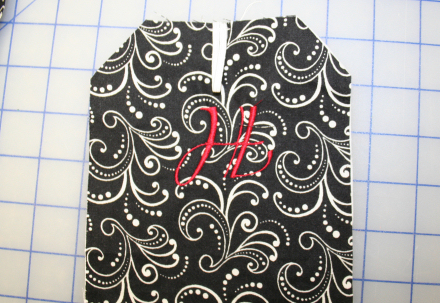
4.  Place the embroidered rectangle face up with the embroidery at the top on your workspace.  Layer the 7" X 5 1/2" outer fabric rectangle face down aligning the bottom edges.  Mark this piece on each side 1/4" from the top edge.  Using 1/4"seam sew around the edge beginning and ending at these marks.  Repeat this step for the lining rectangles.
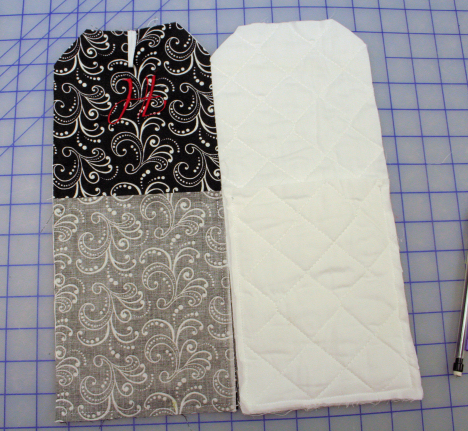
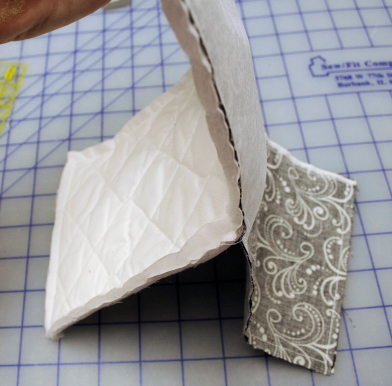
5.  With right sides together pin the flap of the outer fabric to the flap of the lining.  Fold the 1/4" that you did not sew earlier on the pocket out of the way.  Using a 1/4 seam sew the flaps together beginning and ending where the pocket seams begin and end.  (do not sew over the previous stitching.)
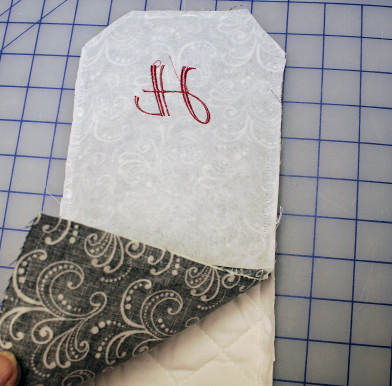
 

6.  Trim all corners.  Turn flap right side out.  Push corners out.
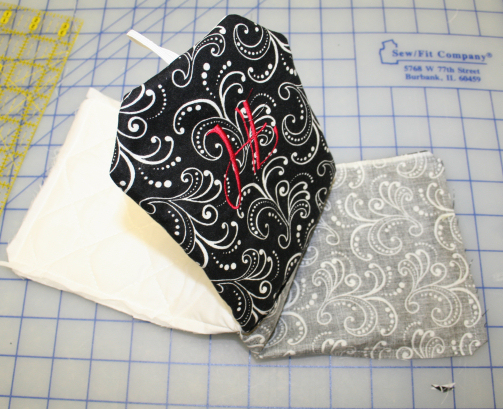
7.  Turn outer pocket right side out.  Tuck the lining pocket inside the outer pocket.  Fold in the 1/4" edges and top stitch just across the pocket top edge.  (This was the hardest part of the whole project)  Then topstitch about 1/4" around the outer edge of the flap.
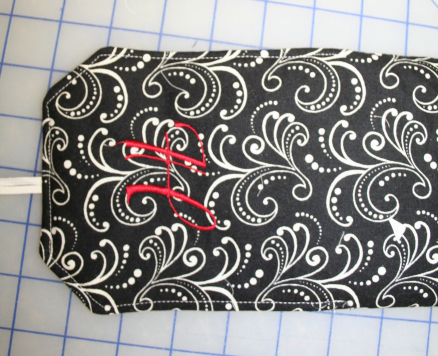
 

8.  Measure up about 1" from the bottom and center your button.  Sew in place being careful not to sew through the pocket. 
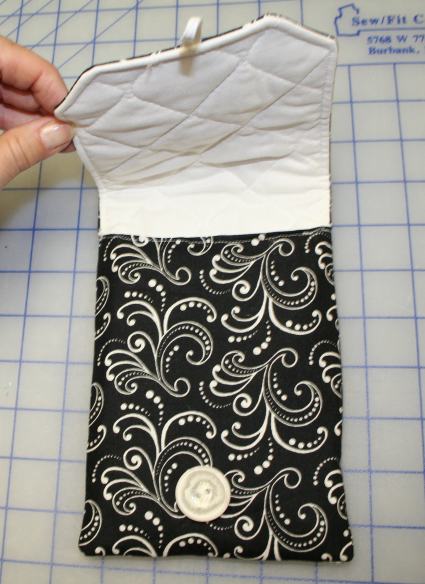
  Click here to download a pdf file of these instructions.

The little cozy is really easy to make and provides the perfect protection while traveling around in a purse or backpack. And it can be personalized to match the personality of the one you are making it for.  My granddaughter wants one in hot pink - with a horse on it of course.  An I might put a pretty ribbon strap on hers since she rarely carries a purse.

If you have a regular Kindle here are the fabric measurements:

For the long rectangles 14 1/2" X 6 1/4"

For the short rectangles 8 1/2" X 6 1/4"

This would be a great little case for lots of things that go inside a purse, so try it even if you do not have a Kindle to sew for.  If you like making purses and bags try here are some other tutorials you might enjoy.

Designer Grocery Bags

Reusable Snack Bags

Totes made from placemats

Really big all-purpose tote

A quick wristlet

A little pocket with strap (great for keepin pacifiers clean and close, storing the camera lense and much more)

Have fun sewing and take care,

DB

Please login to comment
AnnTheGran.com | Beautiful people make beautiful things

Reversible Applique Towel

Take your applique to the next level by making it totally reversible. It is really easy to do with m [More]

Embroidery Advisor Presents: Ice Cold Beer

Football season has begun and you know what that means!  A lot of us will be glued in front of our HD TV screens watching and cheering on our favorite football teams and Fantasy players.  Sipping on an ice cold beer can really enhance the viewing pleasure though while your favorite team an... [More]

Keeping It Simple - Is it a Snake or a Caterpillar?

Now, here is a fun idea, complete with designs to make it, that would make a great stocking stuffer or busy bag learning toy for any preschooler on your list.  My daughter was looking for ideas one day and came across one of these cute little guys that had been made with colored felt squares.&n... [More]

Embroidered Notebook Covers

Make this from this    and this! It is almost back-to-school time and this embroidered notebook cover is a quick and easy project using a standard 50-cent composition book. It takes about a half-yard of fabric, or two fat quarters, and a few scraps for the applique. Best of all, you c... [More]

Simple Casserole Carrier

              These casserole carriers are simple to make and are perfect for upcoming pot luck gatherings.  You can make them different by using an assortment of fabrics (maybe from your “stash”) and embroidery designs. Materials: 2 pieces o... [More]

All Tear-Away is Not Created Equal

      There are differences in tear-away stabilizer besides their weight. I find that most embroiderers are very familiar with "firm" or "crisp" tear-away. But a wonderfully supportive tear-away is "soft" tear-away. Crisp or firm tear-away is made fr... [More]

Cutwork Poinsettia Napkin or Basket Liner

Cutwork is so very elegant, and it looks much more difficult than it really is. This project creates a holiday napkin or a gift basket liner or dinner roll cover. The poinsettia is part of the Christmas Cutwork Encore embroidery collection by Dakota Collectibles and it is available from Ann the... [More]

Keeping It Simple - Pillows with Flapped Edges

Our girls love to read.  So much that our daughter is making a special reading nook out of a closet in her schoolroom area.  The seven year old, who always wants to add her thoughts to a project brought me a picture.  The pillow had these different,  flapped edges and she asked i... [More]

Celebrate Christmas in July

We’ve just passed the halfway mark of the year, so it is time to get a jump start on your holiday projects. Whether you like to create to give or make things to decorate your home, this Christmas Tray is sure to please. Featuring the Baby Lock Enterprise 10-needle embroidery machine, our ... [More]

Hooping T-Shirts for Embroidery

Hooping and embroidering garments that don't open down the front, such as T-shirts and sweatshirts, can be challenging. Even when you get them hooped, it can be hard to get them on and off the machine. Watch this video for tips on how to do this more easily and take at least half the work ... [More]

How To Embroider Those Adorable Stuff Animals!

Following are the instructions for embroidering these cuties!  You'll need the following: Embroiderable Cubbie of your choice Temporary Adhesive Spray Water Soluble Stablizer Medium Weight Tearaway Stabilizer       CHECK OUT ALL CUTE CUBBIES AVAILABLE HERE

Holding the Tough-to-Embroider Items

If you think that you can't embroider items that you can't get into a hoop, or hold with self-adhesive stabilizer, think again. There's another method that will let you hold big, bulky items under the embroidery needle. I embroidered this tote bag on my single-needle home embroide... [More]

Sewing Box Hero

As a Quilter and Sewer I know how important it is to find products that make my projects better and easier without blowing my budget or potentially damaging my work by using something complicated or harsh on fabrics.  It is a balancing act when shopping for supplies, tools, and accessories ... [More]

10 Household Tools for the Machine Embroiderer Part 2

By Eileen Roche We received such a positive response from my recent blog: 12 Household Tools for the Machine Embroiderer that I decided to revisit this subject. JoAnn Connolly of Garden of Daisies Embroidery thinks craft foam and a cardboard carton are great reusable items ... [More]

Keeping It Simple - Keeping Track of the Camera Lens Cover (and more)

My daughters and I love to take pictures.   With digital cameras  we take lots and lots.  However with three little ones almost always in tow one big problem I now encounter is keeping  track of the lens cover.  And Andrea is always looking for hers, digging i... [More]

Caring for Antique Linens

Beautiful embroidery goes hand in hand with beautiful linen, and this is the perfect time of year to find antique linens at flea markets, estate sales, and yard sales. There’s nothing like the feel of antique linen. It could be that it’s pure nostalgia. More likely, it is because it is ... [More]

12 Household Tools for the Machine Embroiderer

By Eileen Roche We are excited to have Eileen Roche, Editor of Designs in Machine Embroidery share this content with you, which was originally posted on Eileen’s Machine Embroidery Blog Digital Camera– best design tool in the house (besides pencil and paper). I use a digital ca... [More]