It's here again. Already! Halloween, apple picking, pinecones and colored leaves. The season's fly by so quickly I can hardly keep up. We took a trip out to the Old Town main street the other day to pick up our fall and winter spices. It is an all cobblestone street and we had to park and walk quite a way to get to the shop. The various shop windows were all displays featuring Halloween and autumn. In the window of one shop my daughter saw a cute display that included a banner and a brick decorated that she said she would like to make for her house. Now, she homeschools three children so you know who she really wanted to make the display. The first two items turned out to be really easy to do so I thought I would share them this week. Here is the banner and the brick portion of the display:

Here is all you need for the Banner:
Three rectangles of utility fabric at least 7" X 9"
On strip of utility fabric 44" long and 2" wide
Three rectangles of cutaway stabilizer at least 7" X 9"
The Boo embroidery designs (Click here to download the ones we used)
Pinking Shears (optional)
Here is what you do:
1. Hoop one rectangle stabilizer and one rectangle fabric. Embroider the B banner design.
2. Remove from hoop and pink around the banner shape.
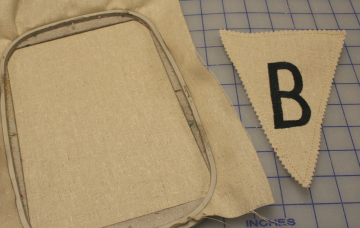
3. Repeat twice for the O banner design.
4. Fold the long strip in half lengthwise and press. Open and fold the outer edges into the center pressed line and press again. Fold in half lengthwise again and press. (the picture I took turned out blank - not sure what happened. It is basically just making your own binding. You could use coordinating ribbon to make it even )
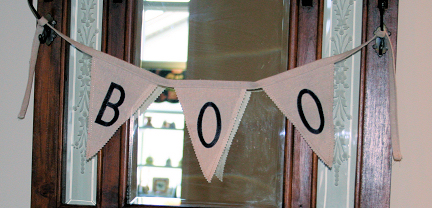
5. Center and sandwich one completed O banner into the folded strip. Pin. Measure 1" right and insert the second O banner. Then 1" left of the center banner and insert the B banner. Sew all along the open edge to complete the banner.
Here is all you need for the brick wrap:
One rectangle fabric 8"X12"
One rectangle tear away stabilizer 8"X9"
The EKKS embroidery design (Click here to download the ones we used)
Pinking shears
Double sided tape or other adhesive
Ribbon or other accents as desired
Here is what you do:
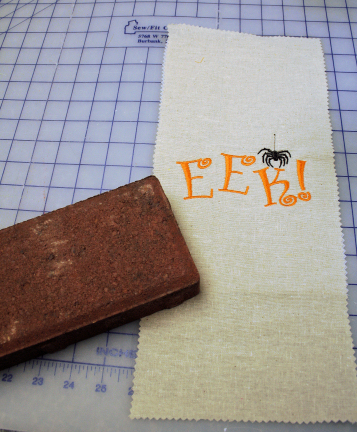
1 . Center the fabric and stabilizer in the hoop. Embroider the EKKS design.
2. Remove the embroidery from the hoop. Remove the stabilizer if desired.
3. Recut the rectangle to 7"X 11" Then barely pink around the edges.
4. Center the design on the front of the brick and wrap. Adhere to the brick as desired (we used double sided scrapbook ribbon tape)
5. Add ribbon or other accents if desired to your wrapped brick.
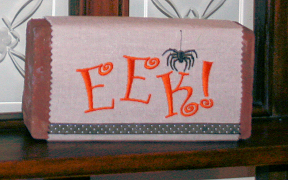
Quick, easy and fun Halloween décor for the porch or the mantel.
Note: We will be making more of these using smaller fabric rectangles to use as candy bar wraps for the dance and guitar teacher gifts.
Here are a few more Halloween Ideas:
Quick Fall Decorating
Tutus and Black Cats
Spiders, Ghosts and Ruffles
Pumpkin Masks
Boo Bags
And there are some additional candy bar wraps here.
I'll post the rest of our Halloween decor soon.
Take care,
DB