Individual characters (letters, numbers and punctuation marks) from my alphabets can
be found on my Stock Design Page. My designs are also available in packs, as described in
this blog. Those can be found here. For designs and packs available in multiple sizes,
choose the size you want in the drop down menu box.
I love bright colors. I especially love them on a black or very dark background, where they can really pop. I also love designing and sewing useful totes, bags and caddies of all sorts. The Caddy for sewing gadgets pictured here is one 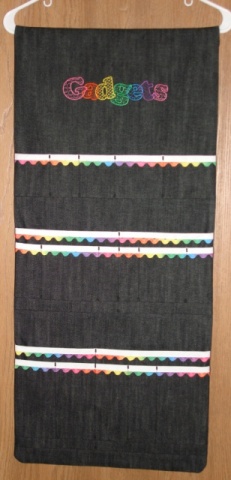 example of the way I combine my interests. I'll talk about this Caddy later in this post, but first let me introduce myself.
Born and raised in St. Louis, I now live about 40 miles west of Chicago. Like many of you, I started out by sewing doll clothes. I made clothes out of felt for my troll dolls. It was in junior high (too many years ago!) that I learned to sew on a sewing machine, and I kept on with it ever since.
I started designing bags when my children were in school. I discovered that teachers love tote bags, so I made them as gifts. I also learned how useful they are for me. I can always find an excuse to make myself another tote bag.
In 1994 I first became aware of automated machine embroidery. The idea of being able to create my own designs really interested me. I finally bought my first machine, a Husqvarna Viking Designer I, in 1999. I also bought the then-current System 5 Professional embroidery software. Since then, I have upgraded to each new version of the software. I particularly enjoy digitizing alphabets. There are so many ways to play with color and personalize an item at the same time.
The Fancy Jumbles alphabet pictured on the Gadgets Caddy is one example. There are ten alphabets, all with the same shape but each with a different "fill pattern" (stripes, polka dots, etc.). Choosing a different fill and color for each letter and slightly tilting the letters creates a fun and playful look suitable for almost any kind of project.
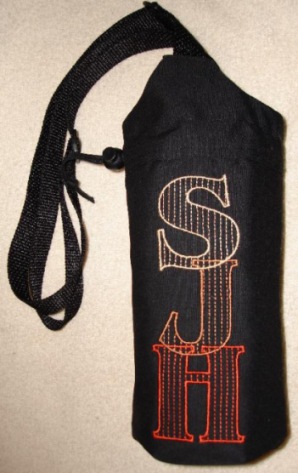
If you want a more tailored style of lettering, look at the Pinstripes alphabet shown on this water bottle caddy. The caddy was a gift for the husband of a cousin, so I wanted the lettering to look masculine.
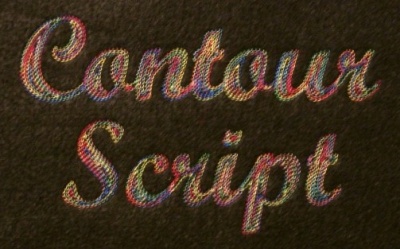
Contour Script is my newest alphabet. The latest upgrade to my software includes a new contour fill pattern. The stitching fills an area by following its shape. Tone on tone, this fill can be very subtle. Variegated on a contrasting background? Wow! I have had many complements on this lettering, and also requests for me to offer it for sale.
Now, back to my caddy...
We all have sewing gadgets that go astray on our sewing table. They get knocked to the floor when we move large amounts of fabric and they never come when we call them! This caddy will keep your gadgets and tools handy and out of the way of danger. The instructions include specific measurements for pocket divisions, but you can adapt the divisions to fit your own collection of useful gadgets. You can also add your name to the embroidery to make it more personal.
When some members of my internet sewing group met last month for a party, I decided that this caddy would be fun to make for our gift exchange. I found some multi-colored jumbo rickrack and then matched the letters in the Fancy Jumbles embroidery to the colors in the rickrack. The friend who "won" this gift will certainly think of me whenever she sews. I will soon make one of these caddies for my own sewing room and will remember the fun for years to come.
Would you like to make your own Embroidered Gadgets Caddy? Click here to view a .pdf file with instructions. The sewing is easy (just straight seams), but it does take some time to bind the pocket edges and attach the pockets. I recommend allowing yourself four to five hours for completion, but you probably don't sew as slowly as I do. I enjoy myself too much to rush.
You will need these products for your Embroidered Gadgets Caddy:
Fancy Jumbles Alphabets, available here.
Denim or other sturdy 60" wide fabric.
Embroidery machine. (Mine is a brand-new Husqvarna Viking Designer Diamond.)
150 mm x 240 mm embroidery hoop or bigger, depending on your embroidery design.
Extra-wide double-fold bias binding.
Jumbo rickrack (optional).
3/4" wide sew-in hook and loop fastener.
Tear-away stabilizer.
Embroidery thread.
Thread for sewing.
Plastic or wooden clothes hanger with base at least 15" across and no vertical divisions.
Have fun with your Embroidered Gadgets Caddy!
- Carol |
 |