October 14, 2011
sewblest
Not rated yet
Applique is usually reserved for embellishing clothing or quilted items. Unfortunately, that doesn't allow for much face time. Holiday applique is especially vulnerable to a short shelf life. But by it's very nature, applique is perfect for holiday decorating where it can be viewed and enjoyed day after day.
Much like freestanding lace, applique designs can be used as a stand-alone piece. They consist of a base fabric, often layered with other fabric and embroidery, and satin stitched all around for a finished edge. Add a hanger, and you have quick, easy, and unique wall art.
 For this project, I chose PLH89 Happy Halloween 02, new from Amazing Designs. It's part of Patrick Lose's Happy Halloween collection. I originally saw the design as a large door hanging kit in a quilting catalog, so I was thrilled to find it as an embroidery design.
This project is excellent for first-time applique users because although it has five color stops they are all black so you don't have to change thread colors.
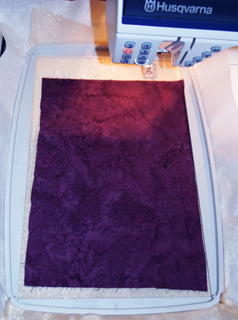
Batiks are wonderful for a project like this. I kept with a purple background and, instead of white, used gold for the moon. Always press applique fabric before stitching to insure there are no fold marks or wrinkles and the piece is as flat as possible.
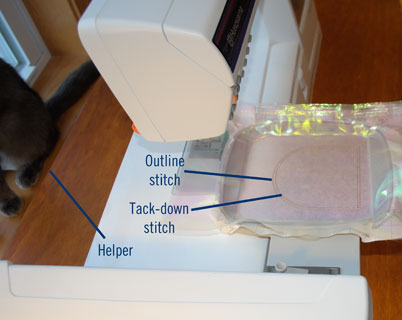
- Hoop a piece of medium-weight tear-away stabilizer or heavy-weight cut-away. Initially, I also included a layer of organza for added stability, but it really wasn't necessary.
- Using black 40 wt. rayon thread, stitch out the first color stop. It will be a placement stitch for the background fabric applique. Remove the hoop from your machine, but do not take the fabric or stabilizer out of the hoop until the very last step.
- The finished size is just about 5" wide and 7" tall, so cut the background fabric 6 1/2" by 8 1/2".
- Spray the back of the purple background fabric with a temporary adhesive and finger-press the fabric in place on the stabilizer.
- Continue with to the next color stop. That will be the tack-down stitch to secure the backing fabric to the stabilizer.
- Remove the hoop from the machine without un-hooping the stabilizer. Place it on a flat surface and carefully trim the backing fabric very close to the tack-down stitch. Applique scissors are preferred as they cut closely.
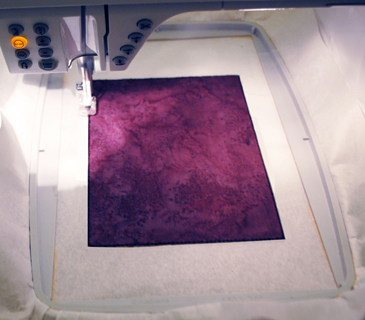
- The third color stop adds a light zig-zag to the backing fabric edge as well as a satin stitch. It ends with a placement stitch-out for the moon.
- The moon measures 4 1/2" square so cut it's fabric 5 1/2" square. Spray the back with temporary adhesive and finger-press in place as in Step 4 above.
- Proceed to the fourth color stop which tacks down the moon. As before, remove the hoop from the machine, keeping the hooping intact, and trim the moon fabric close to it's tack-down stich.
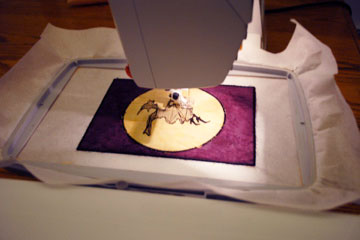
- The final color stop finishes satin stitching the moon and begins underlay stitching for the witch, finishing with the Happy Halloween lettering.
- When stitching is complete, unhoop the mini-banner. Carefully tear away the stabilizer from all four edges. Leave the rest of the stabilizer in place for stability. Carefully trim any stray fibers.
- Using a 6" wire hanger and 1" mini-clothespins, clip the top of the banner to the hanger and enjoy!
Tips:
- If flecks of stabilizer show through the satin stitches, use a black permanent marker to "hide" them.
- Consider making stitches longer during satin stitching so they cover more of the edges.
- Glow-in-the-dark threads will give the piece a wow factor when the lights go out.
- Never spray in the hoop. Instead, spray temporary adhesive to the back of the fabric and finger-press in place.