We are looking forward to another grandchild and I have vowed not to be scrambling when it arrives to be finishing things up. Only time will tell but our grandaughter and I have been working on a soft book for her new brother or sister. We will show it to you when we finish. Of course the other granddaughter, who is only two, wants to make something too. Really, she just likes to sit on my "aps" (lap) and push the buttons to make the machine go and watch it embroider. So when she was over this week she helped embroider the heart on this little blank bear. I added some ribbon and one gift is done. I love to add a handmade gift when I purchase gift cards for new mommas-to-be. These little blanks are so quick and easy to do that I might have to make several to have on hand for this year.
Here's ours:
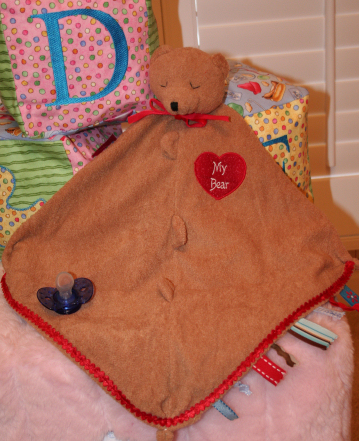
Embellishing a Blankie Blank
What you need:
- One blankie blank, we used the bear but there are several to choose from (click here to see them).
- Embroidery design - see below for a couple of free ones.
- A 3" square of red fabric.
- Ribbon scraps.
- 24" of velvet ric rac trim.
- Embroidery and sewing threads.
- Medium weight tear away stabilizer.
- Temporary adhesive spray.
- Ribbon for a bow around the neck (optional).
What to do:
1. Mark the spot where the center of the heart should be on the bear with a white pencil.
2. Hoop the stabilizer in a 4"x4" hoop. Place the hoop in an old paper box lid or disposable container and spray the stabilizer around the inside of the hoop edges.
3. Pull the opening back and adhere just the inside front of the blank to the hoop using your mark and the center seam as a guide for placement. Place a pin at the very top and bottom to ensure it doesn't move while sliding the hoop on and off the machine.
4. Carefully slide the hoop onto your machine and secure. Embroider the first color as a placement guide for the heart. Place the red square over the placement stitches covering completely. Sew the second color to secure the fabric. Very carefully remove the hoop from the machine making sure you do not shift the blank. Carefully cut around the outside of the heart stitches.
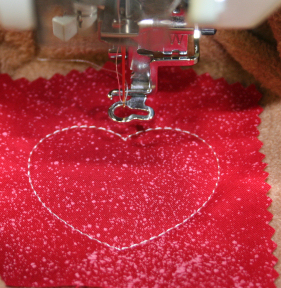

5. Carefully slide the hoop back into place and embroider the third color to complete the appliqué heart.
6. Embroider the final color. Remove the hoop and tear away the stabilizer.
7. Fold the edges of the open side in about 1/2". Cut scraps of ribbon in various lengths with pinking shears or fold them and sew them along the open back inside.
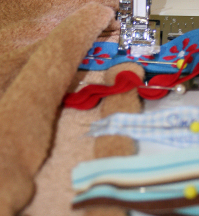
8. Pin the velvet ric rac trim around the bottom of the blank. Sew making sure you catch all the raw edges of the open side. If desired tie a red velvet bow around his neck and tack it so it cannot come off.
Here are my heart designs:
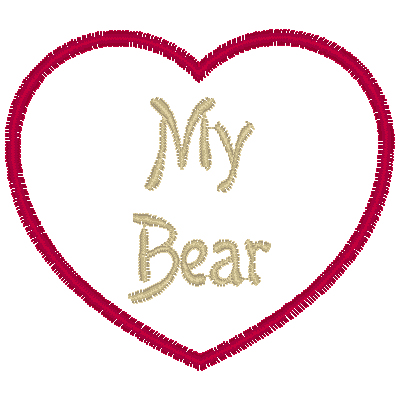 Click here to download the My Bear Heart
 Click here to download the My Blankie Heart
Another idea might be to encase the bottom two sides with satin blanket trim and do the heart appliqué in satin as well. The heart can go on the bottom of the blankie blank if that is easier with your machine. Or just do the heart appliqué and then add the Baby's first initial inside. Get creative and each will be a unique gift.
Take care,
DB
P.S. I just got my registration brochure for the Sewing and Stitchery Expo in Puyallup, Washington. I may not get to go this year (I shot my wad at the Houston Quilt Festival) but it is packed (and I mean packed) with seminars and workshops that I would love to attend. The Ya Ya Sisters, Linda McGhee and Eleanor Burns, all wonderful presenters, will be there. It is just a really fun show - so if you are set for a trip you can go here and learn more about it.