If you are like
me, you subscribe to more than one embroidery and quilting magazine and scour
them all front to back when you finally get the chance. Sometimes I'm inspired
by the projects in the magazines but many times I'm overwhelmed. And any time
that I sit down to sew I'm likely to be in a different mood and it reflects in the
project that I do. There are times I will spend days on one project trying to
make it magazine "worthy". Then again there are times I remember that I
have loads of things to do and not much time so I try to find a way to keep it
as simple as possible.
Now summer is here
and there seems to be even more demands on my time and disruptions at every
turn. Excuse me for a second please -
"No, Emma you may not water the plants inside the house with the hose!" - Sorry
for the interruption. Do you have crazy
days in your lives or is it just me?
Hold on just a minute - "Anna, don't you think milk would be better than
the dog's water for dunking your cookies?"
Hmm.
Anyway, these days
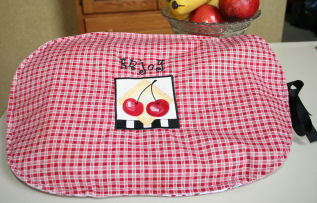
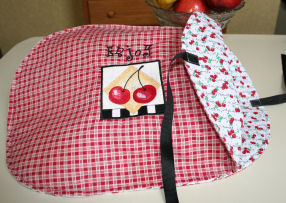
I find myself determined, more than ever, to keeping it simple. Here is a casserole carrier project I have
made numerous times as gifts when I have to take food to a new mother, a sick
friend or new neighbor. I have
embroidered them with holiday designs, fun sayings, notes of sympathy and
favorite bible verses. It is quick, easy and repurposes those old
placemats in a fun way.
What you need:
- Two placemats that
co-ordinate
- Two ribbon pieces
about 12 inches each
- Coordinating
thread
- Embroidery design
of choice (optional but nice)
Step One: Embroider the design.
Step Two: Center the ribbon on inside end of each
placemat and stitch into place. (I stitched a rectangle about ¾" long and just
inside my width on the ribbon.)
Step Three: Align one placemat on top of the other. On a long end mark both sides about 3 ½" from
end. Sew from one mark all the way
around to the other sewing through both placemats. (I sewed right on top of my
original topstitching.)
Step Four: Place your casserole or gift inside, tie and
give it away.
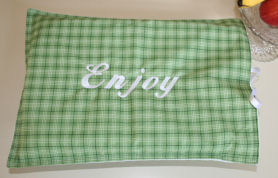
Click
here to download the free
"Enjoy" lettering design in two sizes.
Remember, not
every project has to be a masterpiece worthy of display in a magazine. It is many
times more important just to show you care in whatever way your own special
talents allow. So, in spite of all the
crazy days in your life keep on doing what you love to do and if the need
arises Keep It Simple.
Take care,
DB
PS This is my newest version of classic potato
salad. I really like it so I thought I might share it
this week in honor of Independence Day.
Independence Day
Potato Salad
7 medium red
potatoes 3 hard boiled eggs
2/3 cups sour
cream 1/3
cup mayonnaise
½ tsp salt 1
tsp prepared mustard
¼ tsp onion powder ¼
tsp garlic powder
¼ tsp pepper (or
less) 5
strips bacon, cooked and crumbled
¼ cup celery,
diced ¼
cup bottled Italian salad dressing
Peel, cube and
boil potatoes; drain and cool to room temperature. Cut eggs in half and remove yolks. Mash yolks in a medium bowl. Stir in sour cream, mayonnaise, salt,
mustard, onion powder, garlic powder and pepper. Set aside. Chop egg whites and celery and add to the
drained potatoes. Add bacon and Italian
dressing and mix. Fold in the mayonnaise
mixture. Cover and refrigerate at least
2 hours. Serves 8.