Did you know that Flag Day is this Sunday? It is nice to take a moment and remember how grateful we are for our Country’s Flag and what it stands for. Even when I was a little girl I loved to watch those colors flying in the wind and I can remember feeling so very honored when it was my turn to raise the flag at school.
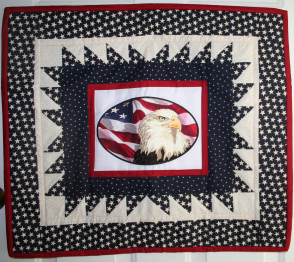
There are lots of ways to show pride in our country’s flag and all it stands for. Here are a couple of embroidered projects that I have done in the past. I fell in love with this design as soon as I saw it. The door quilt was made using just one large design in the center and putting borders all around until it was the size I needed. The design can be found here:
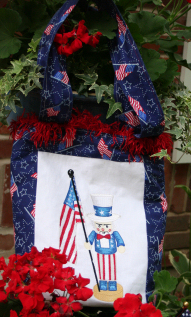
Bags are all the rage right now. They never seem to go out and you all know by now that I make lots of them. They are so easy and fun that I many times use them as a relaxer, a time to get-away - no pressure just the pleasure of sewing. This design is from a collection of nutcrackers I used to make pillows to decorate with one Christmas. Although this one did not fit with my Christmas theme he was such a great design I just had to do something with him. He sat around for a while and then made his way into a stress-free bag.
Here’s how:
Items needed:
- Large white rectangle of fabric 12” X 8.5”
- Nutcracker or other large design
- Medium Weight Tear-away stabilizer
- Embroider Thread for designs
- 1 yard non-directional Flag print fabric
- 3/4 yard red purse fringe
- Sewing thread
Cut the fabric
- 3 rectangles 17” X 14.5” (1 for back and 2 to make lining)
- 2 strips 27.5” X 5” For the straps
- 2 strips 12” X 3.5” for front side borders
- 2 strips 14.5” X 3” for top and bottom border (note: most of the bottom border will disappear when you make the bag bottom)
Embroider the design
Step 1: Embroidery the design, tear or trim the stabilizer.
Make the outside of the bag
Use a 1/4” seam sew throughout
Step 2: With right sides together sew the two side borders to the embroidered white rectangle.
Step 3: With right sides together sew the top and bottom borders.
Step 4: With right sides together sew the back rectangle to the front on 3 sides leaving the top open.
Step 5: Make a bottom by measuring 2.5” from the bottom along the side seams and marking across. Pull the bottom corner out to a point until the marked line is flatancd creates a bottom for the bag. Sew along this line. Repeat for the other side. Trim the corners off. Turn the bag right side out.
Make the bag lining
Step 6: With right sides together sew the 2 lining rectangles together on 3 sides leaving the top open.
Step 7: Make a bottom by measuring 2.5” from the bottom along the side seams and marking across. Pull the bottom corner out to a point until the marked line is flat with the bottom of the bag. Sew along this line.
Repeat for the other side. Trim the corners off. Leave the bag inside out.
Make the straps
Step 8: With right sides together sew down the long sides of the straps. Turn right side out and press. Top stitch 1/8” down both long sides of each strap.
Assemble the bag
Step 9: On outside bag press 1/2” of the raw edge to the inside so wrong sides are together. On the lining bag press 1/2” of the raw edge to the outside so wrong sides are together. Insert lining (inside out) into outside bag and align top edges.
Step 10: Pin the trim between the layers along the top edge.
Step 11: Insert the handles between the layers but behind the trim about 2 1/2” from side seams on front and back of bag. Top stitch through all the layers all the way around the bag.
One fun bag complete. Find the design here.
I intend to celebrate this wonderful day with my Flag raised high and a little picnic on the back porch with a patriotic theme. The girls and I will spend a little time talking about our respect for the Flag and our country that so many have given their lives to protect!
Take care,
DB