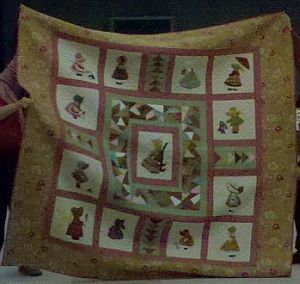
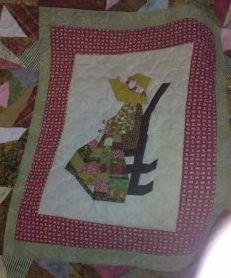
OK, Everybody, If you have followed this blog from the beginning, and have been making quilt block as we go, you should now have enough block to make into a quilt. “How do I do that?” someone says. Well, that’s the purpose of this blog. Let’s put those little buggers all together and make ourselves a quilt.
SQUARE ‘EM UP - I don’t think we have talked about a “square-up” ruler yet. This is a ruler that we use to make sure that all of the blocks are as close as possible to the same size. These rulers come in many sizes, from 2 ½ in. To 18 ½ in. Good sizes to have in your tool chest are a 6 ½ inch and a 12 ½ in. The smaller one is good to have just for cutting smaller size block pieces. The 12 ½ in. square-up is the one you’ll need for squaring up your blocks. Creative Grids rulers are a good brand to use and are available in many quilt shops. They have frosted dots on the back of them to keep the rulers from slipping. They come in a wide variety of sizes and uses. You can see them at this web site.
After you have made your blocks, and before assembling them into a quilt, it’s a good idea to make them as nearly square as possible. When your blocks are all of a uniform size, the finished quilt will lay more flat and it will be easier to quilt. Take each block individually, and lay the square-up ruler on top. Let’s use a 12 ½ in. block for an example. Lay the ruler on the block and line up two sides of the block evenly with two square sides of the ruler. Take a look at the opposite edges of the block.
Are they even with the edges of the ruler? Or are they too large or too small. If there are diagonal lines in the block, is there a 1/4 inch seam allowance left where the diagonals meet so that a seam can be sewn, leaving the points of the diagonal in tack? When making block with triangles, or diamonds, or other similar meeting points at the block edge, it is important to have the 1/4 inch allowance so that the point of the seam is not “lost” in the seam.
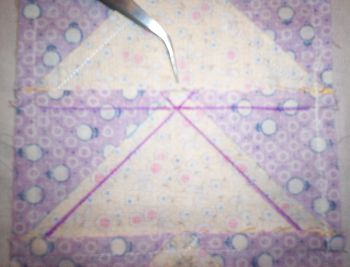
When blocks are sewn together, there are several factors to keep in mind as you sew the blocks together. Be sure that you make accurate 1/4 inch seams so that they will a fit together well. When sewing blocks have opposing triangle pieces, use pins at each intersecting point to make sure that the points come together well. Tweezer tip marks where to place the pin.
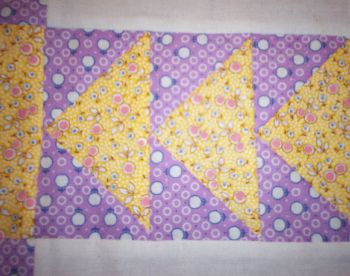
When the blocks are assembled, you want to have all the points in block pieces to show up as “points”, not blunt end points. The first photo shows a block that has all the points. None have been "blunted" by sewing inside the point. In the second photo I have marked with purple marker where the seams come together on the sewn seams. The stitching line is slightly above the point, making the point show corectly on the front.
When you sew the blocks together, it’s a good idea to pin the blocks together to prevent shifting, making the end of the seams uneven. Sew a whole row of blocks together and press all the seams in one direction. After sewing the second row together, press all the seams in that row in the opposite direction. Alternate the direction of pressing seams with each row of blocks. When each rows is sewn together, pin the intersecting seams so that the seam allowances lay opposite each other. This makes the seams lie flatter. I have said before that it’s not a good idea to press the seams open because it makes it easy for the batting to migrate through the seam allowance, leaving pilling on the top of the quilt. Press carefully. Good pressing contributes to the success of any project.
There is quite a bit of "wordiness" in this blog. Some of the things I write about are things that I have learned by word of mouth from quilting teachers in classes. They are a little difficult to explain without an in-person show-and-tell. But they are things that contribute to a more beautiful quilt. I hope I have made them understandable.
After my last blog, I said that I would research and answer a couple questions:
In a recent blog comment, Rosie asked about block size. I’m not really sure what she wanted to know, but I’ll try. If this doesn’t help, please let me know. Block size is most often dictated by the pattern you have chosen. A particular pattern is usually based on a certain size block or combination of blocks to achieve the finished intent. Sometimes you will find books that allow you to choose the size block, depending on the size quilt, but not often. I own a small book called “Quick and Easy Block Tool”. It is in a handy card format, with a corner pin binding it. It has rotary-cutting measurements for 102 blocks, with cutting directions for each block from 3 inches to 12 or 15 inches. It is a quick and simple way to have directions for a whole lot of blocks in one place. It is shown at this web address.
Jelly Rolls are a collection of fabrics from one designer that are die-cut into 2 ½ inch strips and rolled together to resemble a bakery product and tied with a ribbon, etc. Layer cakes are a larger version of charm squares, usually 10 ½ inch squares that are also a collection of fabrics from one designer. They are stacked up to resemble a layer cake. Charm squares are 5 or 5 ½ inch (not sure which) squares. They have been around for a long time. Quilting groups often cut these squares themselves and exchange them between members. Quilt manufacturers and shops began packaging them for sale as groups. All of these are a good way to get all the fabrics as a collection for a quilt made of coordinating fabrics.
Next time, I’ll talk about borders. Please let me know if you have questions. I’ll be glad to answer, or find the answer if I don’t know. Don't forget Florida in March. Check it out.
Stitches to you,
LaRue
Quilter’s Jargon:
Jelly Rolls are a collection of fabrics from one designer that are die-cut into 2 ½ inch strips and rolled together to be used together to resemble a bakery product and tied with a ribbon, etc.
Layer cakes are a larger version of charm squares, usually 10 ½ inch squares that are also a collection of fabrics from one designer. They are stacked up to resemble a layer cake.
Charm squares are 5 or 5 ½ inch (not sure which) squares. They have been around for a long time. Quilting groups often cut these squares themselves and exchange them between members.