I have had it in my head for weeks what I wanted to do this week on the blog. But, as many of you can probably relate, I backed myself into a corner with my schedule and wasn’t able to create the vision I had in my head. I’m right in the middle of two of my busiest weeks of the Fall season and here was my blog deadline quickly approaching!
Then I reminded myself what my AnnTheGran blog is all about---our journey together to make gifts for the upcoming holiday season. And sometimes it’s not about being elaborate or teaching the most cutting-edge method or skill. Sometimes it’s just about simplicity.
One of my favorite features of AnnTheGran.com is that you can shop for all your project needs in one place. Simplicity. So this week’s project is a simple one but sometimes simple is best!
Gift #2 – Something for the neighbor
I have to confess that at times I’ve been guilty of the “bat cave syndrome” when it comes to my neighbors. This means opening the garage door, driving in, and closing it behind me quickly before anyone has time to be friendly. Then I had a baby and my garage started getting full of “stuff” and before you knew it I couldn’t park a car in there. So I had to start parking outside the garage. And soon I knew my closest neighbors! Turns out they are friendly people! The lady to my left is retired and has a cat. She’s a busy lady but you can catch her at home every day at the same time, which is when her favorite soap opera is on. And she always has a cup of coffee in her hand while watching it.
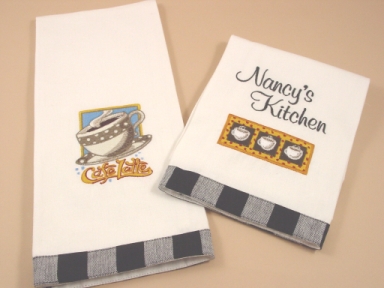
So in an effort to be more neighborly, I would like to give her a little something this holiday season that says “I’m glad we live next door to you”. I found the PERFECT designs for some kitchen towels. Using a couple of the very popular Vintage Gingham Trim Kitchen Towels, I created a quick and simple gift. Maybe this will help you in your quest for that little “something” you want to create for your neighbors. After all, we’re making our gifts early this year, remember!?! So gather up the supplies below (they are all available at AnnTheGran.com - click on the links to see the products!) and get to stitching. This week we’ll knock out another couple of gifts---with 77 more days to go before Christmas!
Supplies: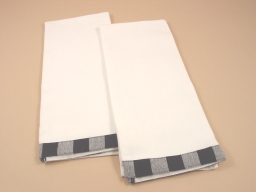
Vintage Gingham Trim Kitchen Towels, Black Border
Ann The Gran’s Medium Tear Away with Adhesive Back
“Coffee Break 1” Design collection by Amazing Designs
Optional Lettering: “Murphey” Alphabet Design Collection
1) In your embroidery software, open up the designs of your choice from “Coffee Break 1” collection. I added lettering to one of the designs to make the gift personal. I feel that as long as you are taking the time to stitch something special, make it personal by adding the gift recipient’s name. This little added touch makes all the difference! I once again turned to one of my all-time favorite fonts—Murphey from AnnTheGran.com. I have gotten a lot of mileage out of this particular set. It’s perfect for children and adults alike and I like its casual elegance.
2) Print a paper template of your design. This is a very important step that I think a lot of people skip. I cut out the paper version of my design and spray it with just a bit of adhesive spray. Because I am a very visual person, I need to be able to play around with the design placement to see just what is pleasing to the eye. This is also important when you are 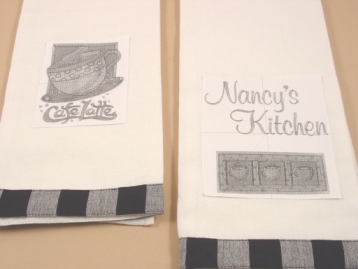 working on a pair of items. You want to be sure the designs line up well and are complementing each other. Assume the finished items will be hanging together in a kitchen or bath. You want them to match and paper templates are a great way to accomplish this. In addition, paper templates usually have the centerpoint indicated, which makes hooping the item so much easier!
3) Hoop the sticky stabilizer and position the kitchen towel onto the sticky paper. I like to pin around the edges (or some of you have that nifty stay-stitch built into your embroidery machines). No need to hoop the towel! Why make it hard?!?
4) Finish stitching, remove excess stabilizer, and iron lightly from the back of the towel. You’re done!
So maybe I didn’t razzle and dazzle you with a new technique this week. But if I helped you decide on a quick and easy gift that is truly personal, then my goal here is accomplished. I’ll try to razzle-dazzle you in a couple weeks when we tackle Gift #3. Now, pick up a dozen of these fantastic towels, and get to stitching!
Best to everyone,
Susan