
Now that we are formally introduced, I am going to be talking about some pretty basic things this time. At least for those of you that have been around for a while,with not only ME, but sewing in general. The following is a list of sewing terms that may help clarify more easily for you both in ME and regular sewing, on a regular basis:
Basting Stitch> Is the longest stitch on the machine, and is used to hold the fabric in place, so you can sew out your design without everything shifting.
Bias> The diagonal of the weave or a line across the grain of the fabric, drawn at a 45-degree angle to the selvage edge; cloth cut on the bias will stretch, allowing for smoother fit around curves.
Selvage> the edge of a piece of fabric, finished by the manufacturer to prevent unraveling, and provide information as to the manufacturer, colors in the fabric and the direction of the design or pattern.
Tension> the balance between the bobbin and the needle threads on a sewing machine, correct tension ensures a perfect stitch.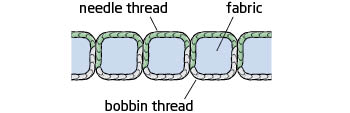
Right Side> The patterned, printed, or figured side of a piece of fabric, the side that is intended to show.
The reason for this is to familiarize yourself with some basics of sewing principles. I am a firm believer that before we can apply too many shortcuts, we must first learn some of the basics. Why is this important? It is important to learn some of these techniques so when buying fabric, it gives more of an idea what to look for. When you start a project, you should know what you are going to need to complete the project from start to finish. It is also important to know what and how much/many materials you will need before going to shop for this project. This way you can do the complete project the most efficient and cost effective way for all of our budgets. Last but not least, you know how to cut the fabric to suit your needs for this particular project idea. As with any thing else with ME, or sewing, it does require some planning.
Now come the questions>>>How much am I going to need? 1 yard for a simple framed picture, or 3 yards for a wall hanging. Is this a very stretchy fabric? Like a t-shirt material, so you know what type of stabilizers to use, as well as needle choice. How wide is it? Fabric comes in various widths, so the wider, the more you will get out of it. What is the density (stitch count) of the design, and is it suitable for the chosen fabric? This is important to get the maximum effect, we need a fabric that can withstand the density of the design you have chosen. For instance, on a thin flour sack towel, I would choose a design like either a vintage or redwork, something that is light and airy. If you put something heavier than that on it, you are setting yourself up for disaster. For clothing I would use a design that is a bit light and airy, but that has more substance than a vintage design.
Very important as most of us (me included) want to put some of those high density, beautiful designs on something that just will not withstand it. Remember, you cannot change the makeup of the fabric that you are using, You can only stabilize it to hold the chosen design. In short, the fabric is what it is, you can't change that fact. I once had a very smart lady tell me that you can never over-stabilize a design! You can ,however under stabilize it.
What am I going to do with it? What project do you have in mind for this particular fabric, a wall hanging , or a quilt block? All these things are questions to ask yourself before sitting down at the machine. Most important question a lot of us ME folks who hoard fabric ask is, "when am I going to use this fabric"? The answer is, "Oh sometime in the future", and "Oh I know what the perfect thing is for this". With us that could take a while! These are all things we should ask ourselves when shopping for fabric. I like to get extra, so if I need 1 yard I get 4........See what I mean! Sound familiar?
The next is cutting. Why is that important? A mistake in cutting cannot be taken out like a poorly sewn seam. With an expensive fabric it can become costly in a hurry. a very wise person told me long ago, "Measure twice, Cut once!" Words to live by in my book! I keep a note pinned in my sewing room to remind myself of this every time I go to cut anything. OK, is it obvious that I have a lot of sticky notes everywhere in my sewing room?
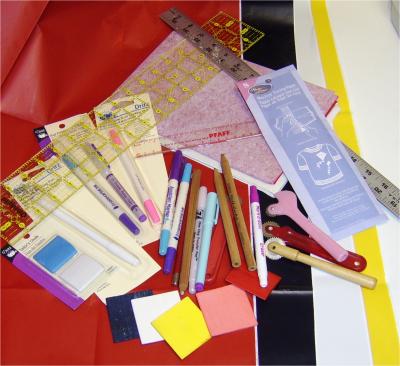
A good measuring tool is the lip Edge Ruler. A lot of quilters use them, they are worth whatever you pay for them! I use mine for almost everything! The reason for that is that it will lay flat on your cutting mat and hold the fabric in place so you can take your rotary cutting tool and follow along the edge for a perfect cut every time. Again, planning is the key. There are many types of cutting tools, the most popular is the rotary, the cutting mat and the lip edge ruler. It is also likely the easiest to use. 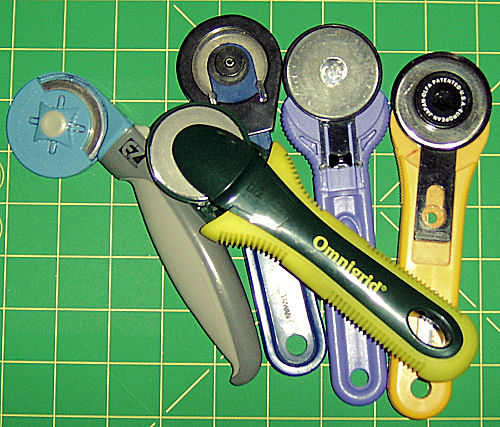

Also with ME, I cannot stress enough how important it is to do a "Test Sew"! I have heard many excuses for not doing this. For me, it is a necessity! It tells you so much about not only the design, the weight of the combination of the design and the fabric, how they blend together, your stabilizer,h ow much and what type to use, colors, size of design, and yes even the needle type you should use! There are two mistakes that you can avoid, the first is Not making a sample, with your actual fabric, threads, and stabilizer you plan to use. Remember that everything shrinks at a different rate, and can leave your garment puckered and unwearable. The second is start ME'ing a design, only to realize too late that the design is not placed exactly where you wanted it. One way to predict how the embroidery will look and a way to place it on the garment; First, make your test sample, but don't remove it from the hoop, use chalk or rinseable marker, to draw a line around the inside wall of the hoop directly on the sample. Then remove the hoop, cut out the sample along the chalk line, and position it on the garment. Pin in place, mark along the edge of the sample directly on the garment (use only removable chalk or marker). When you remove the sample the remaining chalk circle is a perfect guide for placing the hoop to begin your embroidery, ensuring the design is exactly where you want it. I would rather lose a $5.00 piece of fabric rather than a $65.00 jacket. All it really costs me is some time and some thread, but I have guaranteed myself a beautiful, completely wearable garment!
Suzy's Tip Of The Week!: Keep an Excel sheet of all of your thread colors and manufacturers, along with all of your sewing and ME needs. When you start running out, you can simply go to your sheet on the computer and put a mark next to the things you need, including, stabilizers (you get from ATG of course!),needles (what type and size), ribbons, elastic and so on. Add anything you may need either from the fabric store or online store. Print it out and take it with you. It is a wonderful time saver. The most effort you will put into it is at the very beginning when first making your list. Any trip to either the fabric store or online store is a breeze as it is all right in front of you including upc codes, manufacturers and where you got it from!
Signing off until next time....................................................Happy Stitchin'!
Remember to K.I.S.S someone you love today!
Judy/AKA Suzy !