January 4, 2008
atgadmin
Not rated yet
 For Diane Brown, embroidery started as a hobby to get away from all the stress of her job as a bank compliance officer. It didn’t take long, however, for her obsession to blossom into a new career. For a number of years she has been working behind the scenes in the development of software and embroidery designs that are fun and easy-to use. Creating embroidery software learning tools and fun projects that inspire creativity is her specialty. “Embroidery should always, always be fun” is Diane’s motto.
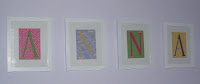
Using embroidery to make whole rooms come to life has become a real passion for Diane. Themed nurseries are her favorite, although she loves creating comfortable accessories for every room in the house. These simple framed letters were inspired by some very expensive accents but were a fraction of the cost. They were fun to make and they match the nursery to a T.
Diane's Description 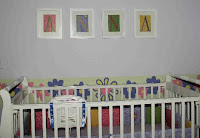
I gasped when my daughter showed me some stamped, framed jumbo letters in a very popular magazine and said she would love to have them for the new baby’s nursery. But the price was astronomical. So, we used AnnTheGran’s Jumbo Alphabet, scraps from the nursery quilt, hand cut mats from cardstock and some simple white frames from the local discount store.
Step-by-step
1. Cut 4 8”X10” rectangles from fabrics of your choice. Spray starch your fabric if desired as this will help give you a professional finish.
2. Hoop fabric with a heavy weight stabilizer (tearaway or cut away should work fine). To be sure it is centered fold the fabric in half and finger crease both vertically and horizontially.
3. Choose threads that contrast with the fabric. Just a tip: I always use the same color thread in my bobbin as in the top when I do any type of lettering. Embroider the letters that you need. 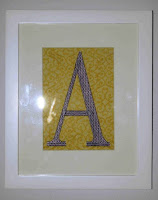 Cut the stabilizer even with the edges of the fabric.
4. Cut a piece of cardboard the size you want your mat opening to be. Use this as a template for cutting your mats. You can use precut mats if you like.
5. Place the mat face down on your work surface. Center the letter in the opening and glue the fabric front to the mat back. I left the stabilizer on and glued the edges of it down to the fabric as well.
6. Place the matted letters in the frame.
7. Note: If you have software you can resize these letters to 6” tall and then for all but the widest letters they fit perfectly in a 5X7 mat or frame.
What makes this project special?
I love being a grandmother and being able to make things that are loved by my daughters. It is fun to see a whole room take shape and know that there is no one else with one just like it.
Skill Level
Beginner
Products
My embroidery machine
AnnTheGran Jumbo Alphabet
Stabilize It! heavy cut-away stabilizer
embroidery thread
fabric
Time Investment
Two to three hours once all the supplies were gathered.
Why You Love This Project
It was for Anna – my precious new baby granddaughter.
Send Us Your Creations
Do you have any creations that go with a great story? If so, I'd love to hear about them, and see them! If I choose to post your project, you'll get a free $25 gift certificate to use in the AnnTheGran.com online store. Click here for details on how to submit your creation.
What Would You Do?
Diane's passion is room decor, particularly themed nurseries. Do you have a particular passion or specialty at which you excel? Click on the Comments link to tell us your area of expertise.