Time For Kangaroos And Pop-Up Baskets?


Hello Everyone!

Now that you have some of the basic things down pat (right?), we can move along to some other things, like the fun stuff with ME and sewing! This selection will include a simple project I think everyone will not only enjoy doing, but giving as a gift as well.

First and foremost we are going to discuss some of the tips, tricks and hints I have been talking about. Let us take for example just getting ready to do this project we are going to do today. What is the first thing you do? Do you first look at the field on which the embroidery will be going? Or do you first find a design to put on "something"? OK! Here's the scoop, we all want to have more time to do our craft, am I right? Yep! I thought so! So here is a list of things to consider when working on any project.


The first thing you should do is look at the item you have chosen to do the embroidery on, while looking at it, just for kicks, let's go ahead and find the exact center. Second, what design(s) have you chosen for it? Again, for the heck of it, let's go ahead and re-size our design(s) and move them to either our card or machine ( whatever you do for your brand of machine). So, now we are ready to begin sewing,right? Not quite yet.

Next let's go ahead and check the needle and if necessary, change it. Now prepare your colors on your Thread Pilot or if you are changing them one at a time, place them all to your right within easy reach. Prepare all of your necessary bobbins (this project will likely take two), place them within easy reach of your machine. Now do your test sew, and because I only had one of these I used a piece of cotton fabric, as I only wanted to make sure the re-sized design sewed out properly. Once this is done to your satisfaction, save the design to the machine for safe keeping. This will hold all the settings you have created with your test sew. Once the test is done and you are satisfied with it, remove it from the hoop, then prepare the hoop for the actual stitch out,and set it up ready to sew.

What the test sew should have told you is (a) what type of stabilizer (b) is the design big enough for your item (c) how long it took to complete (d) what colors to use (e) was the needle type working well with the design (f) Was the proper speed working well with the design. Now I know this doesn't sound like much but when you put it all together, it is more that you think,

By now you have already completed for the project, (1) the item prepared and already centered for your design (2) your thread colors set up on your Thread Pilot (3) your design(s) re-sized and moved to your machine (4) sewn out with your test sew (5) the stabilizers chosen (6) needle type (7) made any necessary changes in the design, needles and stabilizers (8) prepared the hoop for the actual project (9) saved it to the machine (10) wound your bobbins (11) moved everything where you need it to be for the actual project.

Now you are ready to sew the design to the actual project. By doing all of this as you go along, it will save you so much time, instead of going back and doing them later. When you do that, you are actually performing the same tasks twice!

This is called "Time Management". It is very important in everything we do, especially if you are still a working person and have little time to sew as it is. While working in the factory I learned really fast how to make the most of the time available to sew. You see, in doing this type of sewing everything is based on time. How long does it take for each step you are performing, and how many can a person do in an hour. By watching ourselves, and how we do certain things, we can improve on how we do them. The best way to do this, short of videotaping yourself, is to keep a written journal of the steps you take when doing your ME or sewing. Just number the paper from 1 to 25 and jot down each step as you do it, to complete a project. Once you have it in writing, it is easy to see how many steps it takes you to complete this project and what you can do to save yourself some time. There is something about having it in writing that makes you aware of the steps you have made to get the most out of your time. Many of us spend more time getting ready to sew than actually sewing, me included at times! (We won't go there!)  Wink

I stack all items within easy reach, most of the time I don't even get up from my chair, except to do a thread change. I clip the thread as close to the Thread Pilot as I can and still get it into the tension spring, then tie the new color to the previously used one, then pull all of it through to the needle, thread the needle and start again. Rather than having to completely re-thread every time I have to change a color.

I keep all of my stabilizers at the right of the machine and have them low enough that I can cut them from the wall unit. All of my thread is behind the machine, but the frequently used ones are at my right hand side. All of my scissors I keep on the right of my machine, as well as the bobbins I will be needing for the project, and my Sidewinder. Extra needles in the right hand drawer, as well as the screwdriver I use for my hoops and needles. The trash basket is also to the right of me within easy reach to discard anything I need to. If I am sewing multiple items, I keep them to the left of me so I can grab them easily. the main thing to remember is keep everything within easy reach and close proximity of your machine, without getting too cluttered. As you all know , though this is only a small part of the tips and tricks i was referring to, not necessarily a shortcut but more like training yourself to be more aware of what tasks you are performing and how you are completing each one.

Now here is the project I promised you all! I would like to take this opportunity to introduce you to one of our Central Florida Gals, so:

Introducing Norrie and her Laundry Hamper/ Diaper Stacker!                                                                                                         Norrie brought this project to the luncheon we had, and I thought it was really cool and different, not something everyone would think to embroider on for sure! The good news is that it has a dual purpose, it can be a laundry hamper or diaper stacker. It would be really awesome as a personal baby shower gift, or just to give to your kids to entice them to clean up their rooms! ( yeah right) I would also imagine that it could be used to store toys in as well - you could even personalize it for them.

To complete this project you will need:

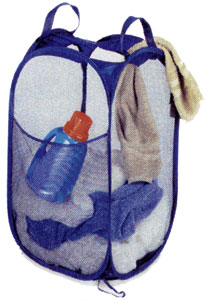
1 Mesh Type Pop-up Laundry Basket

Ann The Gran's Happy Animals Design Set

1 Piece of Ann The Gran Water Soluble Stabilizer/Adhesive Back

1 Piece of Ann The Gran Water Soluble Stabilizer for the toping

Catalog Xpress


The first thing to do is to turn the laundry hamper inside out. I made the design larger with Catalog Express, so it would better suit the size of the embroidery field. Now cut a piece of Ann The Gran's Water Soluble/Adhesive Back and put it on your hoop by peeling the backing off part of the way so you can attach it to the bottom of the hoop. Lay it on  your work area and then pull the rest of the backing off so as to attach it the rest of the way on the hoop, making sure it is a snug fit on the hoop, with no wrinkles. Cut off the excess stabilizer, making sure it fits snugly on your hoop and won't slip in any way. Next lay your laundry basket onto the sticky surface and smooth out gently with your hands to attach the two together. Now lay on your piece of Ann The Gran's Water Soluble Stabilizer and fit your hoop together, making sure it is smooth and gently smoothing it with your hands. (I will be honest with you, you may need the help of someone depending on your hoop type to help you tighten the hoop) Snug your hoop together as tightly as you can without stripping the screw; it must be fairly tight or it will pop out of the hoop. You are now ready to position it on the machine and lock it in, being careful not to pop the hoop. I also slowed my machine speed down as I thought it would aide in the stitching out so as not to jar it too much and pop the hoop. I used a "Sharps" needle because of the type of material it was being sewn on.

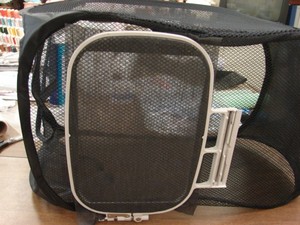
      This is what it should look like after hooping it. (Photo courtesy of: Norrie)

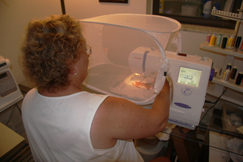
I then began stitching the design to the basket.


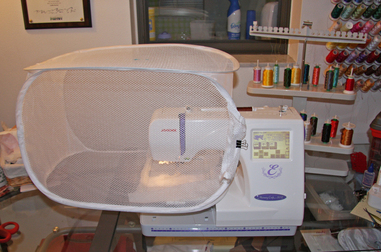
Once it got started good I then was able to take a bit of a break until the color change.   


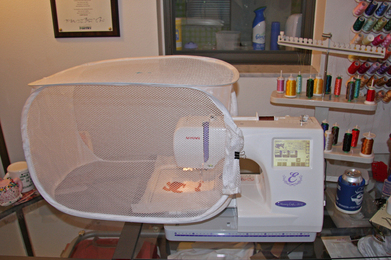
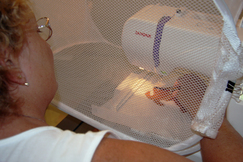
 (Photos courtesy of T. Alcumbrack)

It was not too bad clipping the threads, and changing colors, at least not as bad as I first thought. Thanks to Norrie for supplying me with the directions and some photos so I knew how to do this project.


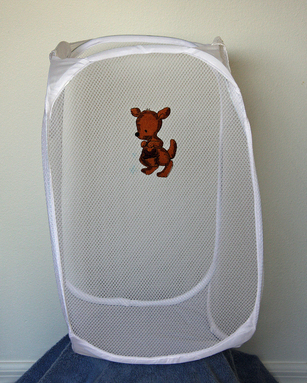
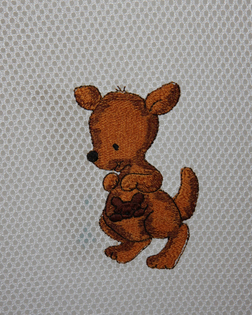
All you do when the design is complete is to turn the basket right side out. Here is the finished product, a cute and lovable Kangaroo and Baby! Perfect for a diaper stacker!


 It was an enjoyable project that is easily completed in an hour or less by anyone from beginner to seasoned ME'er! I purposely chose a design with very few color changes, as I think with this project it is much better with having to reach inside the basket to clip threads and do colors changes. I found Ann's Designs a joy to sew as well, they had only one time I actually had to trim a jump thread. Thanks Ann for designing the animals to sew out with few jump threads. Ann always makes it so easy for me to do a project!!

A special Thanks to Norrie for her idea, and the use of her photos and directions. For taking the time to do this so I could feature her in this blog, she is a very busy lady so for her to do this was extra special for me!


Suzy's Tip Of The Week!       By keeping your sewing room clean, it is a huge time saver! I like to clean up after every time in there, that way I know where things are when I return to it. Not having to look for everything when you begin is a big time saver as well. You can actually start your project instead of having to clean up before you begin. I know if you are like me you would rather be sewing than cleaning, but trust me it is worth the effort!


Judy/AKA Suzy!   

                                                                          Remember to kiss someone you love today!

Selvage: The edge of a piece of fabric, to prevent unraveling and is cut off before you start sewing. It also provides information about the fabrics such as design, manufacturer, colors in the fabric and the direction of the design or pattern.

Hem: a finished edge, usually folded under and stitched also referred to as the bottom edge.

Notch: On a concave curve, to make clips to allow for flattening the seam

Til Next Time>>>>>>>>>>>>>>>>>>>>>>>>>>> Happy Stitchin!

Comments (45) -

Judy:


The project looks fun and your tips are really helpful.  I could see this with sports stuff embroidered all over it for a teen boy's room.  Maybe the clothes would actually make it in if it were decorated like a basketball hoop.  Hmm, I only have girls, so will have to think of something else.  Maybe bunnies.  Thanks for the post.


DB


jalcumbrack 8/29/2008 1:09:33 PM

Hi DB,


Yes the possibilities are endless with this project! I actually have a new Great Neice, so this will look nice in her room for either a diaper stacker or clothes basket! Thanks for the comments, Glad you liked it!


Judy


I think this is one of the most imaginative projects I have seen in a long time!


I love the versitility of it, diapers, dirty clothes, toys and I might even place it on its side and use it for storing towels and/or linens.


Did the net cause any problems?  I was thinking that the holes are usually a little large.  That kangaroo is adorable!


Pat


This is a fantastic project.


Instructions and tips are great.


OPPO        


jalcumbrack 8/29/2008 4:50:51 PM

Hi Pat,


Thanks! Yes Norrie came up with a very good idea here,imaginative and easy! I can only imagine the possibilities with this one!


The netting wasn't too difficult,with using the water soluble/adhesive back the net stuck to it very well,and by using the water soluble on top it helped to adhere not only the netting but the top layer of water soluble as well. I must say though to use a new "sharps" needle to keep it from pulling the netting any at all. Even though the top layer was on there I still worried that it may "pull" the netting anyway so I took every precaution. I am working on some other "netting" type projects for gifts for Christmas,once I have them complete I will post them. Seeing Norrie's project has opened up a whole new world for me as far as blanks are concerned! It just proves to me that anything can be a blank canvas for me! That bathroom rug is still calling to me!


I actually thought of the linens thing. I have 6 very huge cupboards in my hallway that I store linens in and have been looking at the very expensive baskets that are from the home store,so thought this would work as well and be a lot less expensive. I have seen these baskets for as little as 2/$5.00 in some places,so the savings would be tremendous over the home store type,and yet would solve the problem of the un-organized look in the cupboards. By adding designs to them it would really be much more attractive as well as useful!


jalcumbrack 8/29/2008 4:56:50 PM

Thanks OPPO,


I am so glad you liked it! It was very fun to do as well! Hope you have as much fun as I did while doing this one!


travelbug1237 8/29/2008 5:35:21 PM

HH Judy/Suzy!!!!,


   What a DARLING project!!!! It is SOOOO cute!


There are so many things I like about your blog & so many helpful tips....especially putting all tools close at hand so you don't need to get up once you get going! ...also  LOVE seeing your CLEAN and organized room!!!


It looks so bright and cheery!.


Great job again!!!


  Smile


CinO


tourlady522 8/29/2008 6:03:27 PM

Thanks for the great blog on this. I am thinking of different ways I can use this myself. I sell things at a craft store & I bet they will sell well.


Thanks again.


Bonnie


jalcumbrack 8/29/2008 7:56:24 PM

Thanks Cathy! yours will be organized soon,just hang in there. the main thing to remember is to clean up after every time in there,it gives you the gift of time with every new entry into your sewing room! Once you get a "feel" for where things suit your needs then it will be a breeze!


Judy


jalcumbrack 8/29/2008 8:13:32 PM

Hi Bonnie,


You are very welcome,but the person to really Thanks is Norrie for bringing it to the table and sharing with us all how to do it. Her wonderful instructions and photos to me are what did it! Yes I bet they will, they are so multi functional! I actually was going to see if the ladies in my sewing group here in the complex would like to have some to sell for a fundraiser coming up. I bet they will sell like hotcakes!!


I am so glad you liked it and wish you much success with them!


Judy


I was really impressed when I saw this at the luncheon.  I've been playing it over in my mind on how to go about doing this.  Thank you Norrie for a wonderful project and for sharing it with us.  Thank you Judy for a great blog.  I think I might be ready to give this a try now.


jalcumbrack 8/30/2008 7:44:01 AM

Thanks Roseanne!


You can do this for sure! With what I saw in the Media section on the Central Florida area,I know you can do this one! Your Fabric Bowl and Doily were spectacular!


Thanks and I am so glad you like it and was helpful to you. I know many had talked about this one but no one could remember how it was done. I liked it because it was so multi-functional! It literally could be used for anything!


Judy


I was very impressed with this project.  I make lots of stuff for babies since the new granddaughter arrived.  This will make a great addition to the field.  I can imagine it filled with bibs, burpcloths, matching blankets, etc with a bow on top....no wrapping paper needed!


jalcumbrack 8/30/2008 12:49:17 PM

Thank you so much! Wouldn't this make a spectacular shower gift filled with all sorts of wonderful baby things! Like you said put a bow on it(and maybe even include a rattle in the bow) it is sure to please every new mommy! Let me know if you need an easy burp cloth and bib pattern,I have one I had created years ago when my kids were small.They are simple to make as well as inexpensive,completely washable and hold up extremely well.


I am glad you liked this project so much,I loved doing it! It was fun and functional!


Judy/Suzy


wOW THAT IS INCREDIBLE.  i'LL HAVE TO TRY THE DESIGN.  i WOULD ALSO LOVE A PATTERN FOR THE BIB AND BURP CLOTH.

I would love the burp cloth and bib pattern.  I was making burp cloths out of diapers, but can't get the weight I prefer any more.  Thanks in advance.  ;>) MS


jalcumbrack 8/30/2008 3:12:23 PM

Hi Kewankiw and Pyracantha,


If you could just e-mail me through the site I will send you the patterns for the burp cloths and bibs.These are much easier and much more practical and economical as well. I am sure you will love them.


Judy/Suzy


This sounds great.  Im new to your forum and this is a great start.  I will give it a go for a friend who is expecting a new baby


jalcumbrack 8/30/2008 4:24:08 PM

Hi Marieclay,


Well, let me personally Welcome you to the site and the blog! I think you will find any thing you could possibly want on this site. We have so many blogs to read and so much to offer here. If you have any kind of question just post it to one of the forums and someone will answer it.


Thanks a bunch and I am glad you liked this project. I sure hope to see more of you in the weeks and months to come!


You may also want to check out the Groups section if you're from Florida! We love to have anyone pop in and give us a big Hello!


Again Welcome,hope you enjoy it here!


Judy/Suzy


An adorable project Norrie!


Fantastic visual instructions Judy!


Joan/NJ


sheilahopkins 8/31/2008 12:25:58 AM

Did you turn the hamper inside-out before stitching on it?


jalcumbrack 8/31/2008 4:04:25 AM

Thanks Joan! Norrie sure came up with a winner here,didn't she. I am glad you enjoyed it. You can thank the photographer in the family for that one! He always does a great job with the photo's.(I'm the producer though! LOL) How have you been doing?


Sheilahopkins, yes I did turn it inside out first,you have to be careful when doing that as it likes to pop back into it's original form,when you turn it right side out also be a bit careful with it as well as the rings they use in them are really strong but can get a little mishapen if you are too rough with it.So I just sort of messed with it a bit to get it back into it's original form.


You can really decorate this one up a lot if you care to,by adding names,or even more animals. The main thing is to have fun doing the project,I know I sure did!


Judy/Suzy


jalcumbrack 8/31/2008 4:44:03 AM

mspacman>>> Please send me your e-mail address via the e-mail here at the site so I can send those bib patterns to you. You e-mailed me but did not include it,because we go though the site I have no way to get it,yes ATG protects everyones privacy when you e-mail someone through the site unless you include your own personal address no one can get it either.Please do not post it out here as it is safer through the site.


Thanks!


Judy


Judy, absolutely love the step by step, draw me a picture, way you do your tips and helpful projects.  will use this for my new grandbaby.


Love ya,


Marylou


Thank you for sharing.  This is really neat another idea is use this to stack your stash material....embroider it with small sewing items or applique some swatches of what is in it.  


What a great project. My step-daughter just had a baby and her decor is classic pooh. I can see him on this also as a diaper stacker.


Where can you get this? I have not seen it. Or maybe I have and not really looked? what is it called?


Another idea I did. Does everyone know the mesh bags that are being made and used? I made one without adding any material, but ME'd a cute rubber duck and gave it to my neice for a tub toy holder. All the water runs out of the bag into the tub and the "mess" of kid toys are taken care of right away.


I used the wss on both the front and back. Was really cute. Since my neice lives in Ohio and I live in WA I cannot take a photo of it... ( I keep forgetting to take photos of the things I make for my scrap book... drat!!)


I too would love your bib directions.


Thanks


cme


I forgot to mention. A friend of mine did a welcome mat. Her friend was into horses but could not find a "cool" welcome mat. She bought a plain inexpensive one. Got a two horse designs. Started with new sharp needles. She made the horsed facing each other, so she had to mirror one of them. The sewout was wonderful. Her biggest problem was sitting there to hold the matt while it was doing the sewout. She did not have a large enough table (at the time) so she had to help support the mat.


Just another idea for anyone to try.


cme


jalcumbrack 8/31/2008 1:24:11 PM

Hi Marylou!


Thankyou so much! It will make a great gift for baby for any occasion! Even just for the heck of it! Thanks,I am glad you like things so far,there is much more to come. I certainly will be doing many more projects for sure.


Hi Jozilla,


You are very welcome,that is a very good idea too for the fabric stashes,we all have one of those I am sure of that one! Great idea putting a swatch on top of it as well!Thanks!


Hello CME,


These are actually laundry baskets,and you can get them at places like the major retail store or even your local drug store has them on and off, as well as online,just type in mesh laundry bag. I got this one at the major (walmart)retailer in our area and know this type of store is everywhere!


the toy holder is an excellant idea too,it's great to help keep the bathroom organized and toys out of the way! The next one you do you may want to try some of the Ann The Gran water Soluble/adhesive back,it is wonderful for this type of project!


Send me your e-mail address via the site and I will send you photo's and directions for bibs, if you want to veiw them you can do so by going to the Central Florida Embroider's area in the Media section,I posted some pictures of them yesterday.


The welcome mat sounds like a fun project! I would like to try that one as well.I also want to try to do something on a bathroom rug too,but am having a hard time convincing myself the rubber backing won't wreck my machine,not worth it in my book to try it! But it sure would be awesome!


Thanks so much for your positive comments and inspiration for many more projects for folks to try as well! I am glad you are enjoying your time here on the site. I hope to bring many more interesting and different projects out so everyone can do them. Most are practical,but I have a few fun ones as well!


Again Thanks everyone,Glad you like the project,but again I have to Thanks Norrie for letting me do it for all to see! Thanks Norrie!!


Judy/AKASuzy


serenemachine2 8/31/2008 9:56:35 PM

I am alwaqys amazed at he imagination of creative people!!!  Never would have thought of this on my onw, so thank you for all the information.  I just love this site!!!


jalcumbrack 9/1/2008 6:22:36 AM

Hi Serenemachine2,


Thankyou so much. I am so glad you love the site(so do I) They just have so much to offer folks here,and that amazes me! It's not just about sewing, or ME, it is the creativity of everyone and everything on it!


Judy/Suzy


Hi Norrie.  I also live in central Florida and would like to keep in touch with you. I am going to try your project and use it for myself.  I am a lighthouse collector and have loads of nice designs.  I will try to pick a simple one to avoid having to clip and rethread.  Thanks again.

jalcumbrack 9/1/2008 12:39:10 PM

Hello sneaker1,


 Thankyou so much!! I so very happy that you liked it!!


Well I am not Norrie, but the one who featured her idea. I am Judy/AKA Suzy  and I write this blog.


I was so Honered that Norrie let me feature her idea for everyone to see! I am from Florida,around the Tampa area. Have you checked out out Groups Area yet? You should come in and say Hello to all the folks in there,we love having new folks to talk ME with!! Just click on Groups and we are not hard to find as we are the only ones in there for the time being! We have lots of fun conversations,please come in and join us!


I love lighthouses as well and have many wonderful designs of them,some in cross stitch and others that look like a painting when they are done. the are so peaceful looking I think! To me that is what the beach is for me,totally relaxing!!


One little bit of advice though,you really shouldn't post your e-mail address on the site. There are programs out there that do nothing but pick out e-mail addresses for spam.For your own safety you should never post it on any site,it can be dangerous.


When ever any of you want me to have your e-mail address,please send it to me via the site, I love hearing from you all!!! I worry about you all too!!  Sorry ,it's the Grandma coming out in me!!LOL


Loretta67


I would love to have a pattern for burp cloths and bids.


Could you put it on the site or put an email where we could


request the patterns.  I have a nephew who is having(his wife)


a new baby after years of marriage.


Love to hear,


ARrrrrrrrrrrrrrrr been with out internet all weekend THANK YOU COMCAST.... cable down no HD was a real pain this long weekend but on the good side... love that design Judy.  Great blog glad to pass the idea along and you did a great job. I have been a sewig fool this weekend.


Norie


jalcumbrack 9/1/2008 2:19:08 PM

Hi Loretta,


I just sent you an e-mail through the site for the things you asked for. I am glad you like the blog,and tell your nephew Congrats!!! That is wonderful! There is nothing as exciting as a new baby to spoil!


Judy


jalcumbrack 9/1/2008 2:24:48 PM

Hi Norrie!!


I am glad you liked it ,I am sorry about you not having internet,......bummer!! But it sounds like you got a lot of things done!!


Thank you again for letting us use your idea!!


The design is from Ann's Happy Animals Design Pack,and they are all so adorable, I had a hard time deciding which one to use for it! I decided that since the Kangaroo had a baby, it would be perfect for a diaper stacker!


Glad you are back on board!! Have been wondering where you have been,but I also know how busy you are as well.


Take care Norrie,and Thanks again!!


Judy


Thanks for all the great pictures.  What a wonderful idea.  I can't wait to embroider one for the next baby shower!


jalcumbrack 9/2/2008 12:20:31 PM

You are very welcome!


Thankyou so much, and I know it will be a hit! They are just so practical and useful as well as cute for baby's room!


I hope you'll come back often!


Judy/Suzy


Hi Judy


I found one of those baskets.... now I will try to ME it...


How do you post your email via the sight? Where do you go and how do you do it? I was wanting the bib pattern..


thanks


cme


jalcumbrack 9/3/2008 11:43:30 AM

Hi CME;


I am so glad you are going to do this project!! You will have a lot of fun with it~~ Please post some photo's in the Media area so we can see it when you are done with it!


Just click on my name above and it will take you to my profile page. On the left hand side there is a place that you just click on ,it will say; e-mail jalcumbrack. Once you click on it another page will come up that will be the body of the e-mail,then you just click send when you are ready. Please include your e-mail address within the e-mail. That should do it!!


Thanks!!


Judy/Suzy


alssweetheart 9/6/2008 4:31:02 PM

Hi!


How very cleaver to embroider on the pop ups!! I have 2 that I use for laundry. Now I will have to find a new idea to decorate them! It will make seeing the laundry pop up better : D  !!!


Thanks for the great idea & the blog. Keep up the great ideas!!!


Carol


jalcumbrack 9/6/2008 5:32:48 PM

Hi Carol!


Thankyou so much for your wonderful comments. Yes it does seem better doing the laundry with a cute and lovable animal staring back at me! I smile every time I see it now,that in itself is a good thing! Any time something so simple can put a smile on your face it is well worth it!


Come back often to see what we are up to next! Again Thanks!


Judy/Suzy


Great blog & visual! Thanks Judy & Norie.  Sherry


jalcumbrack 9/8/2008 5:13:57 AM

Sherry,


Thankyou so much, I am so happy you liked it and sincerely hope it was of help to you.  Also glad you like the visual,I think it makes it so much easier to explain how to do something if you can see a picture. Come back often to see what we are up to next!


Again, Thankyou! Have a wonderful day!


Judy


Adorable....just absolutely adorable.


Please login to comment