OK, I admit it. I despise making jack-O-lanterns. The carving is OK but in my mind cleaning out the pumpkin guts has never been fun. Yuck-O! And because it gets so cold here before Halloween these hollowed out orange decorations many times look like little old men by Trick or Treat night. So once our children were no longer interested in this age-old tradition I began devising other ways to decorate my pumpkins. We've painted them, used the Mr. Potato Head pieces, whittled them, wrapped and covered them. This year we decided to make masks. Here is what my pumpkins look like:
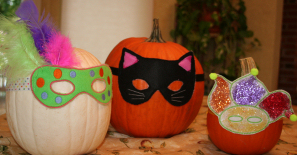
I can't decide if we should add a face or not - I kind of like them as they are. What would you do?
To download the mask designs click here. I am happy to share them with you but remember that I am not a professional digitizer and these designs were quickly made just for the pumpkins.
These are so simple that I doubt you need any instructions but, just in care, here they are:
For the Black cat mask
What you need:
- Medium weight tear-away stabilizer
- Mask embroidery design
- Rectangle of black felt 8"x6" or larger
- A couple of scraps of pink or tan fleece or felt about 2" square each
- Black, pink and white embroidery thread
- Bobbin thread
- 5"x7" or larger hoop
- Ribbon or elastic
- Medium size pumpkin
- A pair of small embroidery snips or very small sharp scissors
What you do:
- Hoop the stabilizer.
- Load the design.
- Embroider the placement run (color 1). Use whatever color thread you like for this.
- Place the rectangle of felt so it completely covers the run. You can free float it or use a small amount of adhesive spray if you are more comfortable.
- Embroider the tack-down run (color 2) using the same color as in color 1 as long as it is not black.
- Remove the hoop. Trim closely around the outside of the cat head and inside of the cat eyes using your snips of sharp scissors. Do not cut the stabilizer.
- Put the hoop back. Using black thread embroidery around the head and eyes (color 3).
- Place the small pink or tan squares of fabric over and just below ear area on cat head. Embroider the ears (color 4)
- Embroider the whiskers (color 5)
- Remove the hoop. Clip around the pink stitching of the ears. Remove the design from the hoop and tear away the stabilizer.
- Sew the ribbon or elastic to the sides of the mask. (Measure your pumpkin to determine how much you need.)
- Place the mask on your pumpkin. If you want to get more creative use colored markers to draw a face.
The Dot Mask is made basically the same way. The Jester Mask needs to be sewn out on felt as you just cut outside the candlewick stitching and add sparkle as desired (Emma loves to put glitter on things so of course we had to do at least one this way).
You could use the cat mask for a person as well. Dress in a black sweat suit. Add a stuffed tail (or a black boa section would work well) and some gloves and voila you are a black cat.
These pumpkins could also make great center pieces for a party. Add whatever embellishments you like to make them eye catching. If you make any masked pumpkins be sure to post them or email them to me so we can see all see what you did.
Take care,
DB