Individual characters (letters, numbers and punctuation marks) from my alphabets can
be found on my Stock Design Page. My designs are also available in packs, as described in
this blog. Those can be found here. For designs and packs available in multiple sizes,
choose the size you want in the drop down menu box.
One of my friends searched the internet for an in-the-hoop baby bib
but was unable to find one. In fun, she challenged me to create one. As it
happened, I was at the time waiting for my first grandchild to be born while
she was waiting for her second. Thus, we would both have use for the bib.
Most of the bibs I see in stores have bias binding around the edges.
I could not see an easy way to handle that in the hoop. At most we'd be
able to stitch it to one side in the hoop, but we'd have to finish it after
removing the stabilizer.
My friend clarified that she was thinking of a lined bib. That's
something I could do! I drew a bib and digitized the outline. I also added
marks for placement of velcro pieces on the neck tabs. My embroidery machine
includes a 200 x 360 hoop, so I created the bib to fit that hoop.
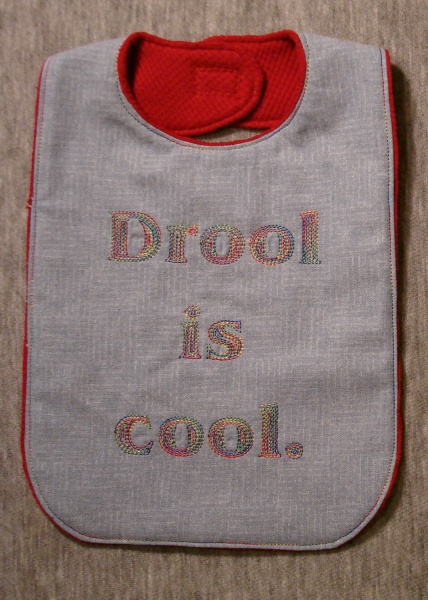
I arranged "Drool is Cool" with my Contour Print 40 alphabet, then added
the hoop design to the screen. I combined the designs and moved the Velcro
marks to the top of the stitch list. That isn't really necessary but saves
jumping back and forth during embroidery. I stitched the Velcro marks and
lettering with my favorite variegated thread, Superior Rainbows #813. I added
right side down lining fabric before stitching the outline of the bib. Here
is the bib I created.
Not all embroidery machines can take 200 x 360 hoops. If yours cannot,
you can still make my bib. The instructions include a printable pattern for
making the bib "the old way." For this version, you only need a hoop large
enough for the text and or designs you wish to include. When you print the
instructions, be sure to uncheck all the sizing options (fit or shrink to
printable area, multiple pages per sheet, etc.). The bib should be 8 1/2"
wide including the seam allowances. For the in-the-hoop bib, you need only
the first two pages of the instructions. Click here for instructions and bib designs.
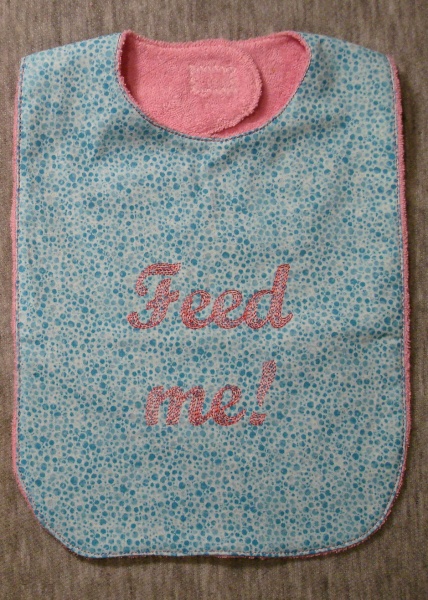
I made this bib using embroidered fabric and my pattern. I used
Contour Script 60 for the lettering and stitched it with a pink variegated
Sulky thread, #2102.
Here is a third bib, with "baby" arranged in Fancy Jumbles. I just had
to see how that alphabet would look. I normally stitch jumbles on very dark
fabric but like how it looks on the light blue print. I stitched this bib in the hoop.
I decided the larger amount of stabilizer was a fair trade-off for faster
construction. I now see the attraction of in-the-hoop projects.

For each bib, I used knit fabric for the linings. I used waffle knit
for the first bib, stretch terry for the second, and sweatshirt fleece for the
third. I pressed the completed bibs so that a little bit of the lining shows
on front, giving the appearance of piping. I topstitched near the seam and
added my velcro.
I recently bought a new type of Velcro. Instead of separate strips, one
with hooks and the other with loops, the Snag-Free Velcro(R) Brand Fastener
has hooks and loops mixed together on the same strip. The Velcro still sticks
to itself but does not stick to other fabrics. Click here for more
information.
My grandson (I'll call him "Wolf") is now four weeks old, and pure
delight. We have another grandchild due some time this summer so the fun is
just beginning. Watch for more baby-related projects in my blog.